Shuffle
Lab Setup for Proof of Concept
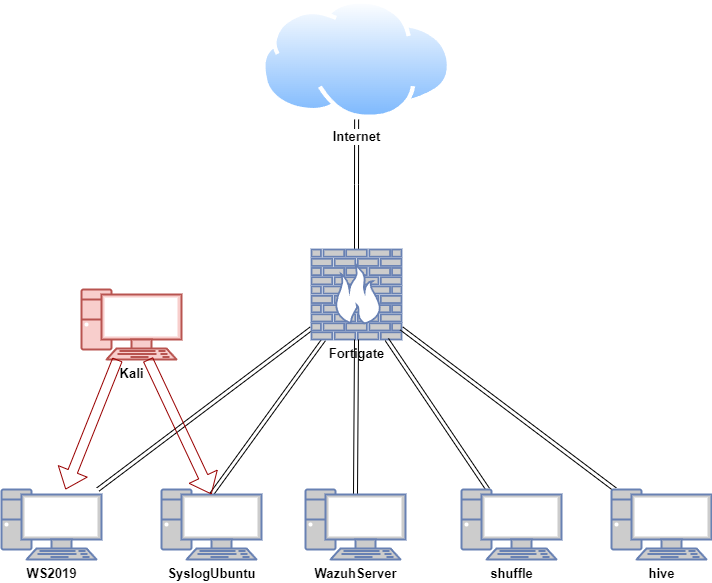
In this proof of concept, Shuffle is installed on an Ubuntu VM. Automated workflows were created using Shuffle, Wazuh, and TheHive. An attack simulation was conducted on the Windows and Ubuntu hosts in a safe and controlled environment.
| Host | OS | Role | IP Address |
|---|---|---|---|
| Fortigate | Fortios 7.6.0 | Firewall/Router | 192.168.1.111 (WAN) / 10.0.0.1 (LAN) |
| shuffle | Ubuntu 22.04 LTS | Shuffle (SOAR) | 10.0.0.28 |
| WazuhServer | Centos Stream 9 | Wazuh server (SIEM server) | 10.0.0.20 |
| hive | Ubuntu 22.04 LTS | TheHive (IR) | 10.0.0.40 |
| WS2019 | Windows Server 2019 | Wazuh agent (SIEM client) | 10.0.0.24 |
| SyslogUbuntu | Ubuntu 22.04 LTS | Wazuh agent, rsyslog server | 10.0.0.26 |
| Kali | Kali Linux 2024.2 | Attacker machine | 192.168.1.161, 10.0.0.29 |
Install Shuffle online
Install Docker using the apt repository (Ubuntu)
Before you install Docker Engine for the first time on a new host machine, you need to set up the Docker repository. Afterward, you can install and update Docker from the repository.
Set up Docker's apt repository.
# Add Docker's official GPG key:
sudo apt-get update
sudo apt-get install ca-certificates curl
sudo install -m 0755 -d /etc/apt/keyrings
sudo curl -fsSL https://download.docker.com/linux/ubuntu/gpg -o /etc/apt/keyrings/docker.asc
sudo chmod a+r /etc/apt/keyrings/docker.asc

# Add the repository to Apt sources:
echo \
  "deb [arch=$(dpkg --print-architecture) signed-by=/etc/apt/keyrings/docker.asc] https://download.docker.com/linux/ubuntu \
  $(. /etc/os-release && echo "$VERSION_CODENAME") stable" | \
  sudo tee /etc/apt/sources.list.d/docker.list > /dev/null
sudo apt-get update
Install the Docker packages.
sudo apt-get install docker-ce docker-ce-cli containerd.io docker-buildx-plugin docker-compose-plugin
Verify that the Docker Engine installation is successful by running the hello-world image.
Install Docker Engine manually (Ubuntu)
All the required deb files for Docker Engine have been downloaded and put together in the folder called docker. For your reference, the steps for downloading the required deb files for Docker Engine are documented below.
On Ubuntu host with internet connection:
You will need to download a new file each time you want to upgrade Docker Engine. Select your Ubuntu version in the list.
Go to pool/stable/ and select the applicable architecture (amd64, armhf, arm64, or s390x).
Download the following deb files for the Docker Engine, CLI, containerd, and Docker Compose packages:
containerd.io_<version>_<arch>.debdocker-ce_<version>_<arch>.debdocker-ce-cli_<version>_<arch>.debdocker-buildx-plugin_<version>_<arch>.debdocker-compose-plugin_<version>_<arch>.deb
Install the .deb packages. Change directory into the docker folder and run:
Run sudo service docker start
Install Docker Engine manually (CentOS)
All the required deb files for Docker Engine have been downloaded and put together in the folder called docker. For your reference, the steps for downloading the required deb files for Docker Engine are documented below.
On CentOS host with internet connection:
If you can't use Docker's rpm repository to install Docker Engine, you can download the .rpm file for your release and install it manually. You need to download a new file each time you want to upgrade Docker Engine.
Go to https://download.docker.com/linux/centos/ and choose your version of CentOS. Then browse to x86_64/stable/Packages/ and download the .rpm file for the Docker version you want to install.
Go to pool/stable/ and select the applicable architecture (amd64, armhf, arm64, or s390x).
Download the following rpm files for the Docker Engine, CLI, containerd, and Docker Compose packages:
containerd.io_<version>_<arch>.rpmdocker-ce_<version>_<arch>.rpmdocker-ce-cli_<version>_<arch>.rpmdocker-buildx-plugin_<version>_<arch>.rpmdocker-compose-plugin_<version>_<arch>.rpm
Install the .rpm packages. Change directory into the docker folder and run:
Start the docker
Download Shuffle GitHub Repository
Clone or download the Shuffle repository as a zip archive from the Shuffle GitHub page. If git command cannot be installed, download the zip.
If Shuffle-main.zip is downloaded, unzip to the /opt directory
sudo unzip Shuffle-main.zip -d /opt
sudo unzip python-apps-master.zip -d /opt/Shuffle-main/shuffle-apps
Change into /opt/Shuffle directory
Fix prerequisites for the Opensearch database (Elasticsearch):
cd /opt/Shuffle-main
mkdir shuffle-database                    # Create a database folder
sudo chown -R 1000:1000 shuffle-database  # IF you get an error using 'chown', add the user first with 'sudo useradd opensearch'

sudo swapoff -a                           # Disable swap
Run docker-compose.
Recommended for Opensearch to work well
sudo sysctl -w vm.max_map_count=262144
# https://www.elastic.co/guide/en/elasticsearch/reference/current/vm-max-map-count.html
Install Shuffle offline
This procedure will help you export what you need to run Shuffle on a no internet host.
Pre-requisite
- Both machines has Docker and Docker Compose installed already
- Your host machine already needs the images on it to make them exportable
Pull images on original machine
Shuffle need a few base images to work:
- shuffle-frontend
- shuffle-backend
- shuffle-orborus
- shuffle-worker
- shuffle:app_sdk
- opensearch
- shuffle-subflow
docker pull ghcr.io/frikky/shuffle-backend
docker pull ghcr.io/frikky/shuffle-frontend
docker pull ghcr.io/frikky/shuffle-orborus
docker pull frikky/shuffle:app_sdk
docker pull ghcr.io/frikky/shuffle-worker
docker pull opensearchproject/opensearch:2.5.0
docker pull registry.hub.docker.com/frikky/shuffle:shuffle-subflow_1.0.0
docker pull frikky/shuffle:wazuh_1.0.0
docker pull frikky/shuffle:thehive_1.1.3
docker pull ghcr.io/shuffle/shuffle-backend
docker pull ghcr.io/shuffle/shuffle-frontend
docker pull ghcr.io/shuffle/shuffle-orborus
docker pull ghcr.io/shuffle/shuffle-app_sdk:latest
docker pull ghcr.io/shuffle/shuffle-worker:latest
docker pull opensearchproject/opensearch:2.14.0
docker pull frikky/shuffle-subflow
docker pull frikky/shuffle:shuffle-tools_1.2.0
docker pull frikky/shuffle:wazuh_1.0.0
docker pull frikky/shuffle:thehive_1.1.3
Be careful with the versioning for opensearch, all other are going to use the tag "latest". You will also need to download and transfer ALL the apps you want to use. These can be discovered as such:
Save images and archive them
mkdir shuffle-export
cd shuffle-export

docker save ghcr.io/shuffle/shuffle-backend:latest > backend.tar
docker save ghcr.io/shuffle/shuffle-frontend:latest > frontend.tar
docker save ghcr.io/shuffle/shuffle-orborus:latest > orborus.tar
docker save ghcr.io/shuffle/shuffle-app_sdk:latest > app_sdk.tar
##docker save frikky/shuffle:app_sdk > app_sdk.tar
##docker save ghcr.io/frikky/shuffle-worker:latest > worker.tar
docker save ghcr.io/shuffle/shuffle-worker:latest > worker.tar
docker save opensearchproject/opensearch:2.14.0 > opensearch.tar
docker save frikky/shuffle-subflow:latest > sublow.tar
docker save frikky/shuffle:shuffle-tools_1.2.0 > shuffle-tools.tar
docker save frikky/shuffle:wazuh_1.0.0 > wazuh.tar
docker save frikky/shuffle:thehive_1.1.3 > thehive.tar

git clone https://github.com/Shuffle/python-apps.git

wget https://raw.githubusercontent.com/Shuffle/Shuffle/master/.env
wget https://raw.githubusercontent.com/Shuffle/Shuffle/master/docker-compose.yml

cd ..
tar cvf shuffle-export.tar.gz shuffle-export
Export shuffle-export.tar.gz to the host without internet connection
Import docker images to host without internet
tar xvf shuffle-export.tar.gz -C /opt
cd /opt/shuffle-export
find -type f -name "*.tar" -exec docker load --input "{}" \;
Create folders to add the python apps
Create a folder called shuffle-database and change the ownership.
If you get an error using 'chown', add the user first with 'sudo useradd opensearch'
Disable swap
Set the vm.max_map_count kernel parameter to 262144. This is often needed for applications like Elasticsearch or Opensearch that require a higher limit for the number of virtual memory areas a process can have.
mkdir shuffle-database
sudo chown -R 1000:1000 shuffle-database
sudo swapoff -a
sudo sysctl -w vm.max_map_count=262144
Run docker images
Edit the image names in docker-compose.yml to align it with the output from docker images
docker images
REPOSITORY                               TAG                     IMAGE ID       CREATED         SIZE
registry.hub.docker.com/frikky/shuffle   shuffle-subflow_1.0.0   5ed48be6f649   33 hours ago    293MB
frikky/shuffle                           app_sdk                 1dde46cd09da   10 days ago     291MB
ghcr.io/frikky/shuffle-worker            latest                  adb137fa1718   15 months ago   44.4MB
opensearchproject/opensearch             2.5.0                   5a030d679ac7   18 months ago   1.17GB
ghcr.io/frikky/shuffle-backend           latest                  2e3d97ae8e30   21 months ago   57.9MB
ghcr.io/frikky/shuffle-frontend          latest                  be49fe2395d3   21 months ago   191MB
ghcr.io/frikky/shuffle-orborus           latest                  068b942b0302   21 months ago   29.9MB
services:
  frontend:
    image: ghcr.io/frikky/shuffle-frontend:latest

  backend:
    image: ghcr.io/frikky/shuffle-backend:latest

  orborus:
    image: ghcr.io/frikky/shuffle-orborus:latest

  opensearch:
    image: opensearchproject/opensearch:2.5.0
Run docker-compose.
Troubleshooting
Verify that there are no major errors in the logs and all containers are up and running
Check docker processes
docker ps

CONTAINER ID   IMAGE                                    COMMAND                  CREATED         STATUS         PORTS                                                                                NAMES
6304c903bdde   ghcr.io/frikky/shuffle-frontend:latest   "/entrypoint.sh ngin…"   3 minutes ago   Up 3 minutes   0.0.0.0:3001->80/tcp, [::]:3001->80/tcp, 0.0.0.0:3443->443/tcp, [::]:3443->443/tcp   shuffle-frontend
899ab92ccdd5   ghcr.io/frikky/shuffle-backend:latest    "./webapp"               3 minutes ago   Up 3 minutes   0.0.0.0:5001->5001/tcp, :::5001->5001/tcp                                            shuffle-backend
cccd0236ead3   ghcr.io/frikky/shuffle-orborus:latest    "./orborus"              3 minutes ago   Up 3 minutes                                                                                        shuffle-orborus
faa724f843ad   opensearchproject/opensearch:2.5.0       "./opensearch-docker…"   3 minutes ago   Up 3 minutes   9300/tcp, 9600/tcp, 0.0.0.0:9200->9200/tcp, :::9200->9200/tcp, 9650/tcp              shuffle-opensearch
Check docker container logs
docker logs shuffle-backend
docker logs shuffle-frontend
docker logs shuffle-orborus
docker logs shuffle-opensearch
Check loaded docker images
root@shuffleoffline:/opt/shuffle-exp# docker images
REPOSITORY                               TAG                                        IMAGE ID       CREATED        SIZE
frikky/shuffle                           TheHive-244ac27f71490576f2152f1a478763dd   04651821b9a9   11 hours ago   292MB
frikky/shuffle                           thehive_1.1.0                              04651821b9a9   11 hours ago   292MB
frikky/shuffle                           Wazuh-2f5945bb5a582a6b676ba7c212412cdb     c6e36c51b505   11 hours ago   292MB
frikky/shuffle                           wazuh_1.1.0                                c6e36c51b505   11 hours ago   292MB
<none>                                   <none>                                     15951f6d8452   25 hours ago   291MB
<none>                                   <none>                                     b99fc014293d   25 hours ago   291MB
<none>                                   <none>                                     5e2ccf369d65   25 hours ago   291MB
<none>                                   <none>                                     dafc616bc131   25 hours ago   291MB
<none>                                   <none>                                     71fa350d234f   25 hours ago   291MB
frikky/shuffle                           shuffle-tools_1.2.0                        4159398549c0   3 days ago     387MB
frikky/shuffle                           shuffle-tools_1.1.0                        5712b5ea194b   3 days ago     362MB
registry.hub.docker.com/frikky/shuffle   shuffle-tools_1.1.0                        5712b5ea194b   3 days ago     362MB
frikky/shuffle-subflow                   latest                                     5ed48be6f649   3 days ago     293MB
frikky/shuffle                           thehive_1.1.3                              9b1209a0ba38   3 days ago     297MB
frikky/shuffle                           app_sdk                                    1dde46cd09da   12 days ago    291MB
ghcr.io/shuffle/shuffle-frontend         latest                                     30c4090d085c   3 weeks ago    196MB
ghcr.io/shuffle/shuffle-worker           latest                                     9f7c39d5fb1e   3 weeks ago    79MB
ghcr.io/shuffle/shuffle-backend          latest                                     59613e03c036   3 weeks ago    93.4MB
ghcr.io/shuffle/shuffle-app_sdk          latest                                     3ac4837de611   3 weeks ago    291MB
opensearchproject/opensearch             2.14.0                                     bf1e1cd1fa30   2 months ago   1.33GB
ghcr.io/shuffle/shuffle-orborus          latest                                     7457cc8b6210   3 months ago   67.7MB
frikky/shuffle                           wazuh_1.0.0                                8a72f12273c6   3 years ago    66MB
If the orborus logs shows that it is trying to pull the images from the internet, tag your locally loaded images by running docker tag
docker logs shuffle-orborus
...
2024/09/07 23:36:59 [DEBUG] Pulling image ghcr.io/shuffle/shuffle-app_sdk:latest
2024/09/07 23:37:39 [ERROR] Failed getting image ghcr.io/shuffle/shuffle-app_sdk:latest: Error response from daemon: Get "https://ghcr.io/v2/": dial tcp: lookup ghcr.io on 127.0.0.53:53: read udp 127.0.0.1:58367->127.0.0.53:53: i/o timeout
If you are using older version of opensearch (< 2.14.0), you may encounter authentication issues as shown by the opensearch logs:
If this is the case, access the opensearch, navigate to /config/opensearch-security and edit the configuration file:
docker exec -it shuffle-opensearch /bin/bash
[opensearch@shuffle-opensearch config]$ cd config/opensearch-security/
[opensearch@shuffle-opensearch opensearch-security]$ cat internal_users.yml
---
# This is the internal user database
# The hash value is a bcrypt hash and can be generated with plugin/tools/hash.sh

_meta:
  type: "internalusers"
  config_version: 2

# Define your internal users here

## Demo users

admin:
  hash: "$2a$12$VcCDgh2NDk07JGN0rjGbM.Ad41qVR/YFJcgHp0UGns5JDymv..TOG"
  reserved: true
  backend_roles:
  - "admin"
  description: "Demo admin user"
There admin hash does not match with admin password defined in .env file
# DATABASE CONFIGURATIONS
...
SHUFFLE_OPENSEARCH_USERNAME="admin"
SHUFFLE_OPENSEARCH_PASSWORD="StrongShufflePassword321!"
The bcrypt hash for the password should be:
#htpasswd -bnBC 12 "" StrongShufflePassword321!
$2y$12$5juqU2/ybhsBB4H928meCO4ZHtzTFSfDRO87AlAF43fhZOWgDlX1W
Replace the current hash for the admin user in the internal_users.yml file with the newly generated hash.
After editing the internal_users.yml, apply the changes to OpenSearch by running the securityadmin_demo.sh script inside the OpenSearch container:
[opensearch@shuffle-opensearch opensearch-security]$ vi internal_users.yml
# "i" for insert, copy and paste theh hash, "Esc" then ":wq"
[opensearch@shuffle-opensearch opensearch-security]$ cd ../../
[opensearch@shuffle-opensearch ~]$ pwd
/usr/share/opensearch
[opensearch@shuffle-opensearch ~]$ ./securityadmin_demo.sh
[opensearch@shuffle-opensearch ~]$ exit
Change the file permission for *.pem in /usr/share/opensearch/config
Restart the shuffle-opensearch and shuffle-backend container
Pull and Save Docker images
All the required Docker images have been pulled as saved as shuffle_images.tar. For your reference, the steps for pulling and saving the required Docker images are documented below.
For this step, we are preparing images from a Ubuntu host with internet connection and Docker installed. The prepared images will then be transferred to the air-gapped environment.
On Ubuntu host with internet connection and Docker Engine installed:
Open docker-compose.yml file from Shuffle GitHub to identify the images you need.
Look for the image key under each service.
services:
  frontend:
    image: ghcr.io/shuffle/shuffle-frontend:latest
  backend:
    image:ghcr.io/shuffle/shuffle-backend:latest
  orborus:
    image: ghcr.io/shuffle/shuffle-orborus:latest
    ghcr.io/shuffle/shuffle-app_sdk:latest
    ghcr.io/shuffle/shuffle-worker:latest
  opensearch:
    image: opensearchproject/opensearch:2.14.0
Pull the Images using docker pull:
docker pull ghcr.io/shuffle/shuffle-frontend:latest
docker pull ghcr.io/shuffle/shuffle-backend:latest
docker pull ghcr.io/shuffle/shuffle-orborus:latest
docker pull opensearchproject/opensearch:2.14.0
docker pull ghcr.io/shuffle/shuffle-app_sdk:latest
docker pull ghcr.io/shuffle/shuffle-worker:latest
Verify the Images are pulled by running docker images
Save the docker images for a transfer to an air-gapped environment
docker save -o shuffle_images.tar ghcr.io/shuffle/shuffle-frontend:latest ghcr.io/shuffle/shuffle-backend:latest ghcr.io/shuffle/shuffle-orborus:latest opensearchproject/opensearch:2.14.0 ghcr.io/shuffle/shuffle-app_sdk:latest ghcr.io/shuffle/shuffle-worker:latest
Download GitHub repositories as a zip archives
All the required GitHub repositories are downloaded as Shuffle-main.zip and python-apps-master.zip. For your reference, the steps for downloading the required GitHub repositories are documented below.
On Ubuntu host with internet connection and Docker installed:
Download two repositories as zip archives from the Shuffle GitHub and Shuffle Python Apps GitHub page.
Transfer the docker folder, shuffle_images.tar, Shuffle.zip and python-apps.zip to the Ubuntu host without internet connection.
Repeat the steps above to install Docker Engine.
Load the Docker images:
Unzip Shuffle.zip to the /opt directory and python-apps.zip to the /opt/Shuffle-main/shuffle-apps directory
Change into /opt/Shuffle-main directory
Create “shuffle-database” folder
Run prerequisites for the Opensearch database (Elasticsearch):
cd /opt/Shuffle
sudo mkdir shuffle-database
# IF you get an error using 'chown', add the user first with 'sudo useradd opensearch'
sudo chown -R 1000:1000 shuffle-database
# Disable swap
sudo swapoff -a
In the /opt/Shuffle-main folder, run docker-compose.
Recommended for Opensearch to work well
sudo sysctl -w vm.max_map_count=262144
# https://www.elastic.co/guide/en/elasticsearch/reference/current/vm-max-map-count.html
Creating Automated Workflows
Workflow Zero
After installation, go to http://(IP address):3001
Create administrator account.
Sign in with the same Username and Password.
Select New to Shuffle
Click Apps
Verify there are activated apps
If there are issues with loading the apps, click refresh or download from GitHub (internet required)
Create a new workflow on Shuffle titled “Wazuh integration test.”
Click on the Triggers tab in the bottom left and drag the Webhook to the workspace.
Click on the webhook and rename it to Wazuh alerts. Copy and save the webhook URI and start the webhook. The webhook URI looks like the following: http://10.0.0.27:3001/api/v1/hooks/webhook_d5c7de34-7dcd-4360-994f-4a134cde3d67
Wazuh server
Download the custom integration script custom-shuffle and custom-shuffle.py from the Shuffle GitHub page. Save it as custom-shuffle and custom-shuffle.py in /var/ossec/integrations directory of Wazuh manager.
[root@Centos integrations]# ls
**custom-shuffle  custom-shuffle.py**  maltiverse  maltiverse.py  pagerduty  pagerduty.py  shuffle  shuffle.py  slack  slack.py  virustotal  virustotal.py
The script must contain execution permissions and belong to the root user of the wazuh group. The commands below assign permissions and ownership to the /var/ossec/integrations/custom-script script.
chmod 750 /var/ossec/integrations/custom-shuffle*
chown root:wazuh /var/ossec/integrations/custom-shuffle*
Copy the content from ossec.conf from the Shuffle GitHub page.
<integration>
  <name>custom-shuffle</name>
  <level>9</level>
  <hook_url>http://<IP>:<PORT>/api/v1/hooks/webhook_hookid</hook_url>
  <alert_format>json</alert_format>
</integration>
Paste it into /var/ossec/etc/ossec.conf and edit it
 <integration>
      <name>custom-shuffle</name>
      <level>3</level>
      <hook_url>http://10.0.0.27:3001/api/v1/hooks/webhook_d5c7de34-7dcd-4360-994f-4a134cde3d67</hook_url>
      <alert_format>json</alert_format>
  </integration>
Where:
<name>: This is the name of the integration and must match with your custom-shuffle downloaded from GitHub.<hook_url>: This is the webhook URI copied from the Shuffle webhook. Note:https://can be used but it is not recommended as it causes a certificate mismatch error with the author’s self-signed certificate.<level>: This is used to forward a specific alert level.<alert_format>: This forwards alerts to Shuffle in JSON format.
Restart the Wazuh manager service to apply changes:
Verify that there are no errors in the ossec and integrations logs
Shuffle
Click on the Shuffle Tools app named “Change me” and rename it to Receive_Wazuh_alerts. Set the call option to “$exec”, and save the workflow. This Shuffle app now repeats the events that are received by the Wazuh alerts webhook. This allows us to test that Shuffle can receive Wazuh alerts.
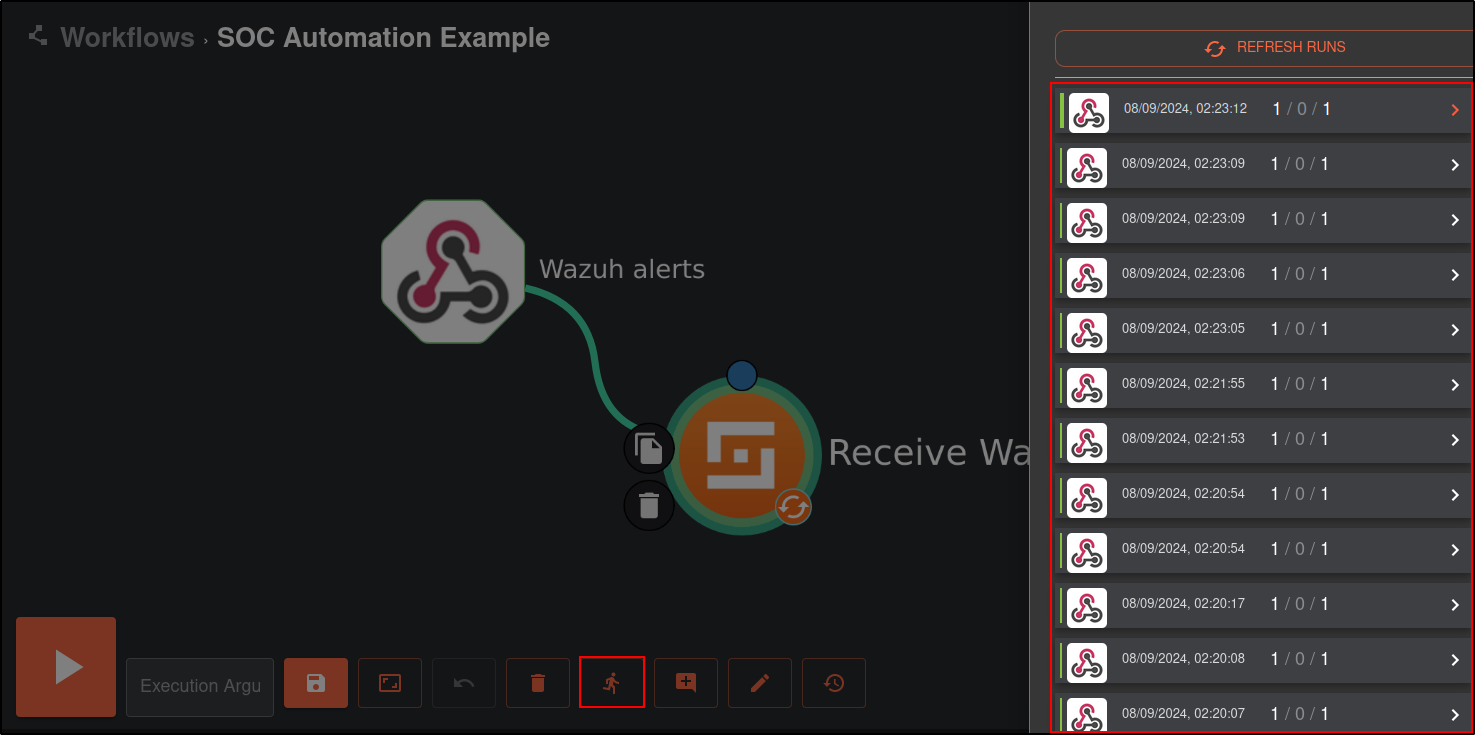
Click on the show executions button.
Select any execution and expand it for details. You should see a Wazuh alert in the output.
Note: You may need to wait for a duration of time for Wazuh alerts to appear in Shuffle. This is dependent on the number of events generated in your environment. To manually trigger alerts, restart the Wazuh manager service on the Wazuh server.
This shows that Wazuh is sending alerts to Shuffle and the integration is successful.
Workflow One
Configure Wazuh
Configure Wazuh Windows Client
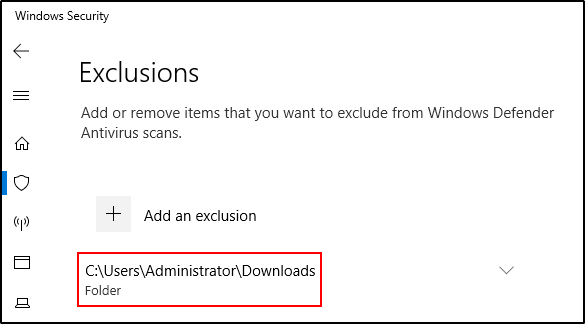
Add Administrator’s Download folder to exclusion in the Windows Security setting.
Download and transfer mimikatz.exe. Mimikatz is a tool that can steal passwords and other login information from a Windows computer's memory, often used by attackers or penetration testers to gain access to more secure areas of the system.
Open PowerShell as Administrator. Execute mimikatz.exe
Configure Wazuh Manager
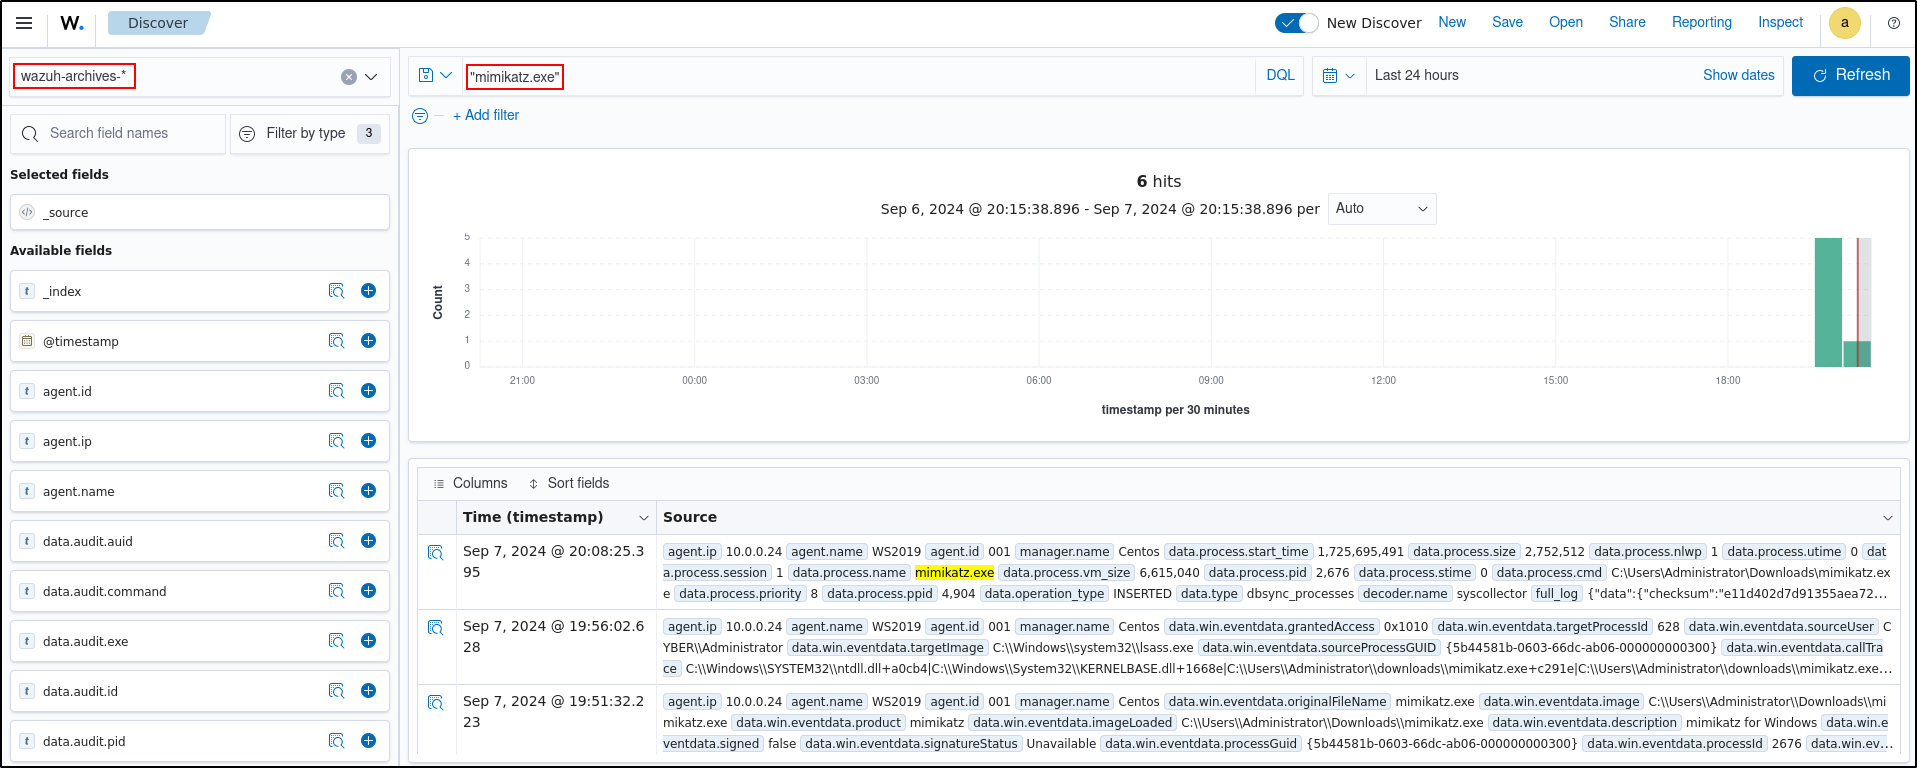
On Wazuh Manager, verify that there are entries related to Mimikatz in the archives file
Verify that searching for “mimikatz.exe” in wazuh-archive-* index returns a result
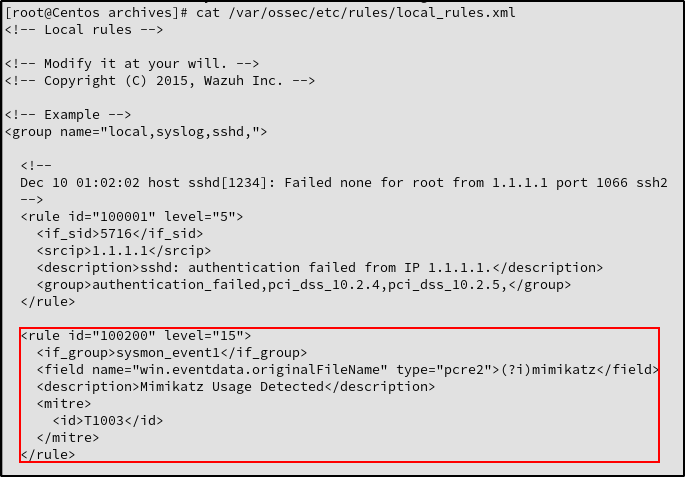
Add a custom rule in /var/ossec/etc/rules/local_rules.xml
Make sure indentation aligns with other rules
nano /var/ossec/etc/rules/local_rules.xml
<rule id="100200" level="15">
  <if_group>sysmon_event1</if_group>
  <field name="win.eventdata.originalFileName" type="pcre2">(?i)mimikatz</field>
  <description>Mimikatz Usage Detected</description>
  <mitre>
    <id>T1003</id>
  </mitre>
</rule>
Restart Wazuh Manager
Configure Windows Client
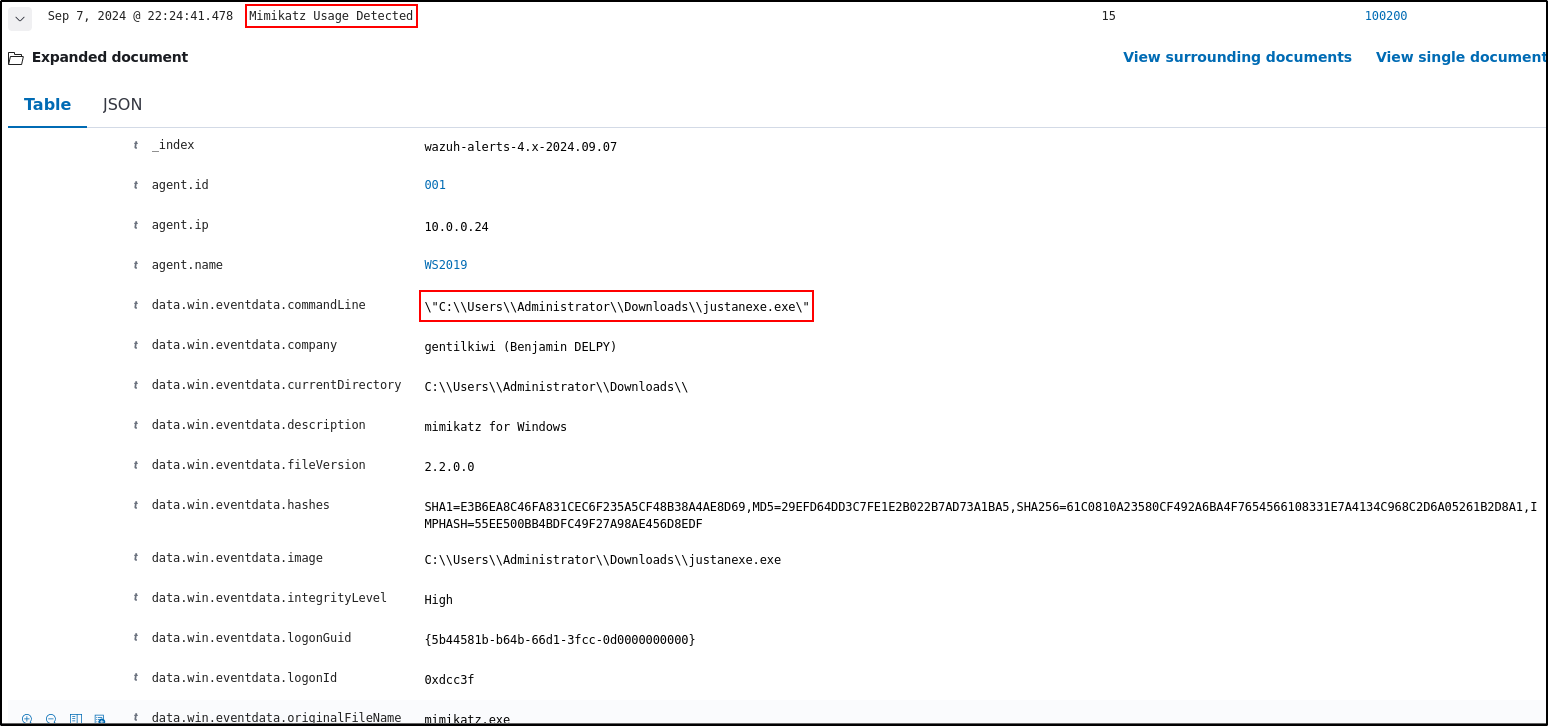
Rename mimikatz.exe to something else (e.g. justanexe)
Open PowerShell as Administrator and execute mimikatz (justanexe)
Configure Wazuh Manager
On Wazuh Manager, verify that there are entries related to ruld id 10020 Mimikatz Usage Detected
Configure Shuffle
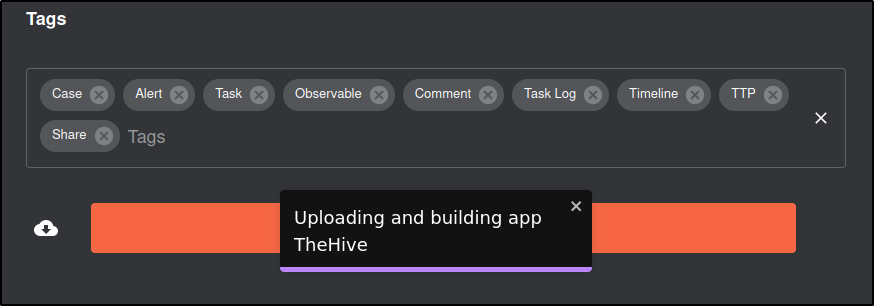
Upload the required Apps
On a machine with internet connection:
Search for Wazuh, TheHive and VirusTotal in https://shuffler.io/search
Download the OpenAPIs (JSON file)
Transfer the JSON files to the air-gapped environement.
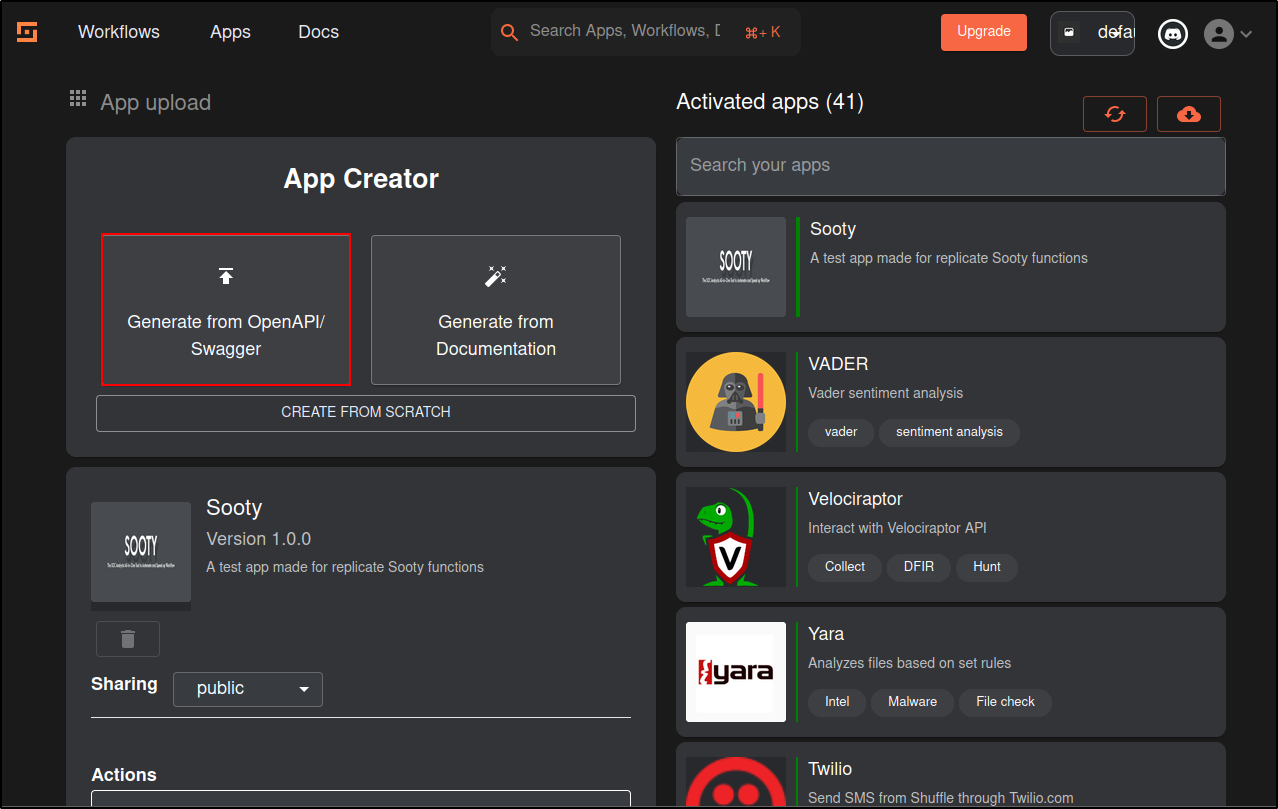
Navigate to Shuffle web UI and into Apps.
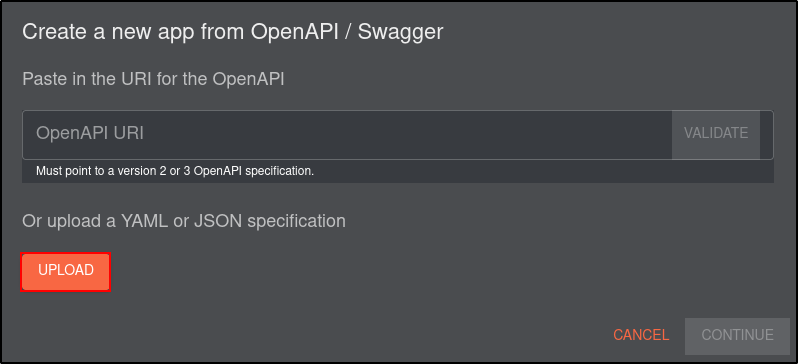
Select Generate from Open API
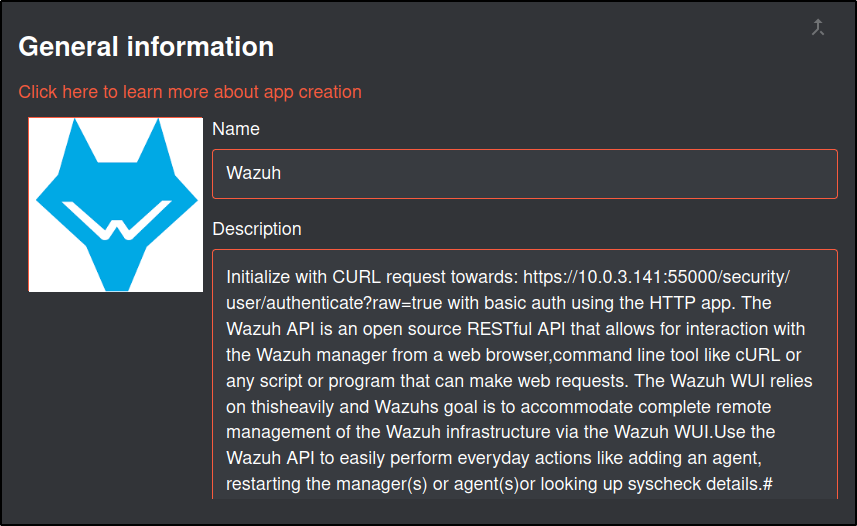
Upload the Wazuh JSON file
Scroll to the bottom and click save.
Repeat the same proccess for TheHive
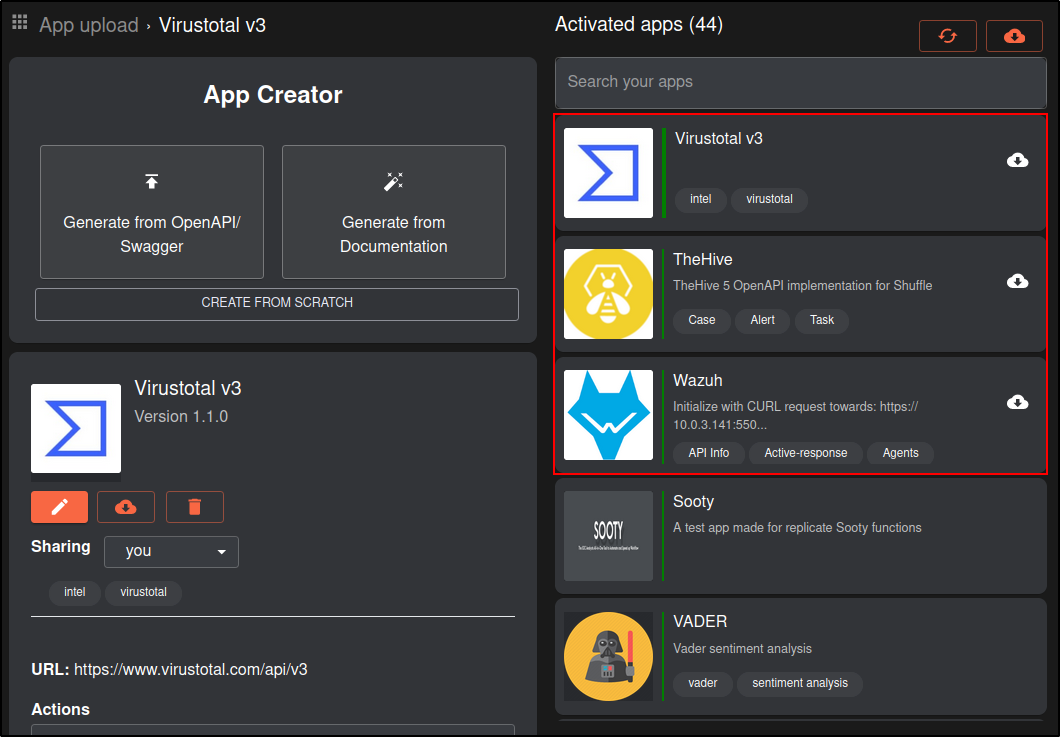
Verify that Wazuh, TheHive and Virustotal appear in the Activated Apps
To ensure that the new app is recognized by Shuffle, restart the Shuffle backend and frontend containers:
Create a Workflow
Repeat the steps covered in Introduction to Shuffle.
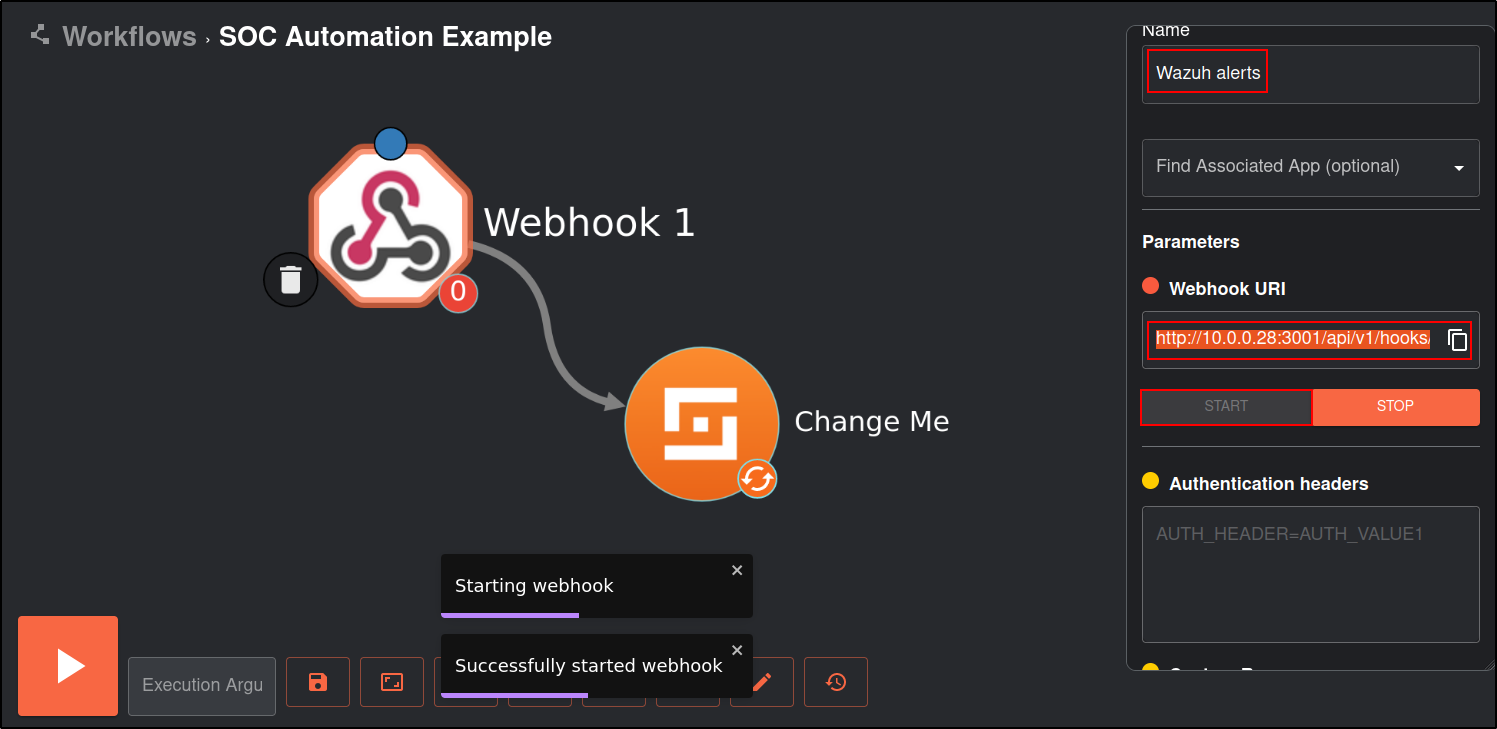
Create a new workflow called SOC Automation Example.
Click on the Triggers tab in the bottom left and drag the Webhook to the workspace.
Click on the webhook and rename it to Wazuh alerts. Copy and save the webhook URI and start the webhook. The webhook URI looks like the following:
http://10.0.0.28:3001/api/v1/hooks/webhook_6f32bbd0-9ca9-498c-9abe-c55b1f573d09
Configure Wazuh server
Download the custom integration script custom-shuffle and custom-shuffle.py. Save it as custom-shuffle and custom-shuffle.py in /var/ossec/integrations directory. The script must contain execution permissions and belong to the root user of the wazuh group:
chmod 750 /var/ossec/integrations/custom-shuffle*
chown root:wazuh /var/ossec/integrations/custom-shuffle*
Copy and paste the following into /var/ossec/etc/ossec.conf
This is the rule id for Mimikatz Usage Detected that we defined in the Wazuh Manager
 <integration>
      <name>custom-shuffle</name>
      <rule_id>100200</rule_id>
      <hook_url>http://10.0.0.28:3001/api/v1/hooks/webhook_6f32bbd0-9ca9-498c-9abe-c55b1f573d09</hook_url>
      <alert_format>json</alert_format>
  </integration>
Restart the Wazuh manager service to apply changes:
Verify that there are no errors in the ossec and integrations logs
Configure Shuffle
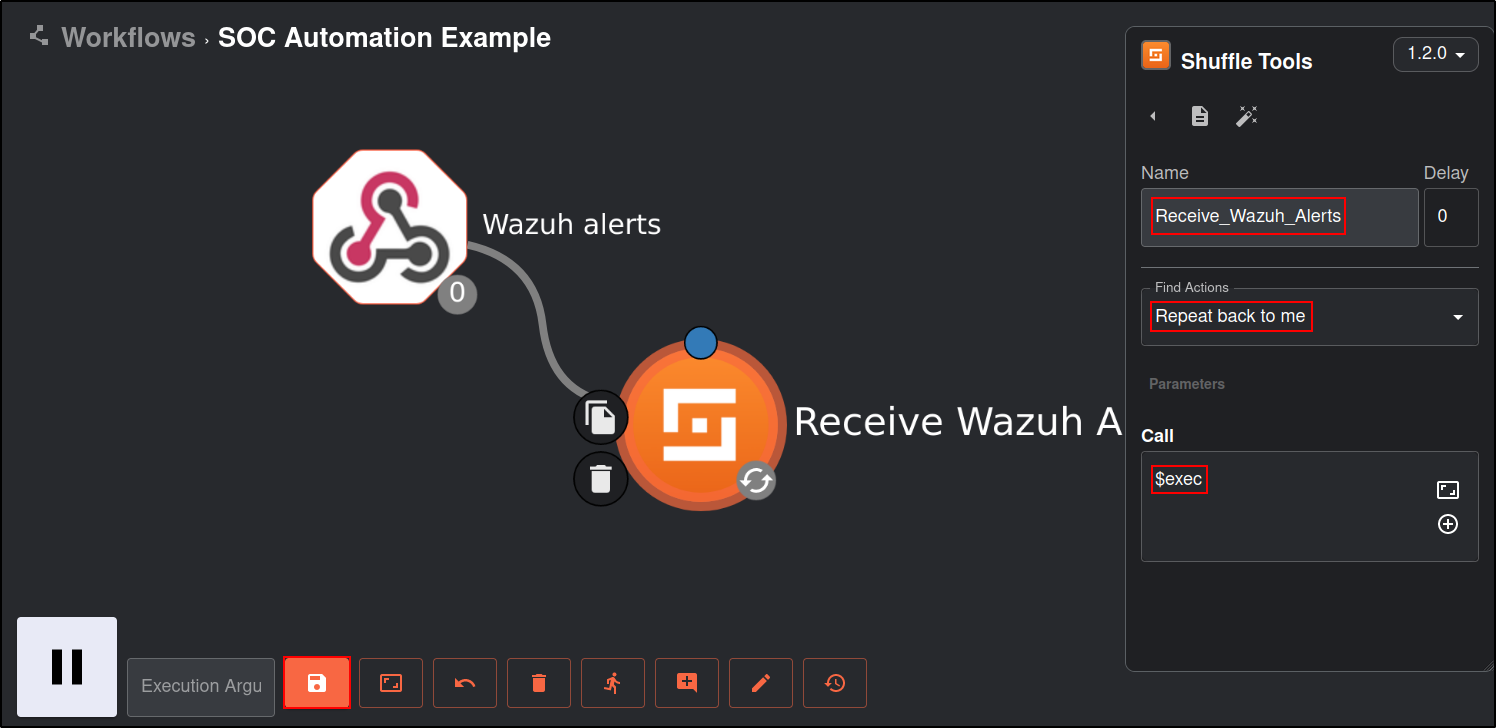
Click on the Shuffle Tools app named “Change me” and rename it to Receive_Wazuh_alerts. Set the call option to “$exec”, and save the workflow. This Shuffle app now repeats the events that are received by the Wazuh alerts webhook. This allows us to test that Shuffle can receive Wazuh alerts.
On Windows host, open PowerShell as Administrator and execute mimikatz (justanexe)
On Wazuh server, verify logs related to Mimikatz are generated
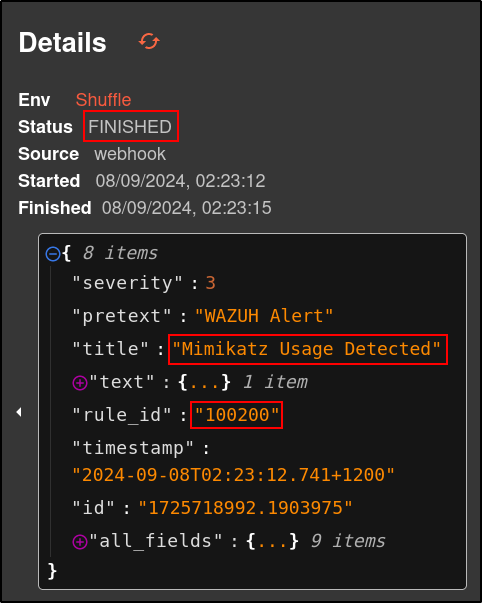
Verify Shuffle is receiving alerts without any errors
Alerts should be green indicating status is FINISHED
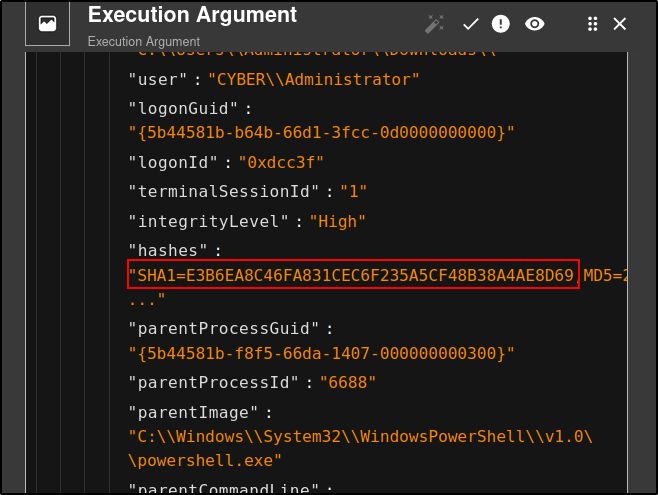
The results displays a SHA1, MD5 and SHA256 hashes
SHA1=E3B6EA8C46FA831CEC6F235A5CF48B38A4AE8D69,MD5=29EFD64DD3C7FE1E2B022B7AD73A1BA5,SHA256=61C0810A23580CF492A6BA4F7654566108331E7A4134C968C2D6A05261B2D8A1,IMPHASH=55EE500BB4BDFC49F27A98AE456D8EDF
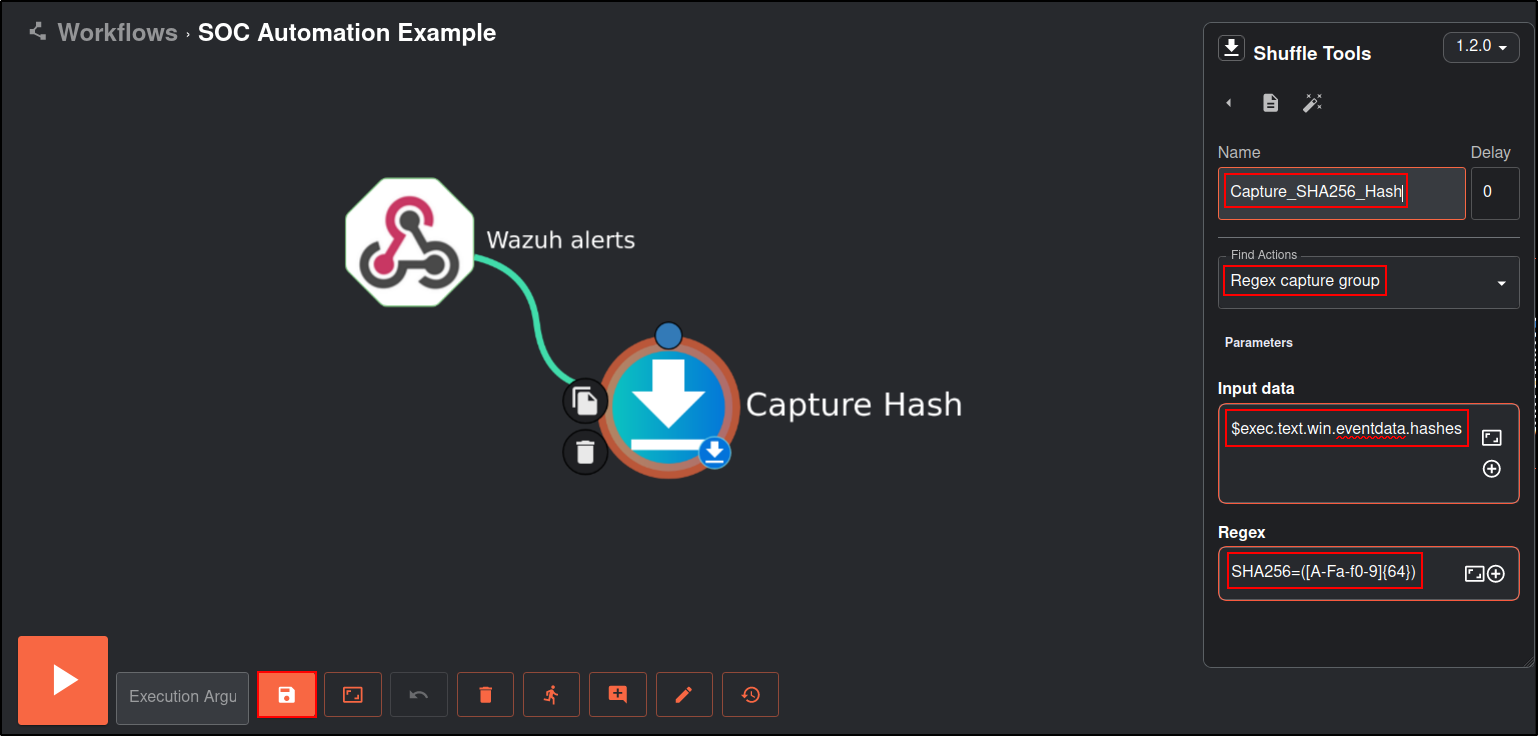
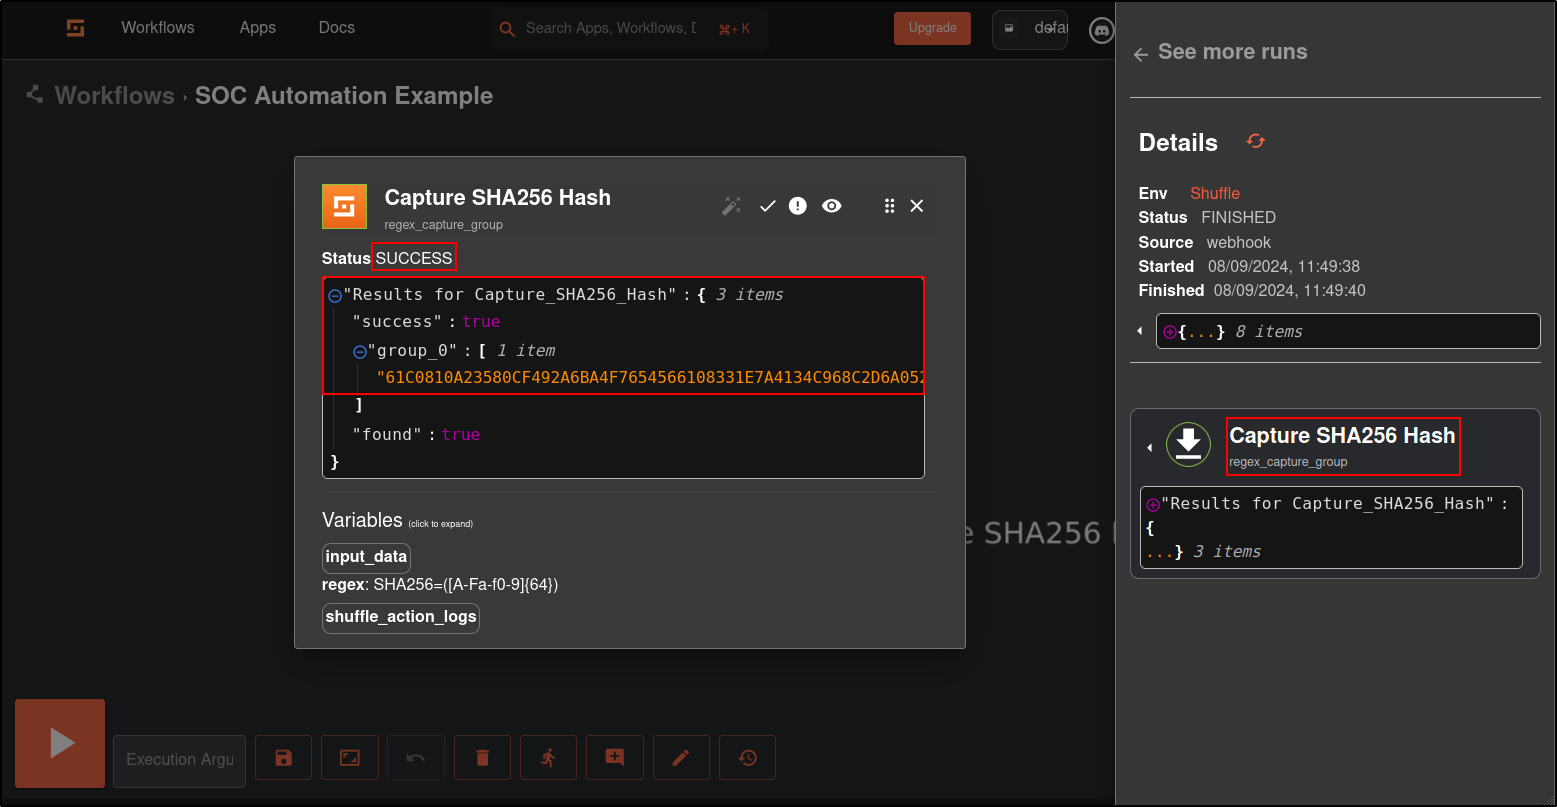
Create a regular expression to specifically extract the SHA256 hash from the string.
Click Shuffle Tools icon. Change the Name to Capture_SHA256_HASH, Find Actions to Regex Capture group, Input data to $exec.text.win.eventdata.hashes and Regex to SHA256=([A-Fa-f0-9]{64})
Save the workflow. Trigger the rule id 100200 by running mimikatz (justanexe) from Windows host.
You should see SHA256 hash returned in the results. If you are not seeing the SHA256 hash, try restarting your Shuffle by running docker compose down and docker compose up -d
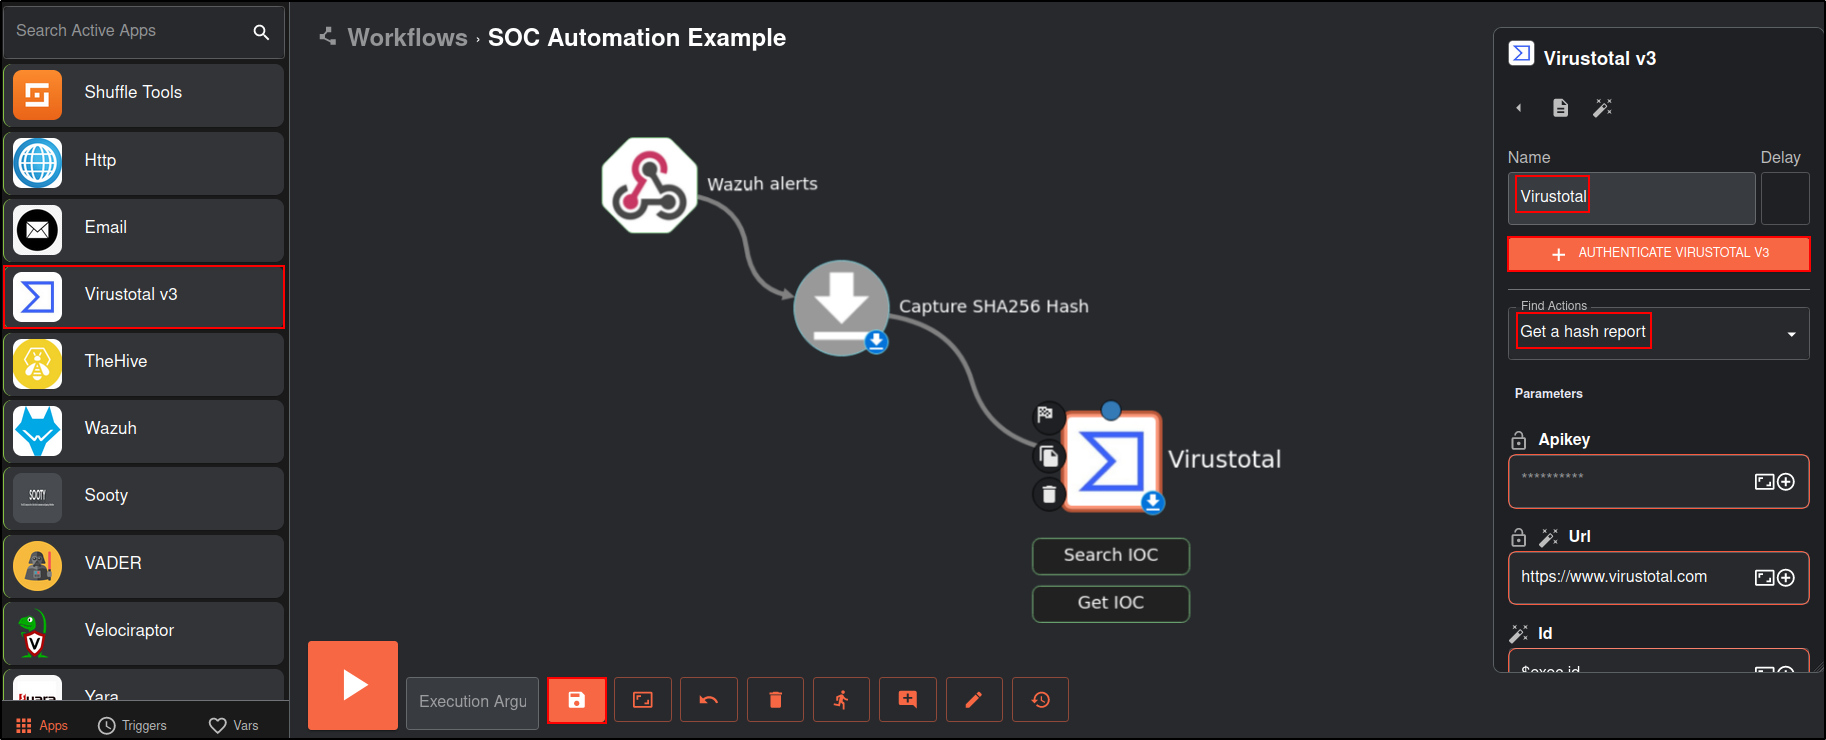
Drag and drop Virustotal app. Change the Name to Virustotal, set Find Actions to Get a has report.
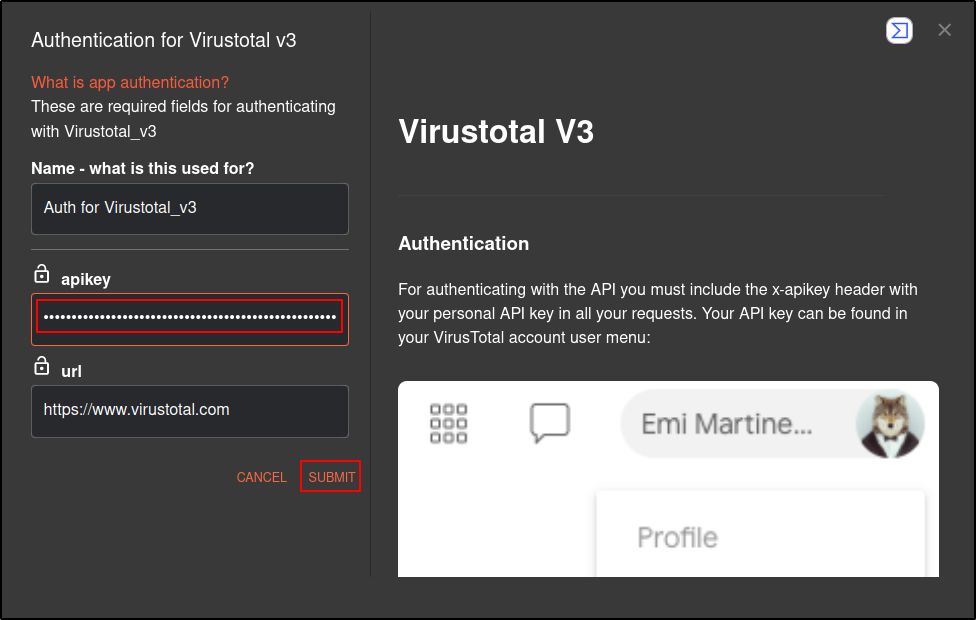
Click Authenticate VirusTotal V3 and copy and paste your VirusTotal API key. You must create an account in VirusTotal to obtain the API key. Note: Internet connection was enabled from this point.
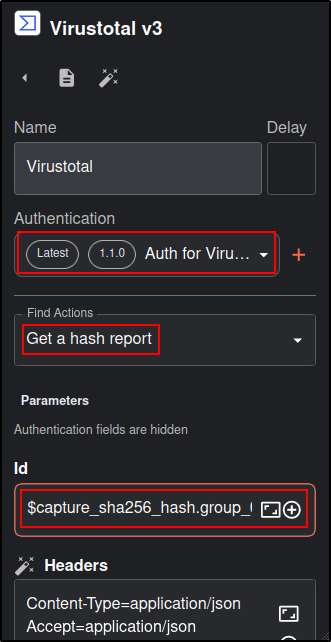
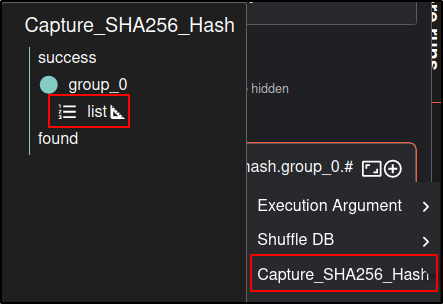
For ID, select Capture_SHA256_Hash list
Save the workflow. Restart Shuffle if required.
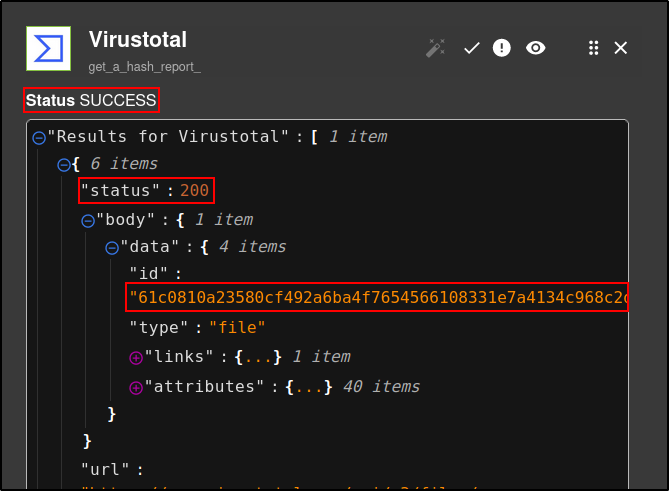
Verify that Virustotal get_a_hash_report returns SHA256 hash of mimikatz with status code 200.
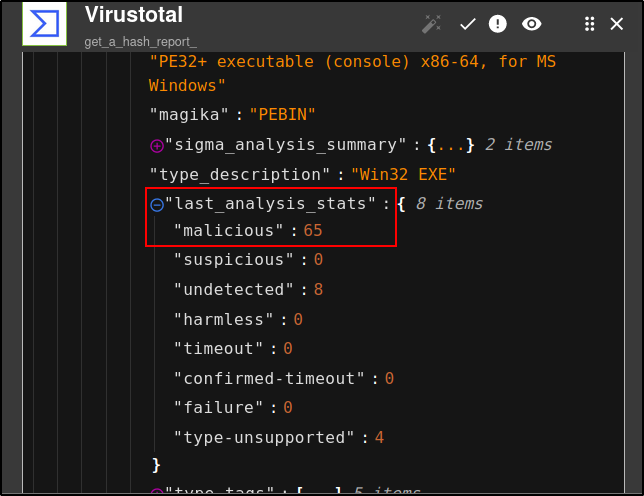
Expand the last_analysis_stats. Malicious: 65 indicates that 65 scanners have detected this executable as malicious.
Configure TheHive
Login to TheHive web UI
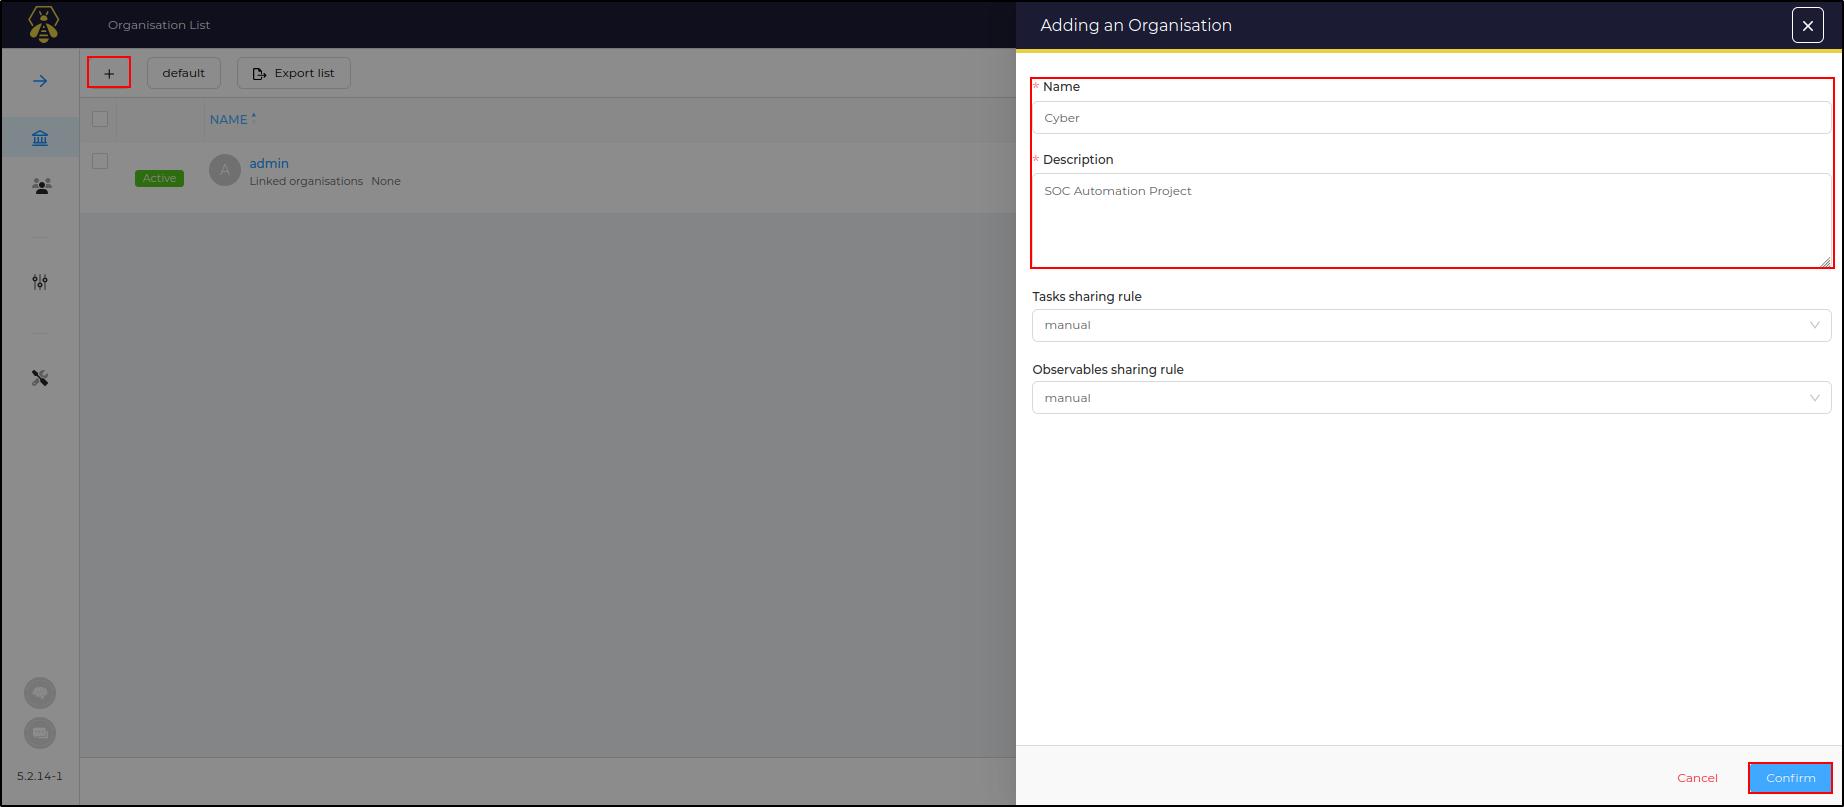
Create a new organisation called Cyber and click Confirm
Click Cyber organisation
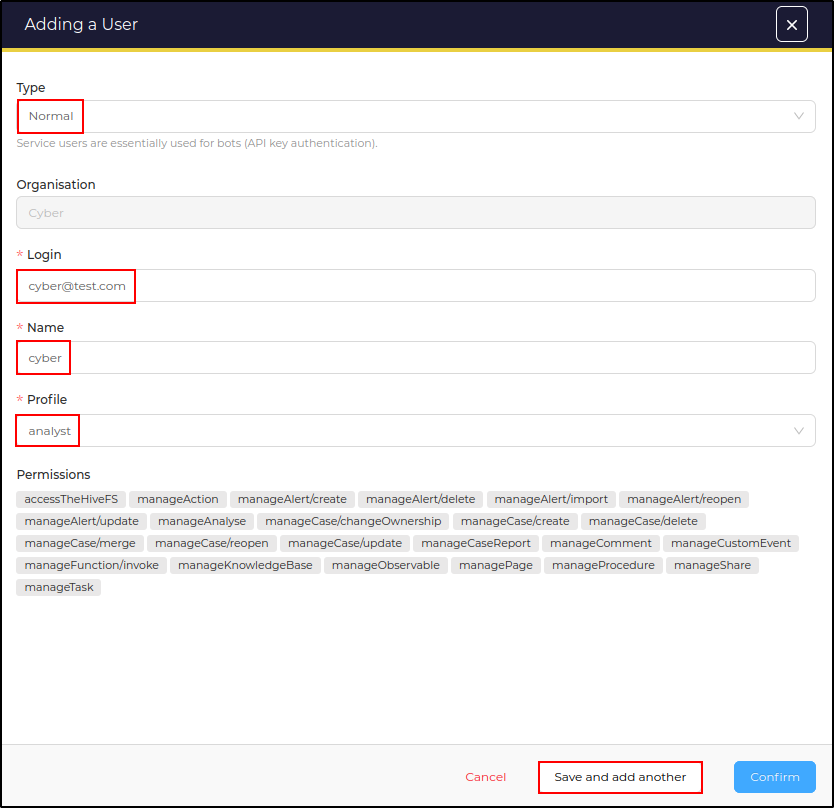
Add a new user with following details
- Type: Normal
- Login: cyber@test.com
- Name: cyber
- Profile: analyst
Save and add another user
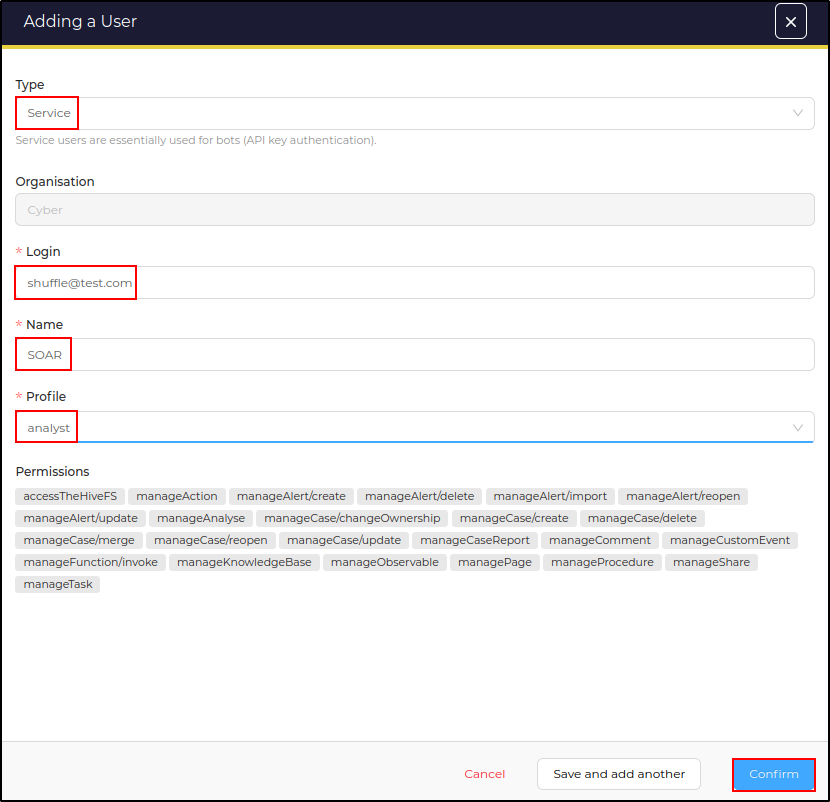
Add the second user with following details
- Type: Service
- Login: shuffle@test.com
- Name: SOAR
- Profile: analyst
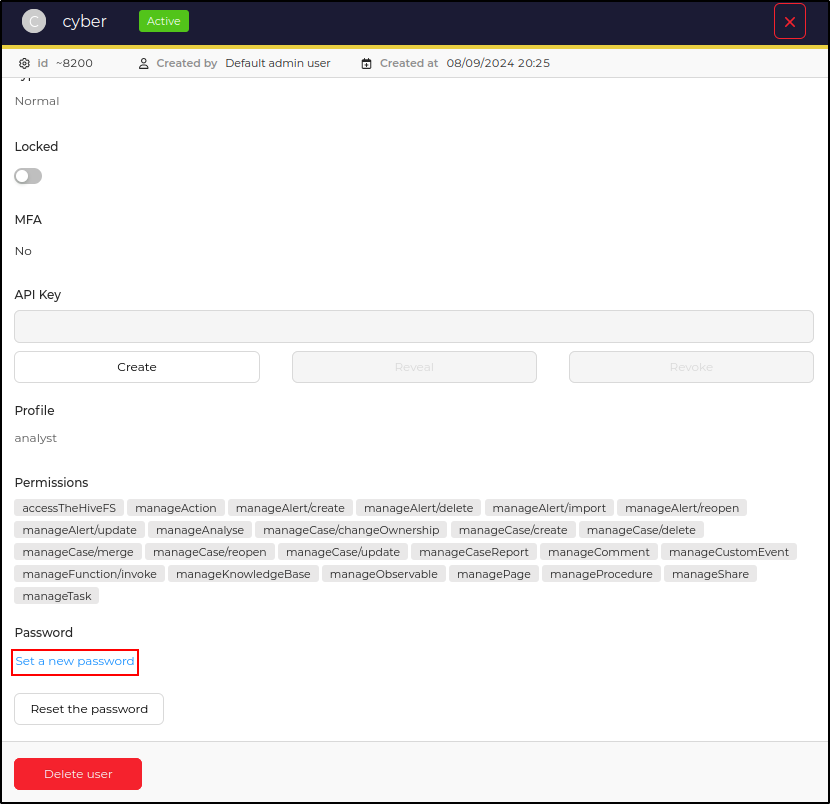
Click Preview on the cyber user and set a new password
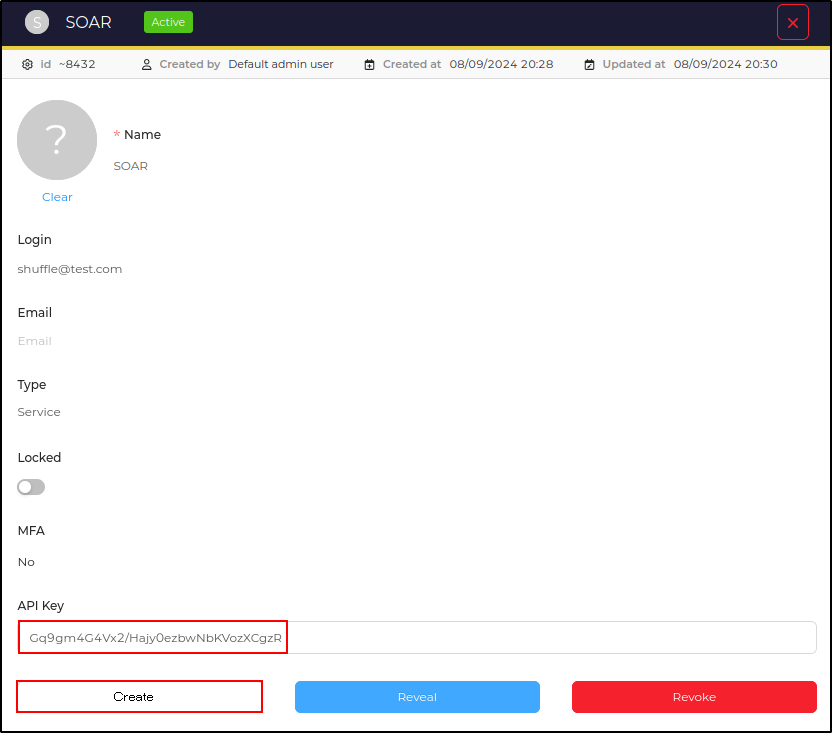
Click Preview on the SOAR user and create an API key
Copy the API key Gq9gm4G4Vx2/Hajy0ezbwNbKVozXCgzR
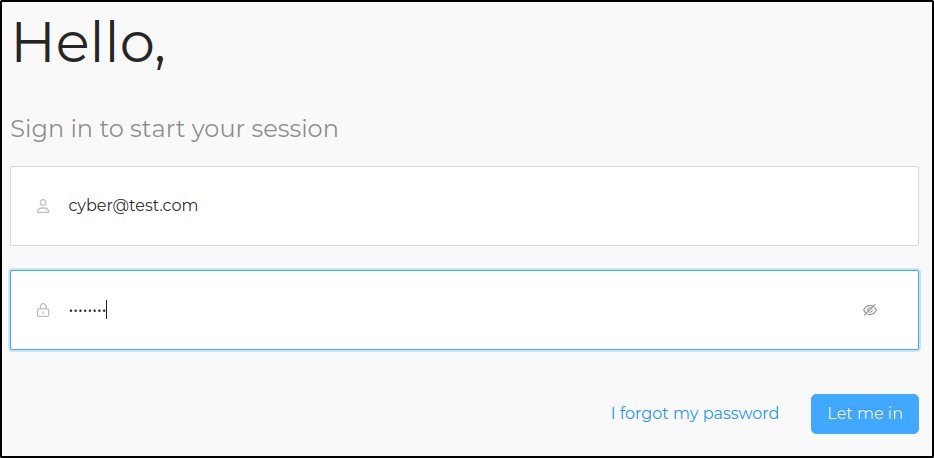
Log out of the web UI as admin and login as the cyber user.
Configure Shuffle
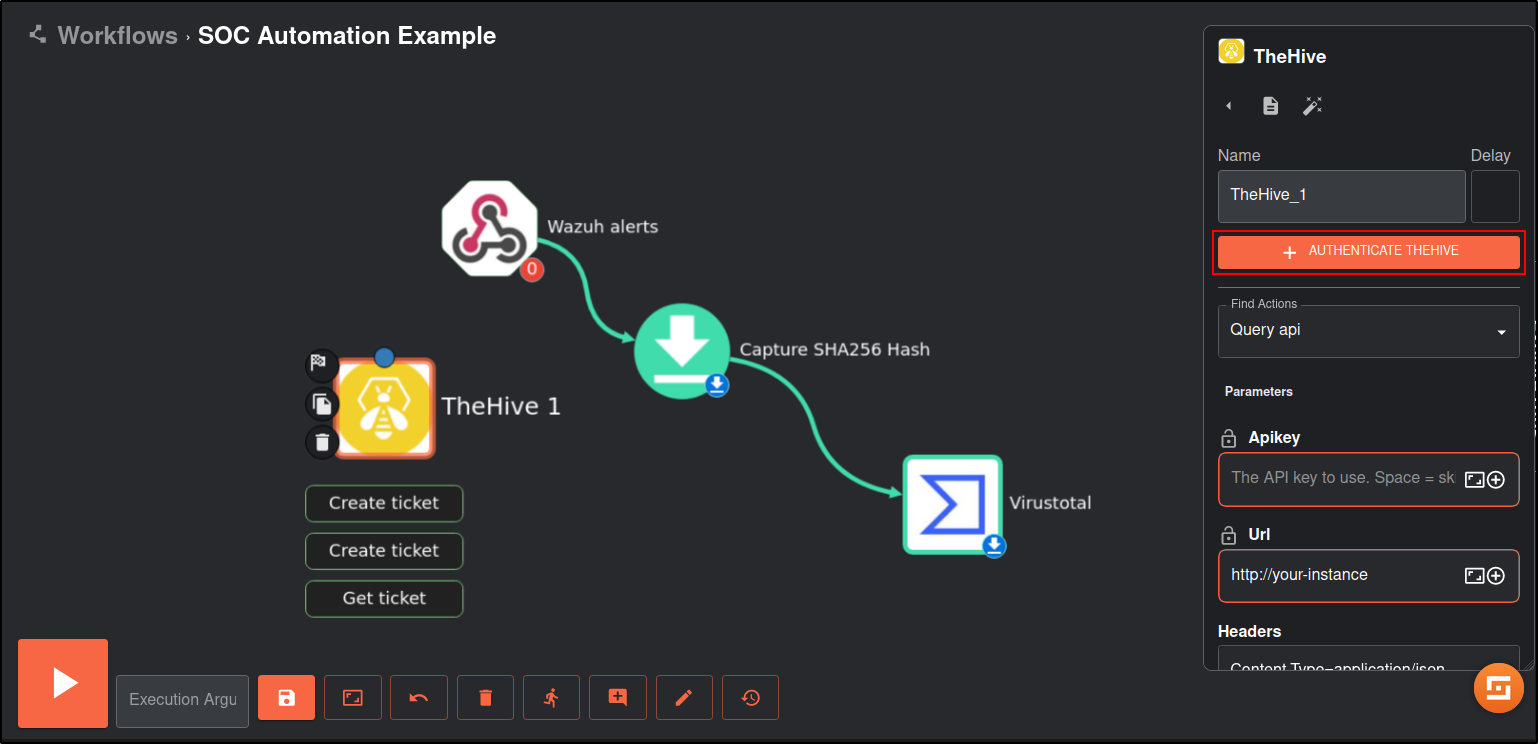
Drag and drop TheHive app to the Workflow.
Click TheHive App and click Authenticate TheHive.
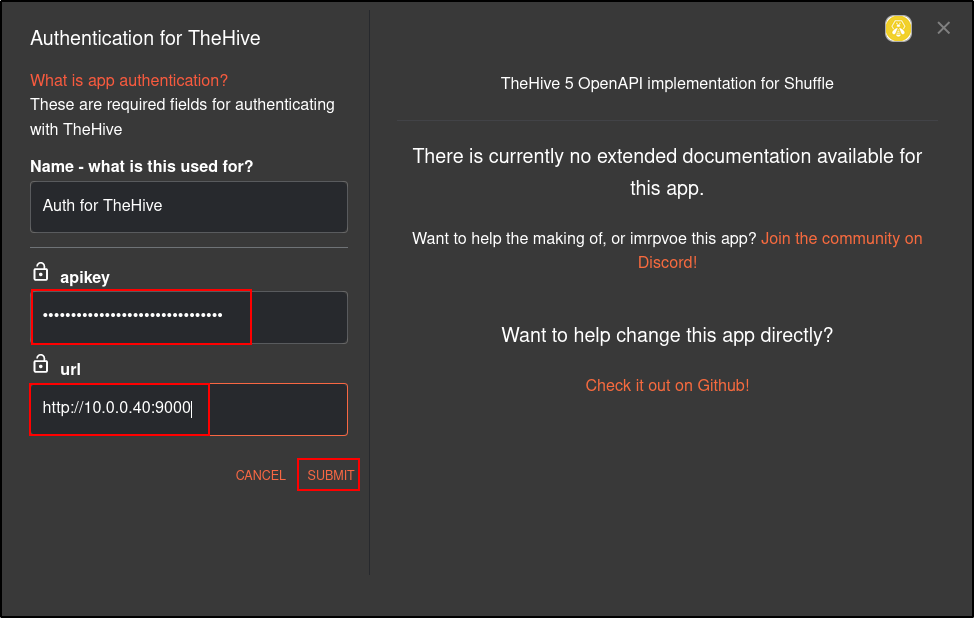
Copy and paste the API key Gq9gm4G4Vx2/Hajy0ezbwNbKVozXCgzR
Enter the url for TheHive http://10.0.0.40:9000
Click Submit.
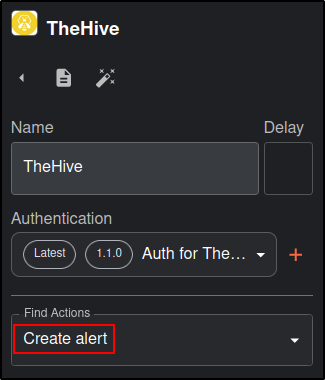
Set Find Actions to Create alert
Connect Virustotal App to TheHive app
There seems to be a bug with how TheHive app handles some of its parameters at the backend.
To bypass the error, set the values for Flag and Pap in JSON first.
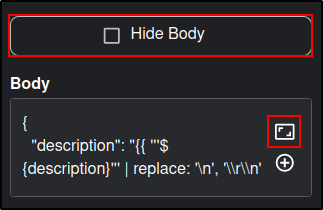
Uncheck Show Body textbox. You should see Hide Body. Click Expand Window icon.
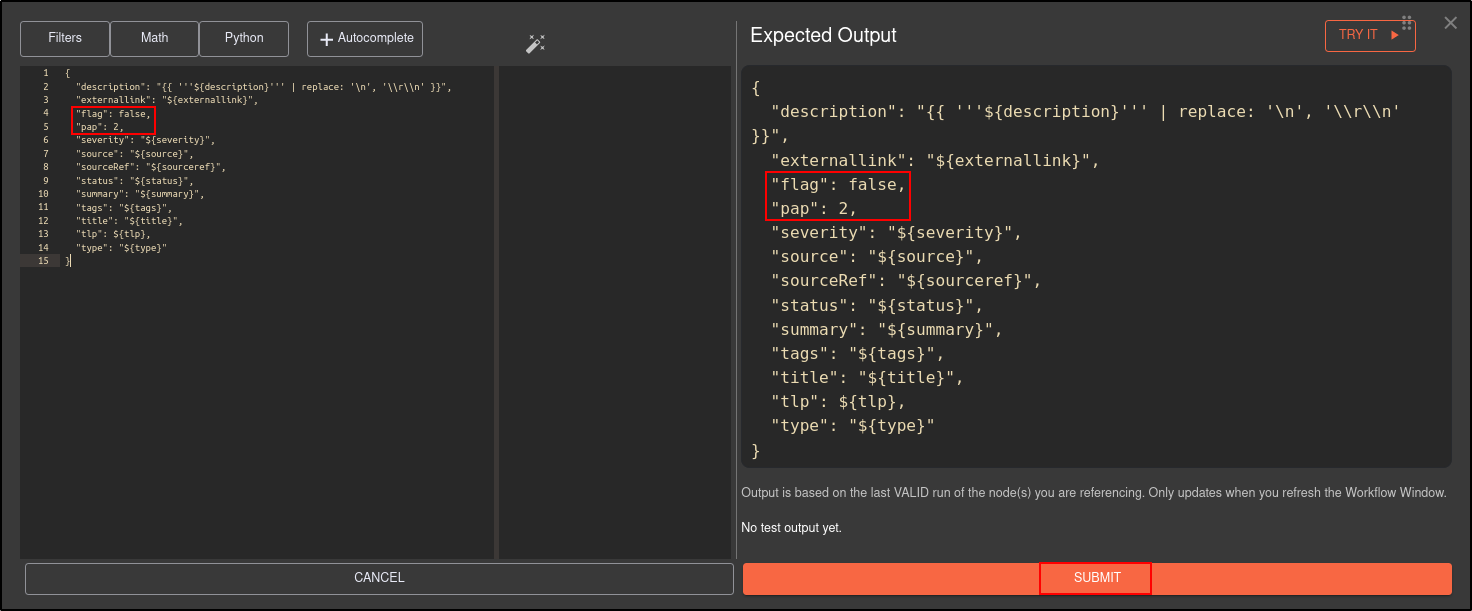
Manually set the Flag to false and Pap to 2. Click Submit.
{
  "description": "{{ '''${description}''' | replace: '\n', '\\r\\n' }}",
  "externallink": "${externallink}",
  "flag": false,
  "pap": 2,
  "severity": "${severity}",
  "source": "${source}",
  "sourceRef": "${sourceref}",
  "status": "${status}",
  "summary": "${summary}",
  "tags": "${tags}",
  "title": "${title}",
  "tlp": ${tlp},
  "type": "${type}"
}
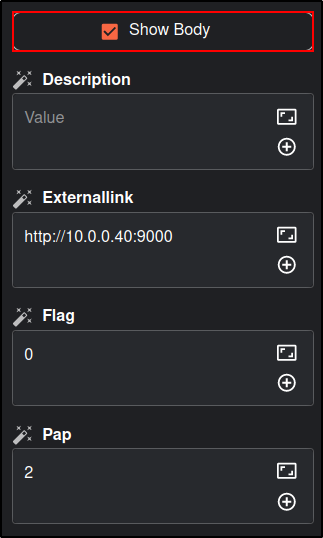
Check the Show Body and this will allow you to edit the app in GUI.
Set the values to the following.
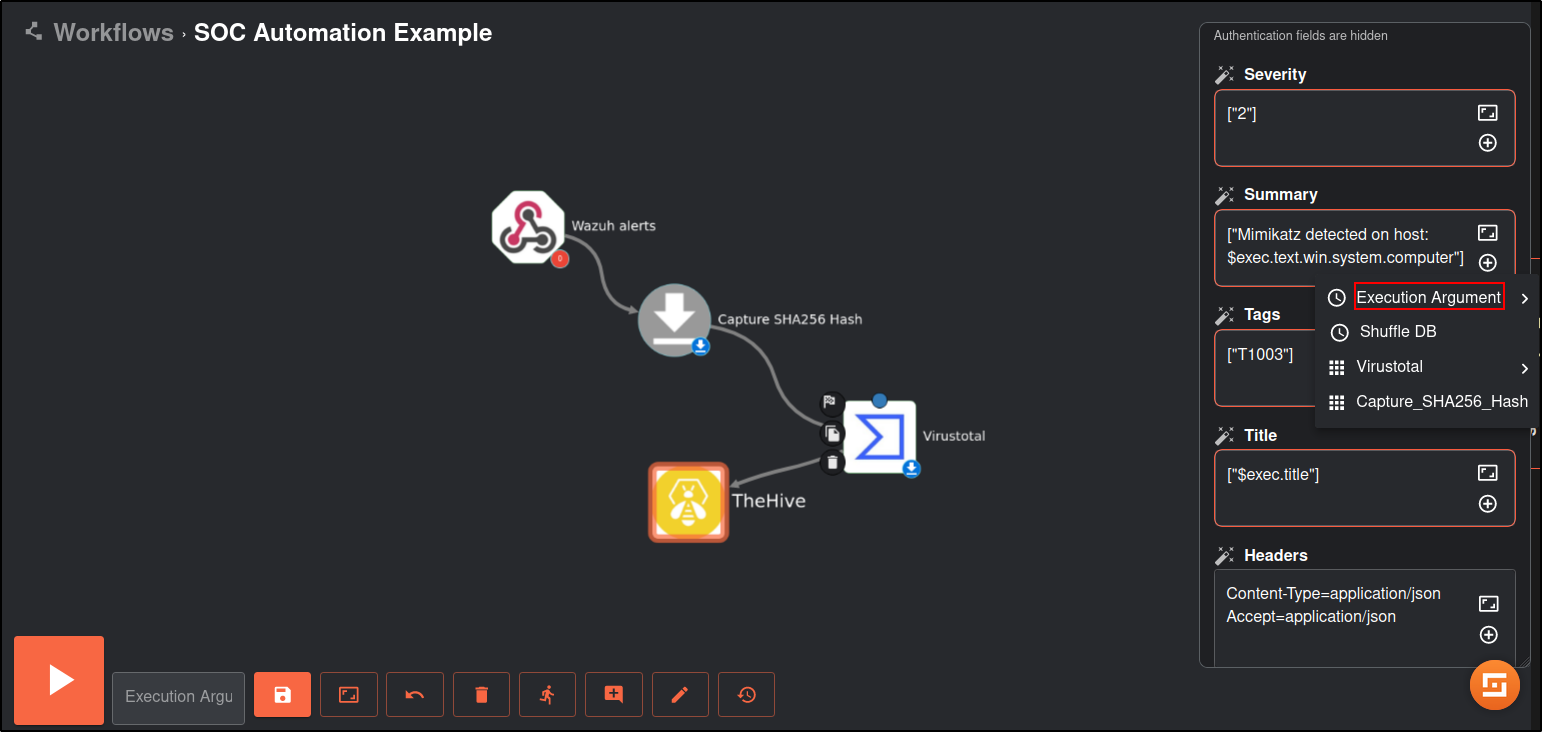
Note: the values in brackets indicate the Execution Argument. Add the execution argument by clicking the + icon.
| Name | Create_Alert |
|---|---|
| Severity | 2 |
| Summary | Mimikatz detected on host: (computer) and the processID: (processID) and commandLine: (commandLine) |
| Tags | [”T1003”] |
| Title | (title) |
| Description | (rule description) |
| Flag | false |
| Pap | 2 |
| Source | Wazuh |
| Sourceref | Incident-(timestamp) |
| Status | New |
| Tlp | 2 |
| Type | Internal |
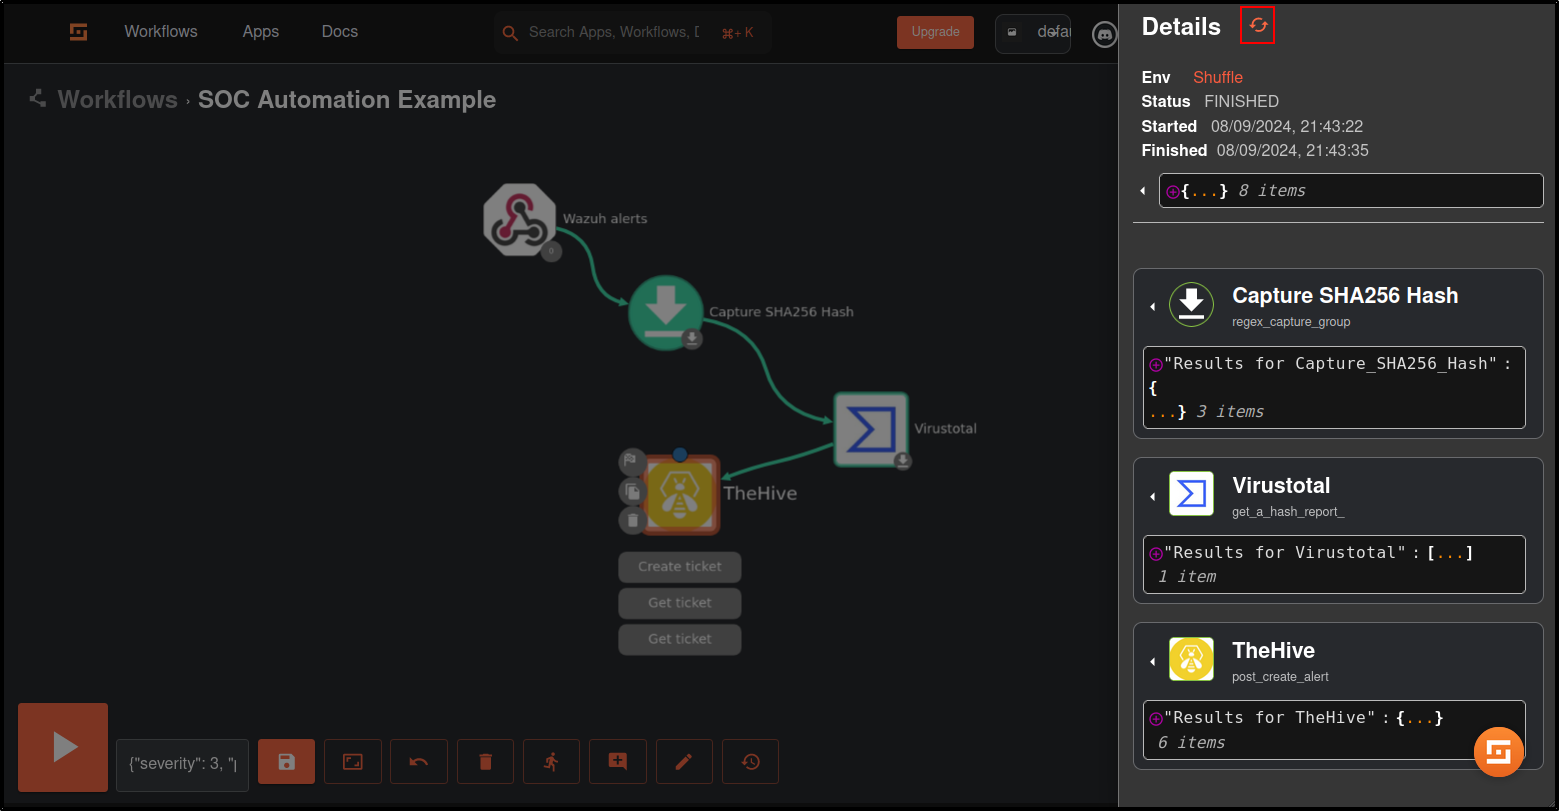
Save the workflow. Click Show Execution (person icon) then rerun the workflow (refresh icon).
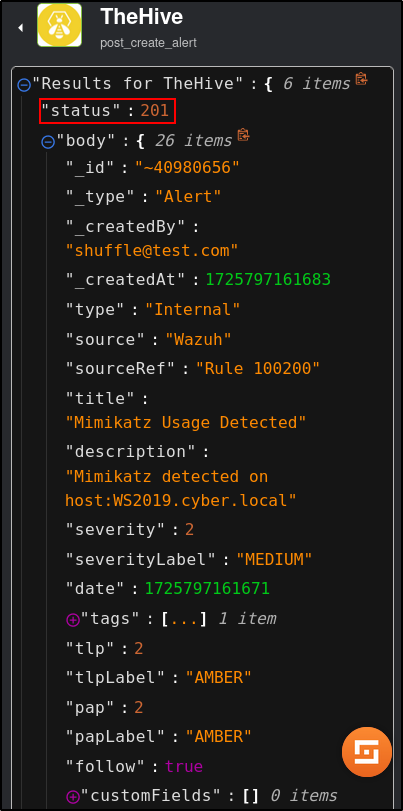
Verify status code from TheHive is 201
Verify that the Mimikatz Usage Detected alert is generated on TheHive UI.
Click on the alert to view the details.
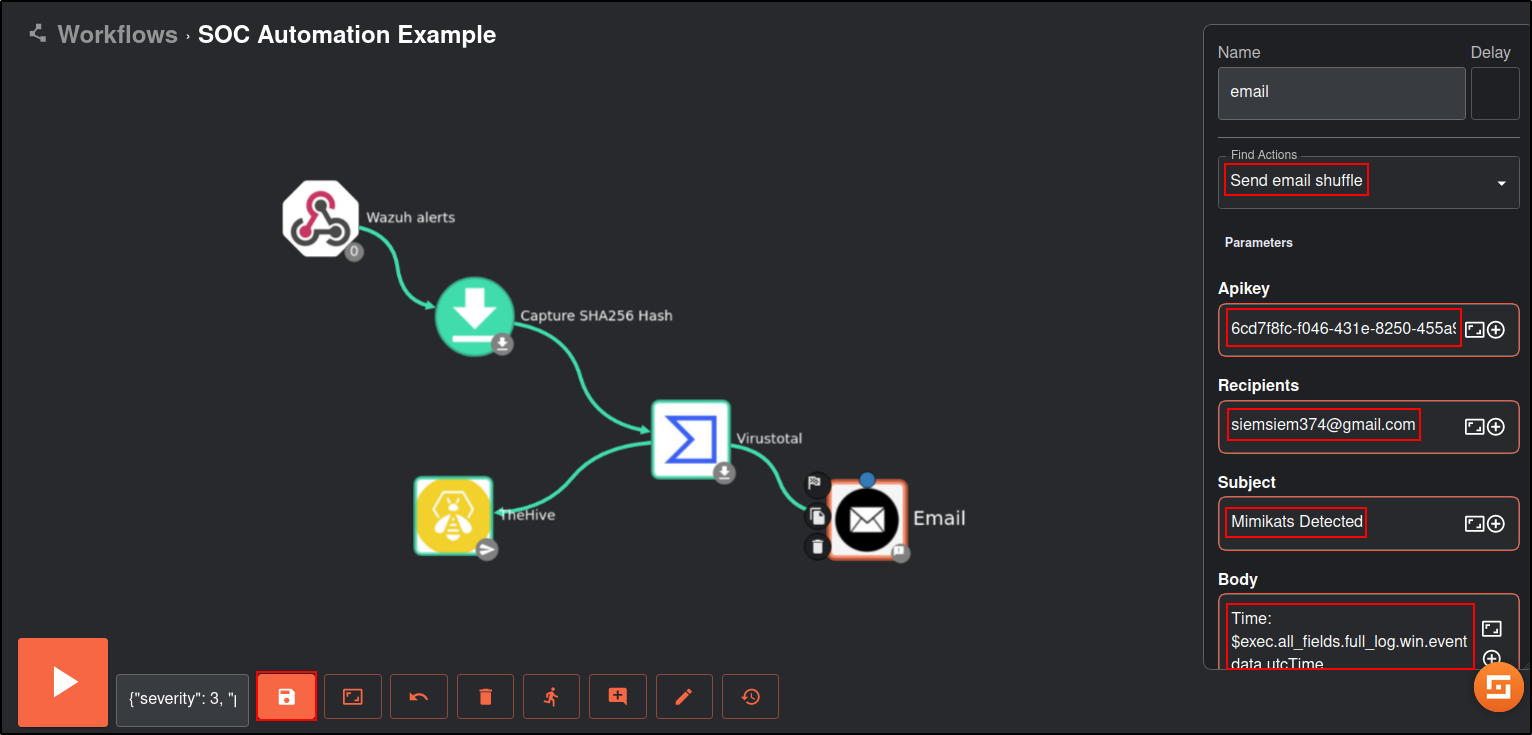
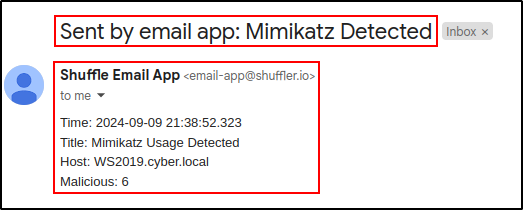
Drag and drop the Email app to the workflow.
Edit the Email app with following details:
Note: the values in brackets indicate the Execution Argument. Add the execution argument by clicking the + icon.
| Name | |
|---|---|
| Find Actions | Send email shuffle |
| Apikey | (Create account on https://shuffler.io/ to obtain API key) |
| Recipients | (Email address receiving the alert) |
| Subject | Mimikatz detected |
| Body | Time: (utcTime) |
| Title: (title) | |
| Host: (computer) | |
| Malicious: (malicious)* |
*Select VirusTotal metadata instead of the Execution Argument |
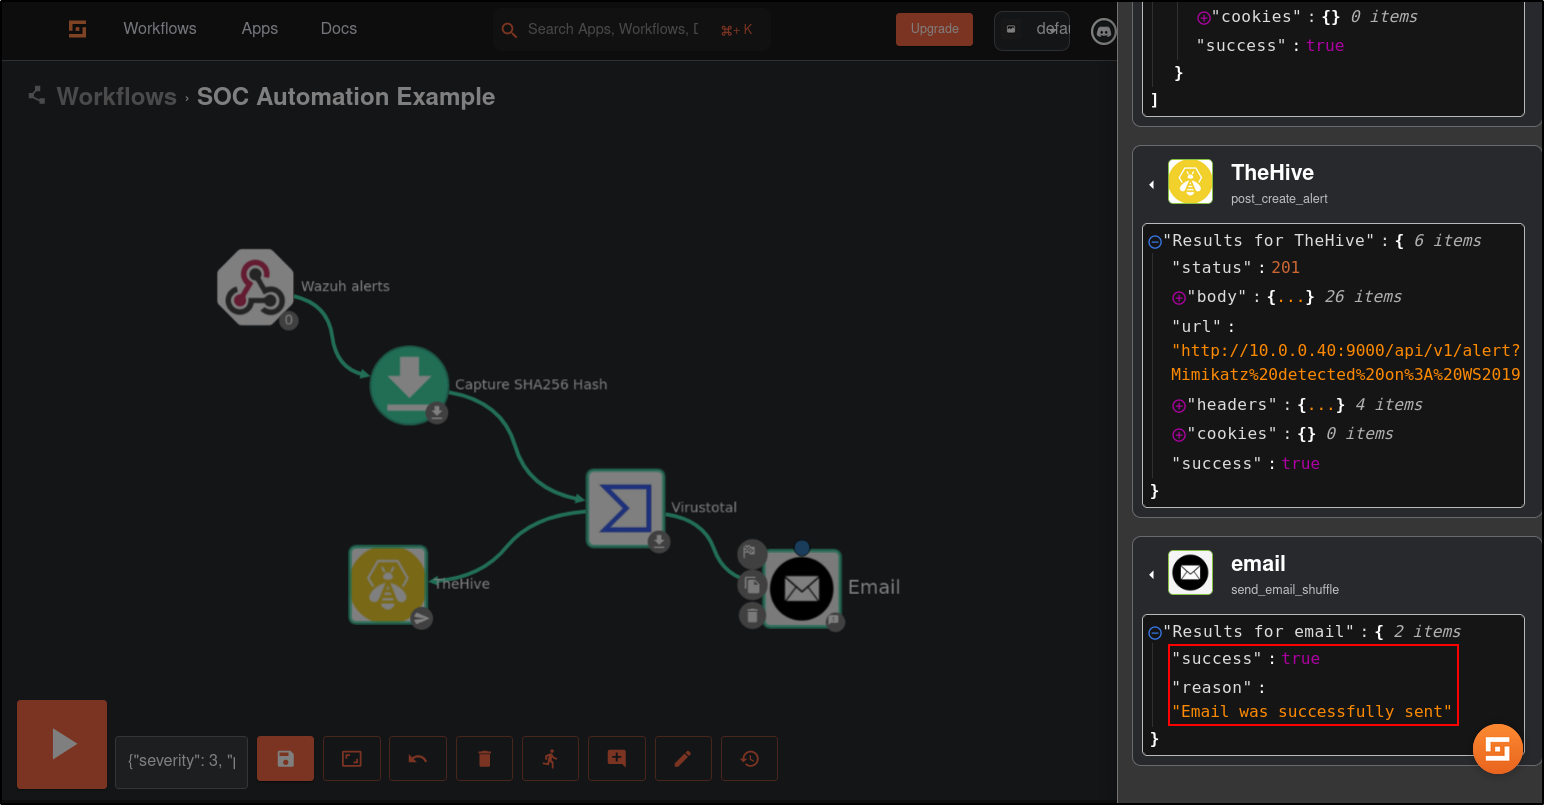
Save and rerun the workflow. If you want to get status code 201 from TheHive, you must delete existing alert. Verify that the results are successful and you received the email.
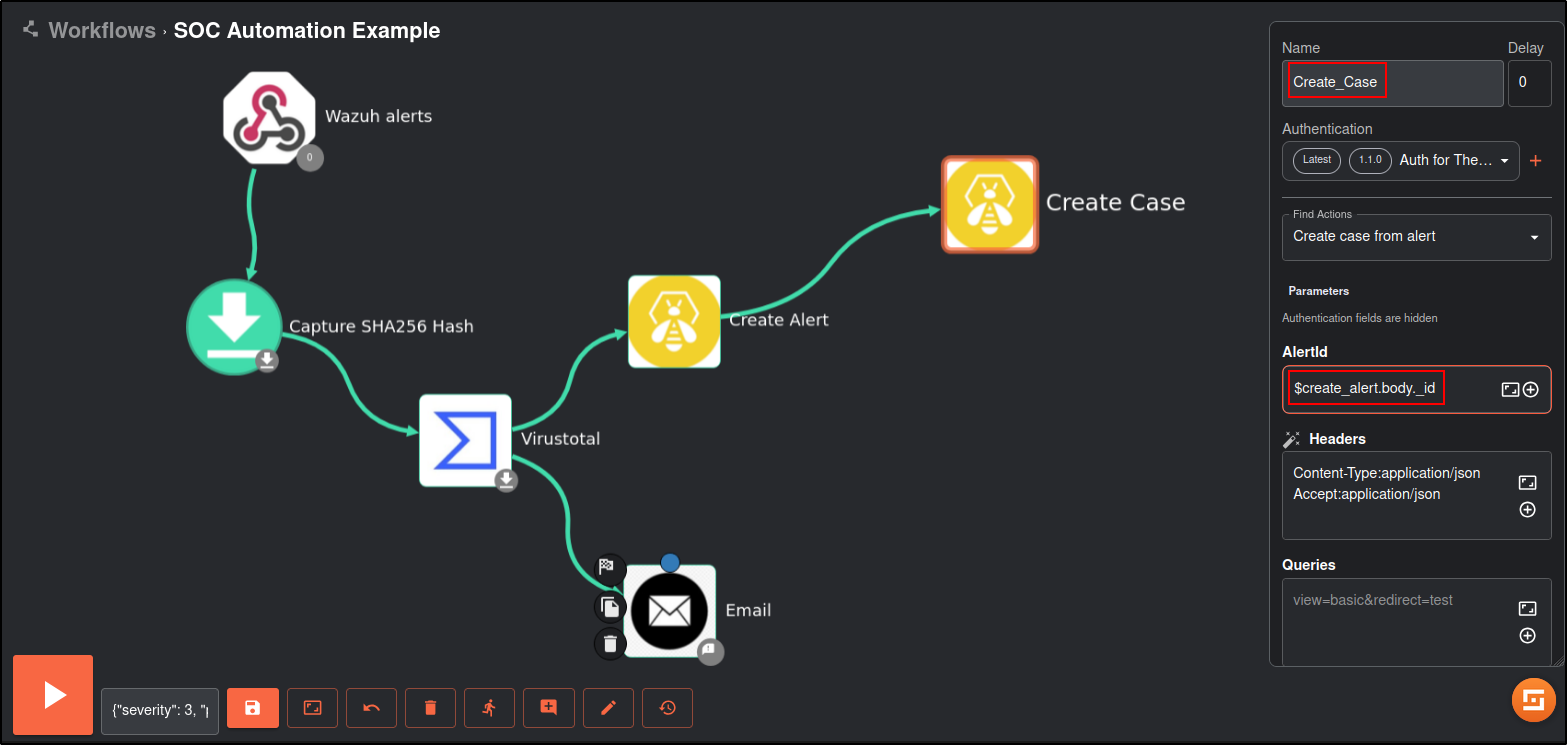
Duplicate TheHive app in the workflow.
Edit the TheHive app with following details:
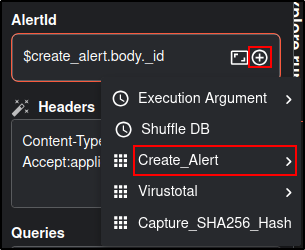
Note: the values in brackets indicate the metadata from Create_Alert. Add the data by clicking the + icon.
| Name | Create_Case |
|---|---|
| Alertid | (body id) |
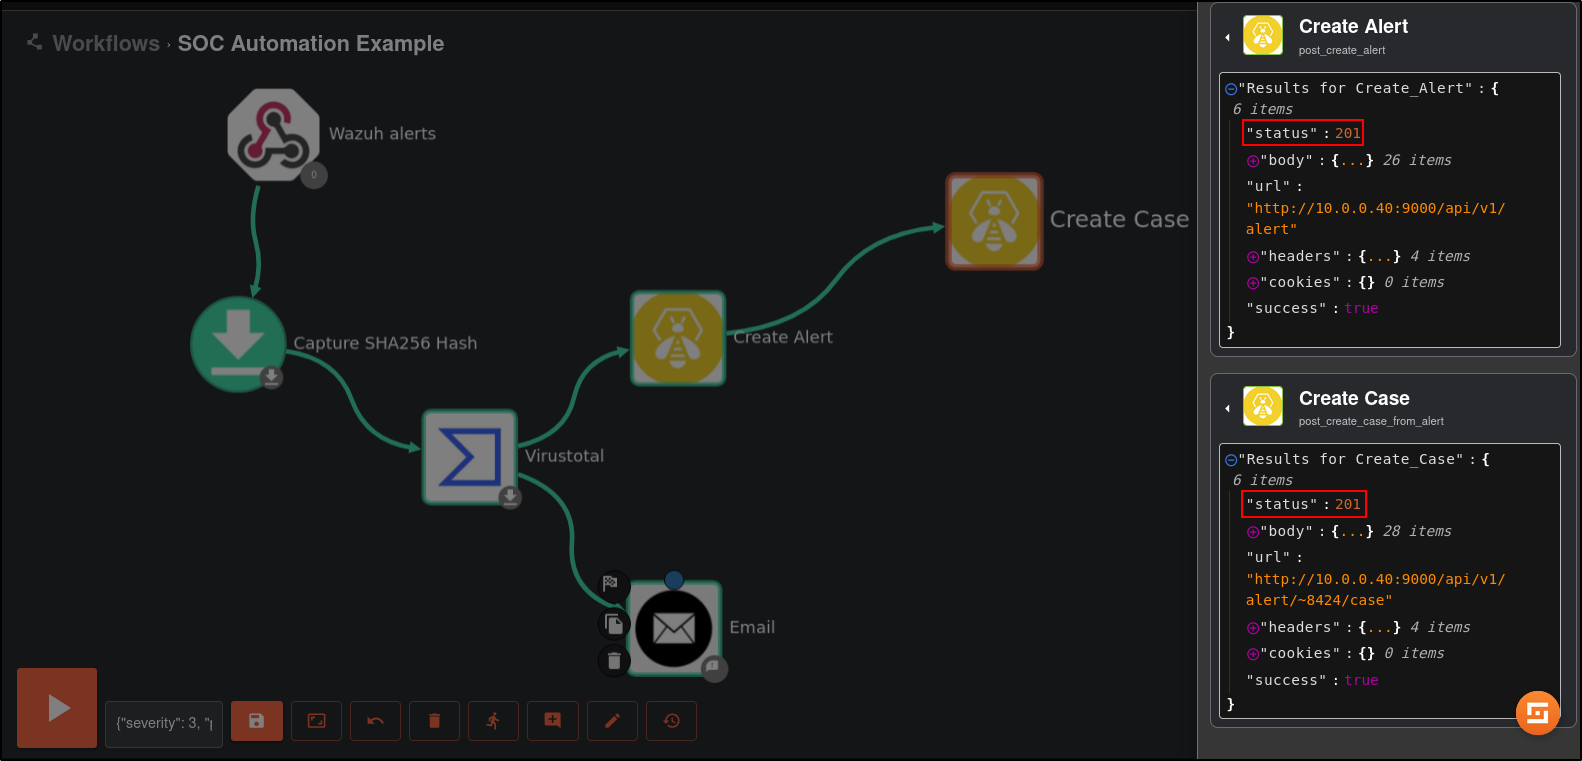
Save and rerun the workflow. You may need to delete existing alert in TheHive.
Verify that results return status code 201.
Verify that the case has been created in TheHive.
Workflow Two
Configure Shuffle
Create a Workflow
Repeat the steps covered in Introduction to Shuffle.
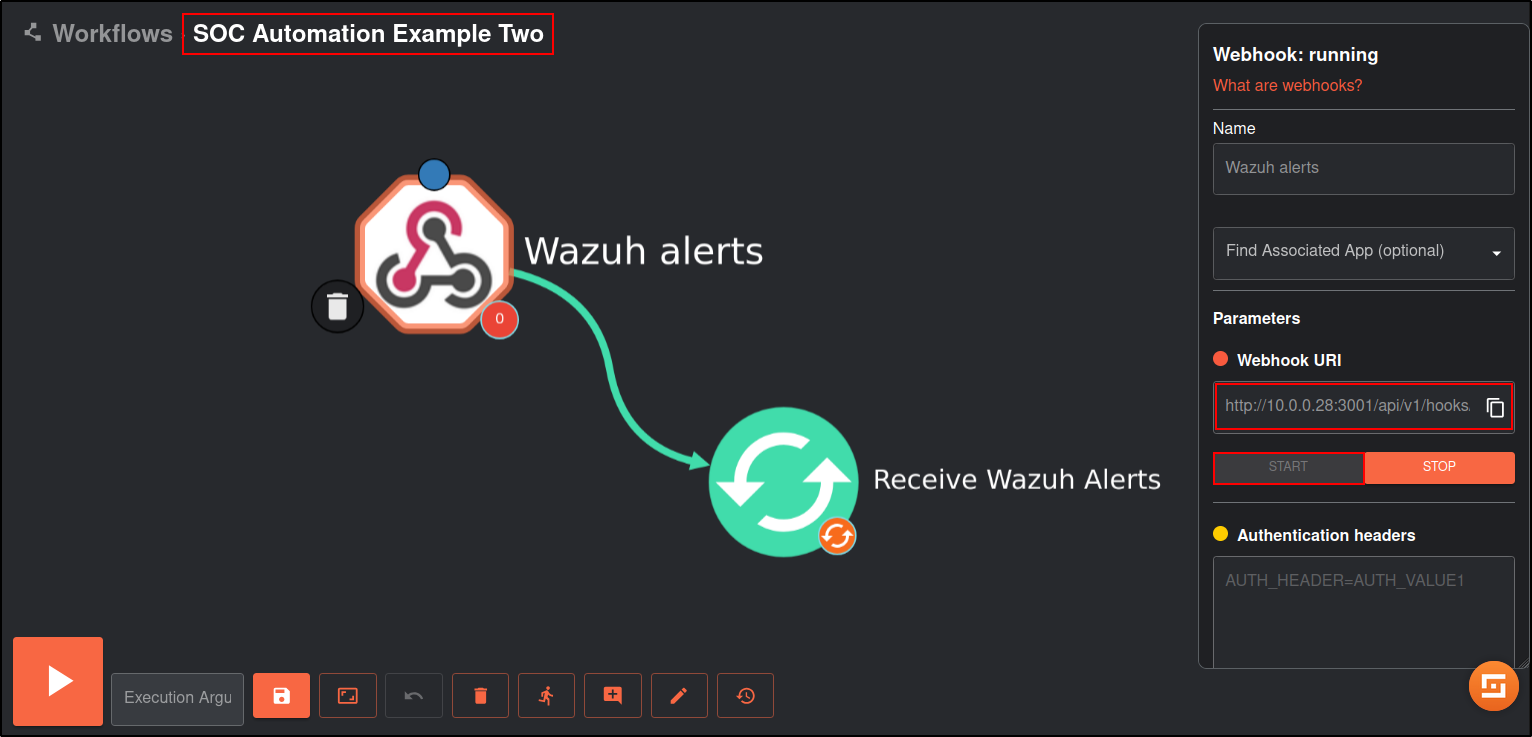
Create a new workflow called SOC Automation Example Two.
Click on the Triggers tab in the bottom left and drag the Webhook to the workspace.
Click on the webhook and rename it to Wazuh alerts. Copy and save the webhook URI and start the webhook. The webhook URI looks like the following:
http://10.0.0.28:3001/api/v1/hooks/webhook_d8fde57c-5501-4063-8954-00af9f3056d3
Configure Wazuh server
Download the custom integration script custom-shuffle and custom-shuffle.py. Save it as custom-shuffle and custom-shuffle.py in /var/ossec/integrations directory. The script must contain execution permissions and belong to the root user of the wazuh group:
chmod 750 /var/ossec/integrations/custom-shuffle*
chown root:wazuh /var/ossec/integrations/custom-shuffle*
Copy and paste the following into /var/ossec/etc/ossec.conf
The rule id 100100 has been configured to use Wazuh’s active response to block malicious IP address. Refer to Blocking a known malicious actor (testing custom active response) from Introduction to Wazh.
 <integration>
      <name>custom-shuffle</name>
      <rule_id>**100100**</rule_id>
      <hook_url>**http://10.0.0.28:3001/api/v1/hooks/webhook_d8fde57c-5501-4063-8954-00af9f3056d3**</hook_url>
      <alert_format>json</alert_format>
  </integration>
Restart the Wazuh manager service to apply changes:
Verify that there are no errors in the ossec and integrations logs
Configure Shuffle
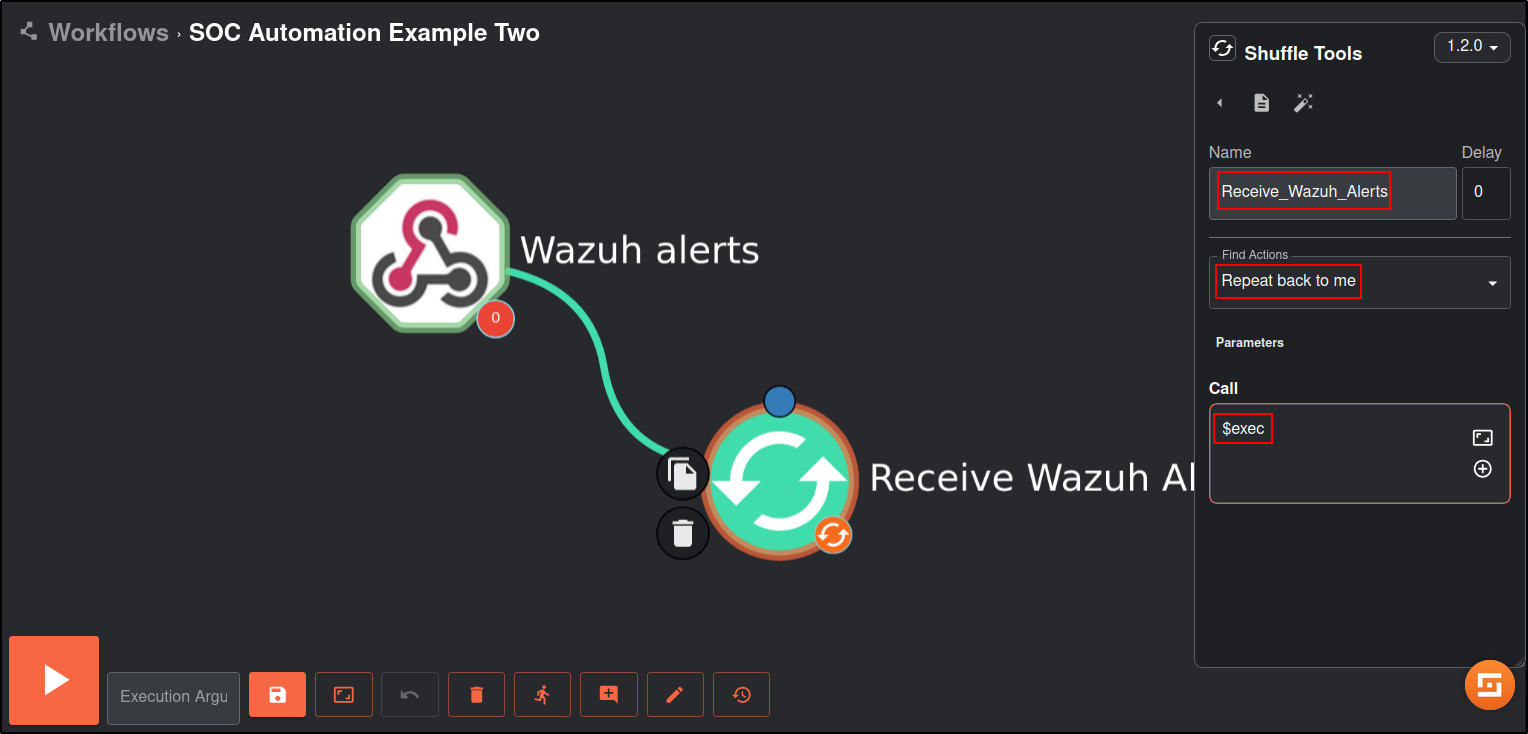
Click on the Shuffle Tools app named “Change me” and rename it to Receive_Wazuh_alerts. Set the call option to “$exec”, and save the workflow. This Shuffle app now repeats the events that are received by the Wazuh alerts webhook. This allows us to test that Shuffle can receive Wazuh alerts.
Save the workflow.
On kali machine, run curl command to access http://10.0.0.26
On Wazuh manager, verify that this has triggered an alert by checking integrations log
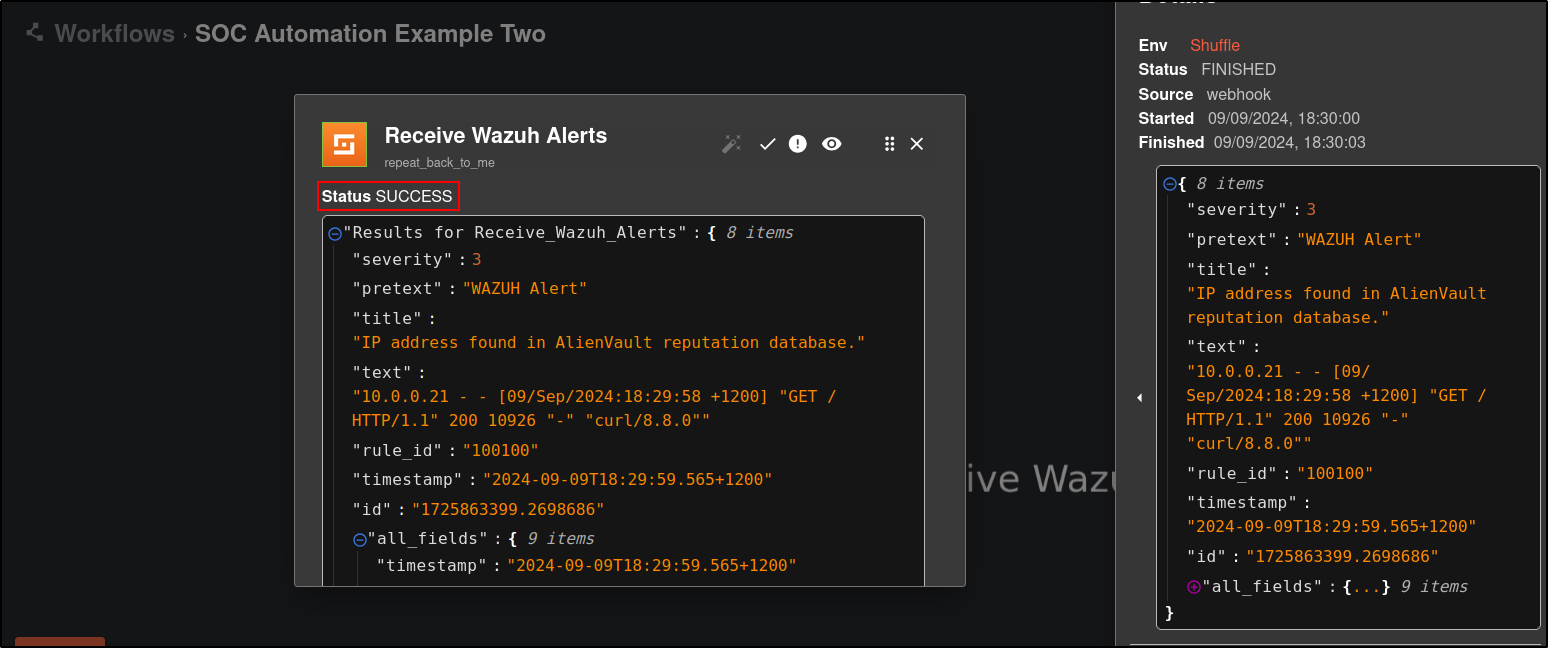
On Shuffle, click Show Executions and verify that there is a successful result.
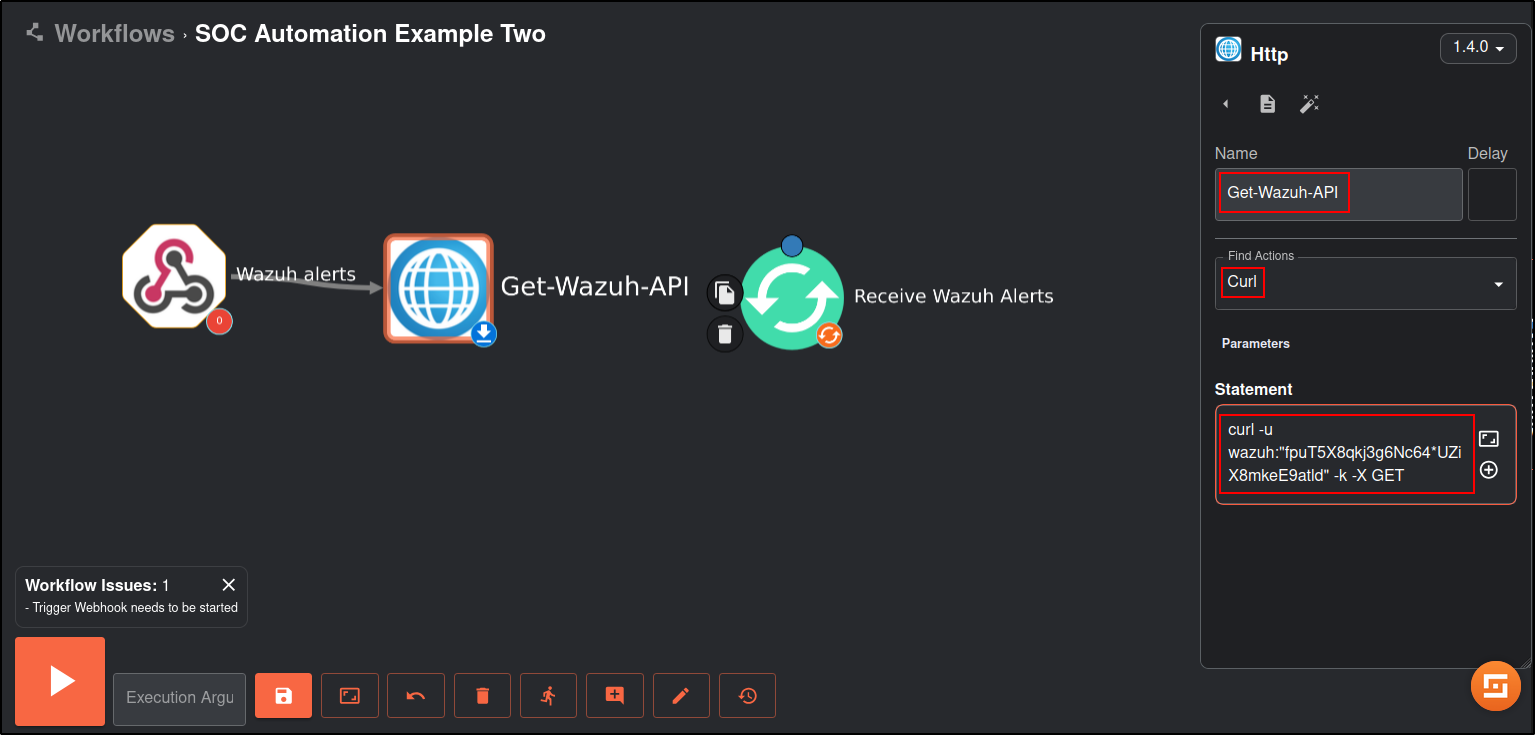
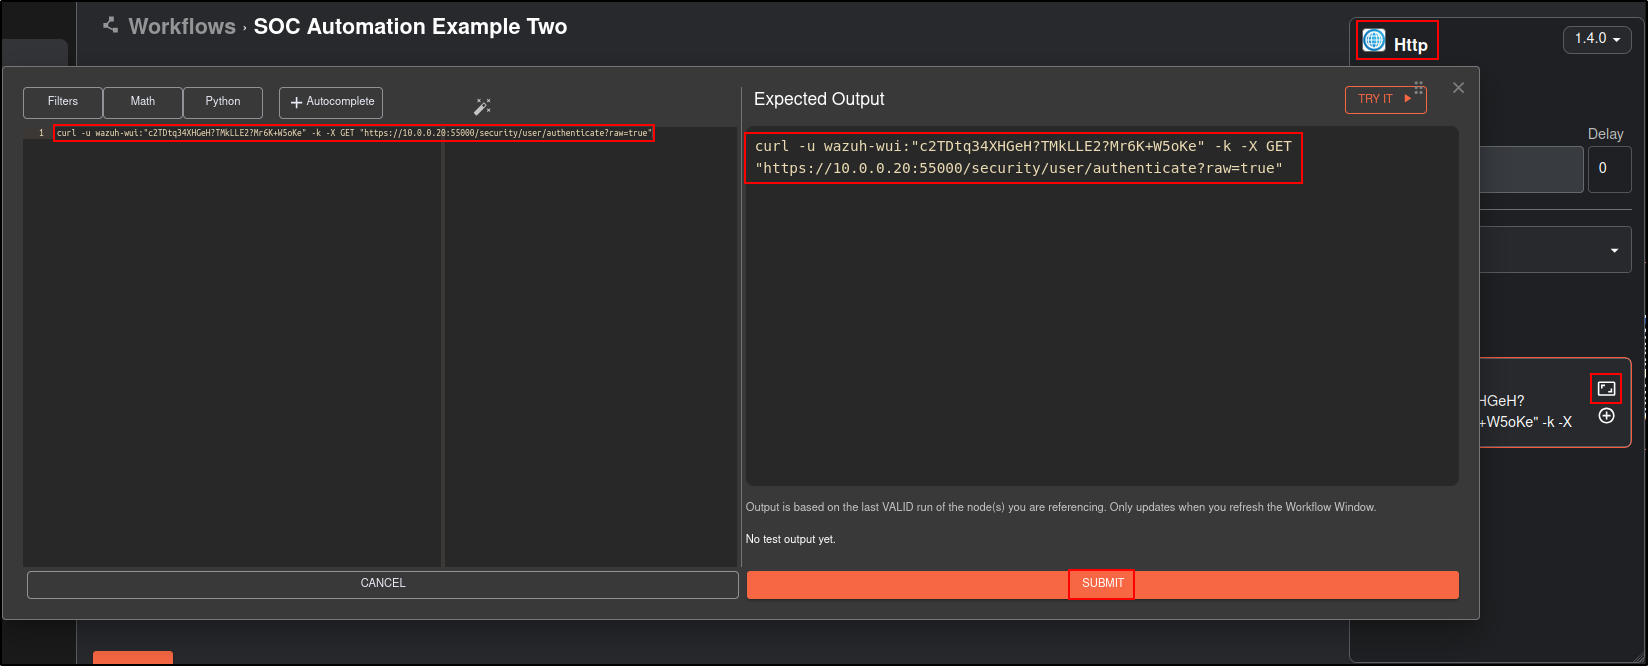
Drag and Drop HTTP app to the workflow.
Edit the app with following detals:
For Statement, use your wazuh API user’s credentials.
| Name | Get-Wazuh-API |
|---|---|
| Find Actions | Curl |
| Statement | curl -u wazuh-wui:"password" -k -X GET "https://10.0.0.20:55000/security/user/authenticate?raw=true" |
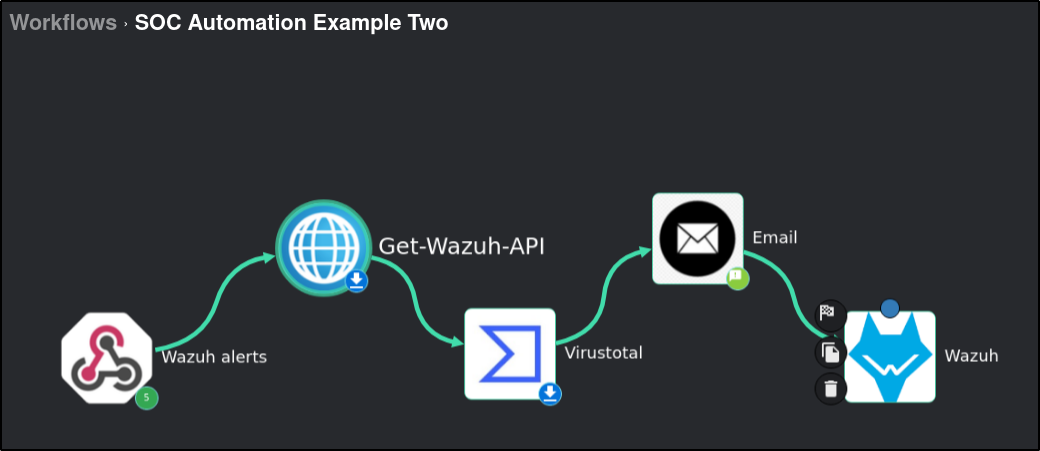
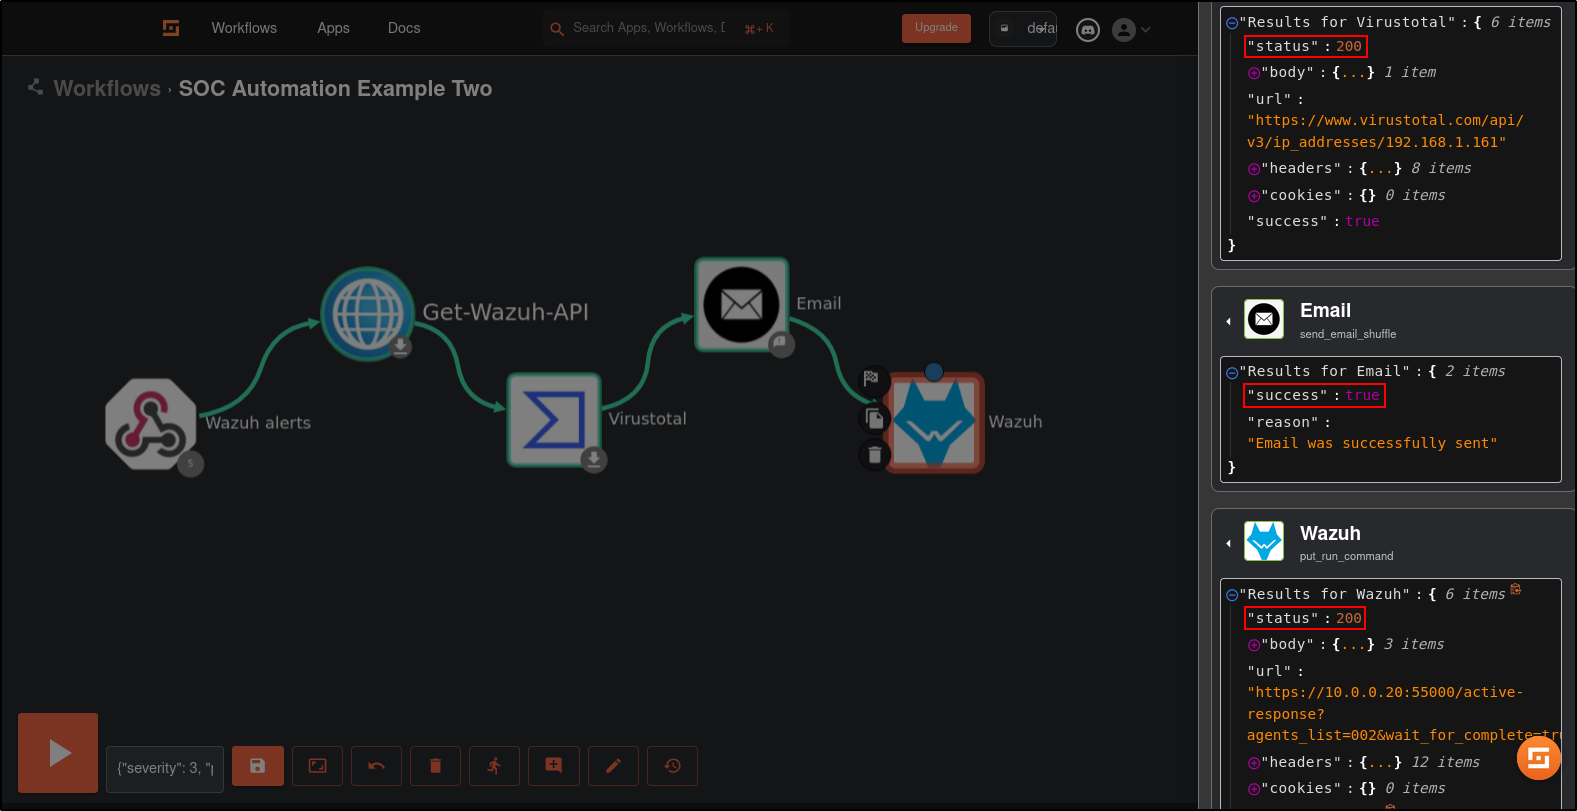
Drag and Drop Virustotal, Email and Wazuh apps to the workflow. Connect the apps in the order shown below:
Edit the Wazuh app with following details:
Note: Arguments must be an array format ["value1"]
| Name | Wazuh |
|---|---|
| Find Actions | Run Command |
| Apikey | (Get-Wazuh-API) |
| Url | https://10.0.0.20:55000 |
| Agents list | (agent id) |
| Wait for complete | true |
| Arguments | [”(srcip)”] |
| Commnad | firewall-drop60 |
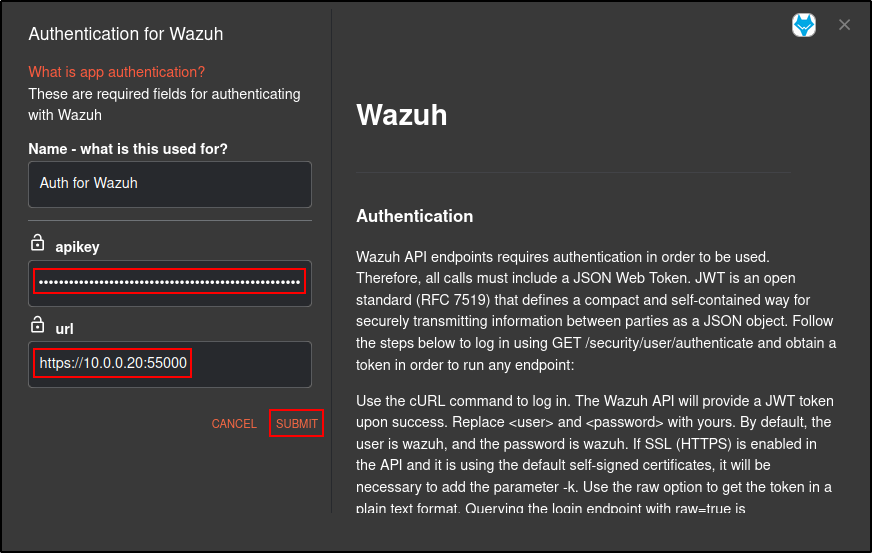
If you get an error with retrieving Wazuh API key, manually authenticate Wazuh App by providing Wazuh API key and Wazuh URL. Obtain API key from Get-Wazuh-API app (you will need to run your workflow to get the result):
On Wazuh Manager, verify that active response is configured in ossec.conf
The firewall-drop command integrates with the Ubuntu local iptables firewall and drops incoming network connection from the attacker endpoint for 60 seconds:
<ossec_config>
  <active-response>
    <command>firewall-drop</command>
    <location>local</location>
    <rules_id>100100</rules_id>
    <timeout>60</timeout>
  </active-response>
</ossec_config>
When using the API, use the active-response command appended with timeout value. For example:
You can verify the command name to use with API by running agent-control -L located in /var/ossec/bin/
[root@Centos siem]# cd /var/ossec/bin
[root@Centos bin]# ./agent_control -L

Wazuh agent_control. Available active responses:

   Response name: firewall-drop60, command: firewall-drop
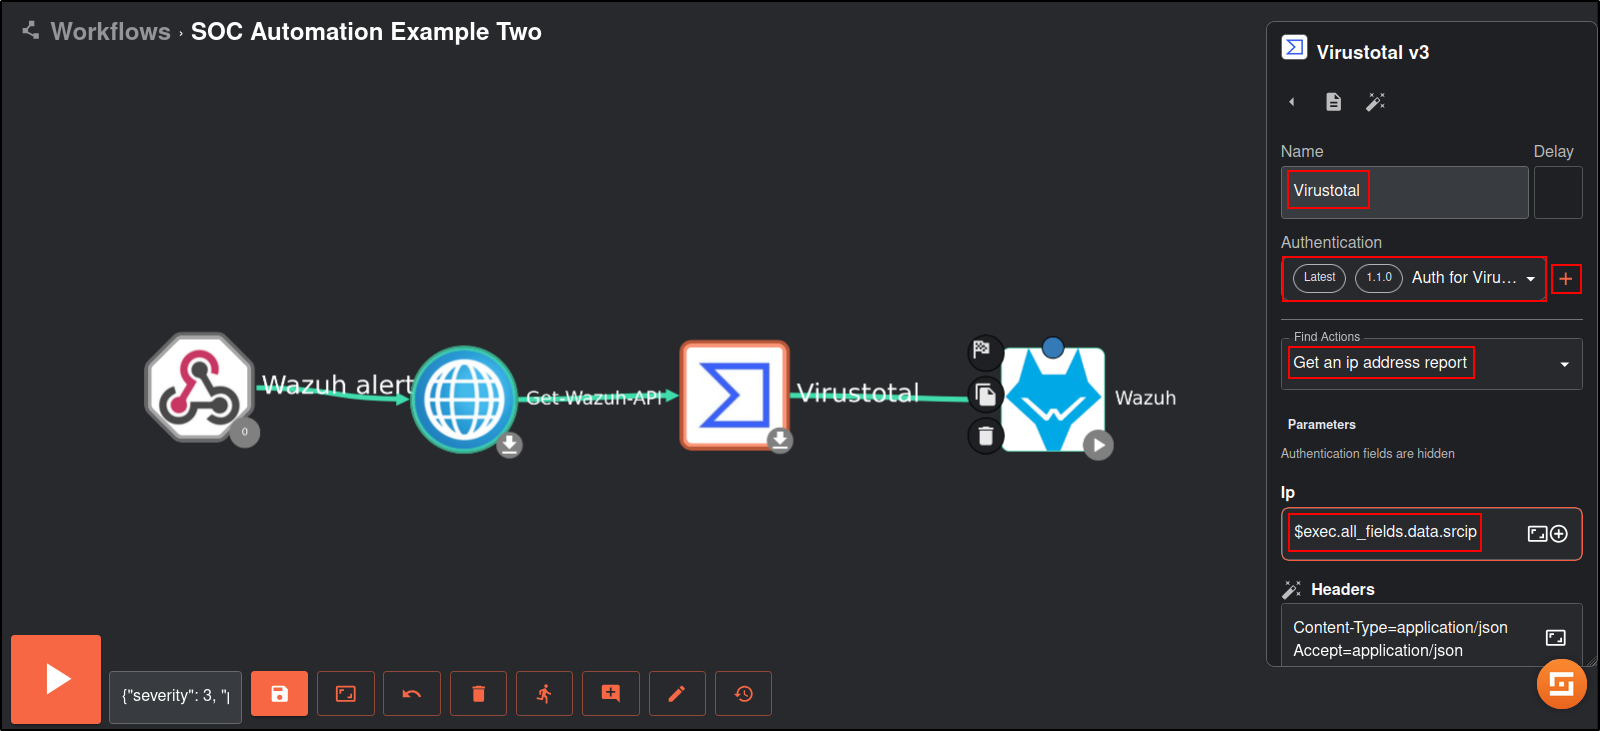
Edit the Virustotal app with following details:
Note: the values in brackets indicate the Execution Argument. Add the execution argument by clicking the + icon.
Authenticate with your VirusTotal API key (you will need to create an account).
| Name | Virustotal |
|---|---|
| Find Actions | Gen an IP address report |
| IP | (srcip) |
Save the workflow. Make sure webhook has been started.
Trigger alert by running curl command from Kali machine:
Note: for demonstration purposes, two network adapters have been assigned to both Ubuntu and Kali hosts. The network 192.168.1.0/24 belongs to Bridged network (Adapter #1) and 10.0.0.0/24 belongs to LAN segment (Adapter #2).
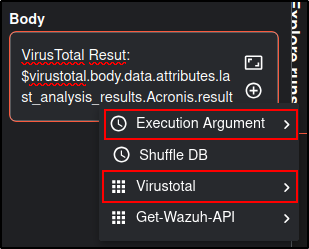
Edit the Email app with following details:
Note: the values in brackets indicate the Execution Argument. Add the execution argument by clicking the + icon.
| Name | |
|---|---|
| Find Actions | Send email shuffle |
| Apikey | (Create account on https://shuffler.io/ to obtain API key) |
| Recipients | (Email address receiving the alert) |
| Subject | Malicious activity detected |
| Body | Title: (title) |
| Timestamp: (timestamp) | |
| Source IP: (srcip) | |
| Malicious: (malicious)* | |
| VirusTotal Result: (result)* |
*These metadata are obtained from Virustotal instead of Execution Argument |
Save workflow. Trigger alert by accessing http://192.168.1.111 from Kali machine multiple times in a row.
Verify that workflow returns successful result. Verify status code 200 is returned by Virustotal and Wazuh.
Verify that active response blocks Kali machine:
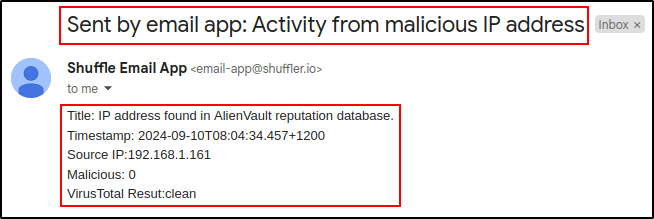
Verify that you received an email from Shuffle:
References
- https://medium.com/shuffle-automation/introducing-shuffle-an-open-source-soar-platform-part-1-58a529de7d12
- https://github.com/Shuffle/Shuffle/blob/main/.github/install-guide.md
- https://docs.docker.com/desktop/install/ubuntu/
- https://shuffler.io/docs/configuration#servers
- https://docs.docker.com/engine/install/ubuntu/#install-using-the-repository
- https://wazuh.com/blog/integrating-wazuh-with-shuffle/
- https://documentation.wazuh.com/current/user-manual/manager/integration-with-external-apis.html
- https://youtu.be/GNXK00QapjQ?si=OHCAyUO2IAMzZF0U
- https://youtu.be/FBISHA7V15c?si=26Qe8BxiPxJVx7FP
